1. Introduction
This guide describes how to set up a graphics passthrough to the Windows or Ubuntu guest in the acontis Hypervisor. It is assumed, the steps listed in the Hypervisor Quick Start guide have been successfully executed.
2. Prerequisites
Intel i915 graphics adapter
additional extern graphics adapter (optional)
activated VT-D/IOMMU (UEFI/BIOS)
At least 6 GB of RAM is recommended for the Windows guest (
ramsize=6144inguest_config.sh).
2.1. Additional information
For more information on the topic checkout the following links:
Intel (filtered) list of possible CPUs:
3. Guest configuration
Some custom steps are required to create a Windows or Ubuntu VM for QEMU.
Caution
It is important to create this machine with OVMF UEFI, because graphics passthrough need it.
Important
Use the Windows or Ubuntu guest guide to setup a guest.
4. Windows guest remote desktop access
It’s required to has Remote Desktop access of the Windows guest, as the standard vga graphics will be deactivated and therefore only remote access is possible with the Hypervisor Host and Windows guest.
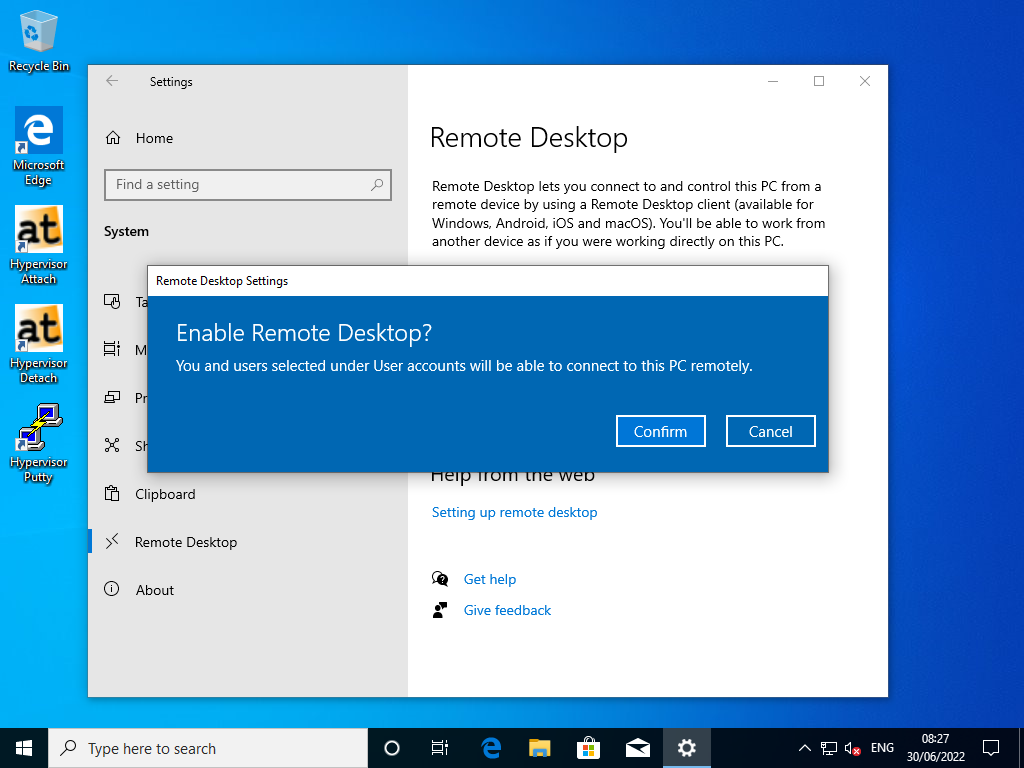
4.1. Enable Remote Desktop

4.2. Remote Desktop Settings
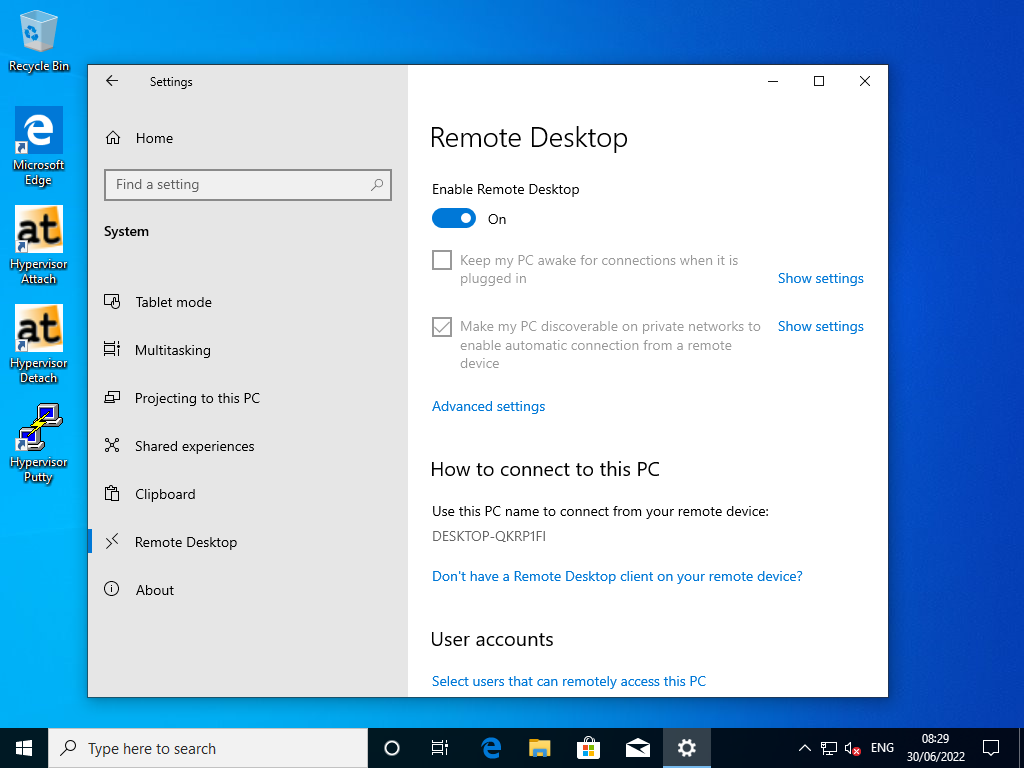

Fig. 4.4 Windows 10 RDP Settings PC-Name (Windows 10 guest).
5. Activate vfio driver
sudo gedit /etc/modules
Add the following lines into the file:
vfio
vfio_iommu_type1
vfio_pci
vfio_virqfd
sudo update-initramfs -u
sudo reboot now
6. Additional guest configuration
Adjust the file
usr_guest_config.shWindows guest:
sudo nano /hv/guests/examples/windows/usr_guest_config.shUbuntu guest:
sudo nano /hv/guests/examples/ubuntu/usr_guest_config.sh# UEFI support export uefi_bios=1 # graphics passthrough export enable_vga_gpt=1 # set to 1 to enable graphics passthrough export vga_gpt_bdf=00:02.0 # PCI bus, device function values for the graphics card, use the lspci command to determine export vga_gpt_kbd_event=7 # keyboard event, determine using ls -la /dev/input/by-id | grep -event- (search for the appropriate keyboard event number) export vga_gpt_mouse_event=4 # keyboard event, determine using ls -la /dev/input/by-id | grep -event- (search for the appropriate mouse event number)
For more information about graphics passthrough, see the Hypervisor Manual.
Important
Use lspci to determine/validate the vga_gpt_bdf value!
rte@RTV-TP104:~$ lspci
00:00.0 Host bridge: Intel Corporation Xeon E3-1200 v2/3rd Gen Core processor DRAM Controller (rev 09)
00:02.0 VGA compatible controller: Intel Corporation Xeon E3-1200 v2/3rd Gen Core processor Graphics Controller (rev 09)
00:14.0 USB controller: Intel Corporation 7 Series/C210 Series Chipset Family USB xHCI Host Controller (rev 04)
00:16.0 Communication controller: Intel Corporation 7 Series/C216 Chipset Family MEI Controller #1 (rev 04)
...
Important
Use ls -la to determine/validate the vga_gpt_kbd_event and vga_gpt_mouse_event values! These values are only valid if bootet with GRUB entry Hypervisor + iGVT-d.
rte@RTV-TP104:~$ ls -la /dev/input/by-id | grep -event-
lrwxrwxrwx 1 root root   9 Feb  7 18:35 usb-Telink_Wireless_Receiver-event-if00 -> ../event5
lrwxrwxrwx 1 root root   9 Feb  7 18:35 usb-Telink_Wireless_Receiver-event-mouse -> ../event4
lrwxrwxrwx 1 root root   9 Feb  7 18:35 usb-Telink_Wireless_Receiver-if01-event-kbd -> ../event7
sudo reboot now
7. Boot Hypervisor in passthrough graphics mode
Please select the following boot line at GRUB:
Hypervisor + iGVT-d
Hint
When executing the /hv/bin/inithv.sh script, a separate GRUB entry Hypervisor + iGVT-d is created.
Important
A missing GRUB entry Hypervisor + iGVT-d shows, that the /hv/bin/inithv.sh script didn’t find any compatible integrated graphics card!
8. Connect to Hypervisor in iGVT-d Mode
In this guide the Putty is used as remote SSH shell:
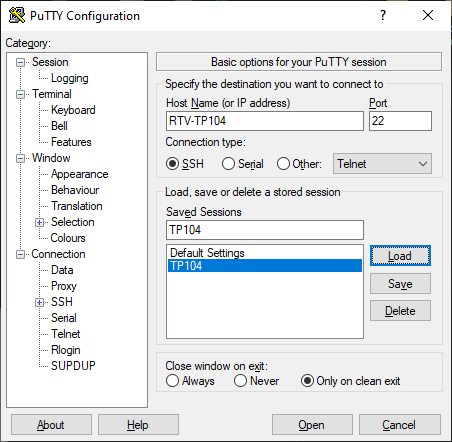
Hint
The screenshots uses the PC-Name RTV-TP104. Replace it by the name you used installing the Hypervisor!
9. Remote guest start
Change to guest directory
Windows:
cd /hv/guests/examples/windowsUbuntu:
cd /hv/guests/examples/ubuntuStart the guest
hv_guest_start -viewWait 30..60 sec.
You should now see the guest at the display. If yes, you are done!
Important
If the screen remains black after 30..60 sec. please go further with next chapter!
10. Update display driver
As the passthroughed display needs an appropriate display driver, please connect to the running Windows guest through
RDP (In this guide the Windows guest PC-Name is DESKTOP-QKRP1FI) and run the Windows Update. Windows Update
will find an appropriate display driver if available.
Important
if no appropriate display driver is found, please go futher with the Troubleshooting section.
11. Troubleshooting
There are several points that can cause problems with Graphics Passthrough. Here are a few hints that can help solve these issues.
11.1. Windows guest
Windows graphics driver
If the Windows guest screen remains black, it’s usually due to a missing graphics driver in Windows guest. To install this, connect to the guest via RDP. In this guide the Windows guest PC-Name is
DESKTOP-QKRP1FI. Replace it by the PC-Name of your Windows guest and connect it through the RDP client on your development PC. As user/password use the defined credentials at Windows guest install stage.- Open internet browser in the Windows guest and get the latest Intel graphic drivers:
https://downloadcenter.intel.com/product/80939/Graphics
OR
https://www.intel.com/content/www/us/en/download/19344/intel-graphics-windows-dch-drivers.html
After installing the driver you should reboot the Windows guest. It could take some minutes until the screen will show up or RDP Connect will work.
RAM size
Increase the RAM size of your Windows guest by changing the value of
ramsizein theguest_config.shfile. At least 6 GB of RAM is recommended for the Windows guest (ramsize=6144).# Major VM settings export num_cpus=2 # Number of CPUs for the VM. # Should not be higher than the number of available physical CPUs # At installation time, the number should be set to one below the number of physical available CPUs! export ramsize=6144 # RAM size of the physical machine. export hdsize=50G # Hard disk size. # This value is only when creating a new hard disk image. # After creating the disk image, this value is ignored.
vendor id
Search for
hv_vendor_idin/hv/bin/kvmguest_start.shfile.runvm_cmd="$guest_dir/$vm_procname -enable-kvm \ -machine pc-i440fx-2.0 -smp cpus=$num_cpus,cores=$num_cpus,threads=1,sockets=1 -m $ramsize -device virtio-balloon,addr=$virtio_balloon_pci_addr \ -monitor unix:$qemu_mon_sock,server,nowait \ -cpu host,hv_vendor_id=acontis,hv_relaxed,hv_spinlocks=0x1fff,hv_vapic,hv_time,pmu=$PMU \ -device virtio-serial,addr=$virtio_serial_pci_addr \
Remove the
hv_vendor_identry.runvm_cmd="$guest_dir/$vm_procname -enable-kvm \ -machine pc-i440fx-2.0 -smp cpus=$num_cpus,cores=$num_cpus,threads=1,sockets=1 -m $ramsize -device virtio-balloon,addr=$virtio_balloon_pci_addr \ -monitor unix:$qemu_mon_sock,server,nowait \ -cpu host,hv_relaxed,hv_spinlocks=0x1fff,hv_vapic,hv_time,pmu=$PMU \ -device virtio-serial,addr=$virtio_serial_pci_addr \
11.2. General issues
Unplug mouse or keyboard
If you unplug and replug the mouse or keyboard during graphics passthrough, they will no longer be recognized and won’t function properly. To avoid this, you can pass through the mouse and keyboard to the guest using USB passthrough. However, in this case, the device must always be plugged into the same USB port.
Please refer to the Hypervisor Manual section on
Windows/Linux USB guest accessfor information on how to get the appropriatehostbusandhostport.In the
usr_guest_config.shfile:Add entries for
USB_HOST_ADAPTER1_PASSTHROUGH.Place a comment symbol before the lines with
vga_gpt_kbd_eventandvga_gpt_mouse_event.
# USB host passthrough (automatic passthrough for any device connected to these ports).
#   Note: on the same physical USB port, different values for hostbus,hostport pairs will show up for different USB speed!
export USB_HOST_ADAPTER1_PASSTHROUGH=""
export USB_HOST_ADAPTER1_PASSTHROUGH="$USB_HOST_ADAPTER1_PASSTHROUGH -device usb-host,bus=$USB_HOST_ADAPTER1_NAME.0,hostbus=1,hostport=4"
export USB_HOST_ADAPTER1_PASSTHROUGH="$USB_HOST_ADAPTER1_PASSTHROUGH -device usb-host,bus=$USB_HOST_ADAPTER1_NAME.0,hostbus=1,hostport=5"

# UEFI support
export uefi_bios=1

# allow dynamically adjust the desktop (from Windows to full screen mode)
export enable_vga_spice=1

# graphics passthrough (see hypervisor manual for more information)
export enable_vga_gpt=1       # set to 1 to enable graphics passthrough
export vga_gpt_bdf=00:02.0    # PCI bus, device function values for the graphics card, use the lspci command to determine
#export vga_gpt_kbd_event=3    # keyboard event, determine using ls -la /dev/input/by-id | grep -event- (search for the appropriate keyboard event number)
#export vga_gpt_mouse_event=6  # keyboard event, determine using ls -la /dev/input/by-id | grep -event- (search for the appropriate mouse event number)