1. Introduction
This guide describes how to set up CODESYS Control for Linux SL or CODESYS Virtual Control SL on RT-Linux for the acontis Hypervisor.
It is assumed, the steps listed in the Hypervisor Quick Start guide and the Windows Guest Guide have been successfully executed.
2. CODESYS Control for Linux SL
2.1. CODESYS Support Package for the Hypervisor
/hv/guests/etc/rt-linux/files/codesys.Hint
Update CODESYS Control version (optional)
The CODESYS Support Package may contain a specific version of the CODESYS Control for Linux SL package (e.g. “codesyscontrol_linux_4.5.0.0_amd64.deb”).
Please follow the steps described in this chapter only in case you want to use a newer version of this package or if this package is missing.
You need to go to the CODESYS webstore (store.codesys.com) and search for “CODESYS Control for Linux SL” and download the respective package.
Unzip the package.
As a result, the folder “Delivery” will contain the CODESYS Control debian package (e.g. “codesyscontrol_linux_4.5.0.0_amd64.deb”).
Please transfer the file you got from the webstore to the PC where the hypervisor is running. If you are running the RT-Linux example, copy the file into the /hv/guests/guestrtlinux/files/codesys folder. Otherwise, copy it to your /hv/guests/guestxxxx directory, where your RT-Linux is located.
2.2. Extract CODESYS Control
CODESYS Control is shipped as a debian package. Its content has to be extracted before it can be used. After extracting the debian package can be removed.
cd /hv/guests/etc/rt-linux/files/codesys
dpkg-deb -x codesyscontrol_linux_4.5.0.0_amd64.deb files
dpkg-deb -e codesyscontrol_linux_4.5.0.0_amd64.deb control
2.3. Adjust CODESYS Configuration
You need to adjust some configuration files.
Adjust the CODESYSControl.cfg file to assure the user configuration file is stored at the hard disk:
cd /hv/guests/etc/rt-linux/files/codesys/files/etc
mousepad CODESYSControl.cfg
Adjust the FileReference.1 setting:
[CmpSettings]
IsWriteProtected=1
FileReference.0=SysFileMap.cfg, SysFileMap
FileReference.1=/mnt/rtfiles/codesys/files/etc/CODESYSControl_User.cfg
If you want to automatically start the PLC application, adjust the CODESYSControl_User.cfg file:
cd /hv/guests/etc/rt-linux/files/codesys/files/etc
mousepad CODESYSControl_User.cfg
Add the Application.1 entry:
[CmpApp]
Bootproject.RetainMismatch.Init=1
;RetainType.Applications=InSRAM
Application.1=Application
2.4. Codemeter support
CODESYS is software protected via a Codemeter USB dongle. This dongle has to be exposed from the Hypervisor Host to RT-Linux.
Hint
How to expose USB devices is described in the Hypervisor Manual in section “USB device access for RT-Linux guests”.
The standard Linux image shipped with the hypervisor does not support usbip.
You need to exchange this image by the separately provided rtlinux515.x64-usbip.bin image file.
This file is part of the CODESYS package and located in /hv/guests/etc/rt-linux/files/codesys/rtlinux.
You need to adjust the configuration:
cd /hv/guests/guestxxxx
mousepad usr_guest_config.sh
Adjust or add the following line:
export osImage=$HV_ROOT/guests/etc/rt-linux/files/codesys/rtlinux/rtlinux515.x64-usbip.bin
2.5. CODESYS autostart
/hv/guests/guestxxxx/files/autostart.sh# load Ethernet drivers if required
modprobe e1000e
modprobe igb
modprobe igc
modprobe r8169
ifconfig eth0 up
/hv/guests/guestxxxx/files/autostart.sh# set IP address
ifconfig eth0 192.168.10.10
# run codesys
cd /mnt/rtfiles/etc/rt-linux/files/codesys
./installcodesys.sh
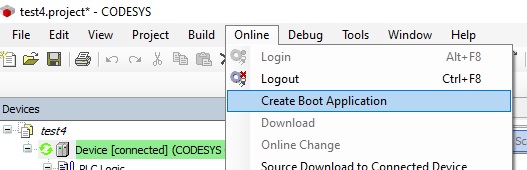
If you want the PLC application to run automatically after CODESYS is started, you need to create a Boot Application. You need select the PLC application, log in into the PLC, download and run the application. Then create the Boot Application.
2.6. CODESYS PLC logfile
In case of PLC issues, you may take a look into the log file. It is located in RT-Linux, so you need to log in into RT-Linux or get it via ssh.
The following command will store the log file from within RT-Linux into the local filesystem into file plc.log.
The requested password is root:
ssh root@192.168.157.2 cat /tmp/codesyscontrol.log >plc.log
3. CODESYS Virtual Control SL
3.1. Virtual Control Support Package
CODESYS Virtual Control files for the RTOSVisor are located in /hv/guests/etc/rt-linux/files/codesys-virtualControl.3.2. Virtual Control Realtime Guest
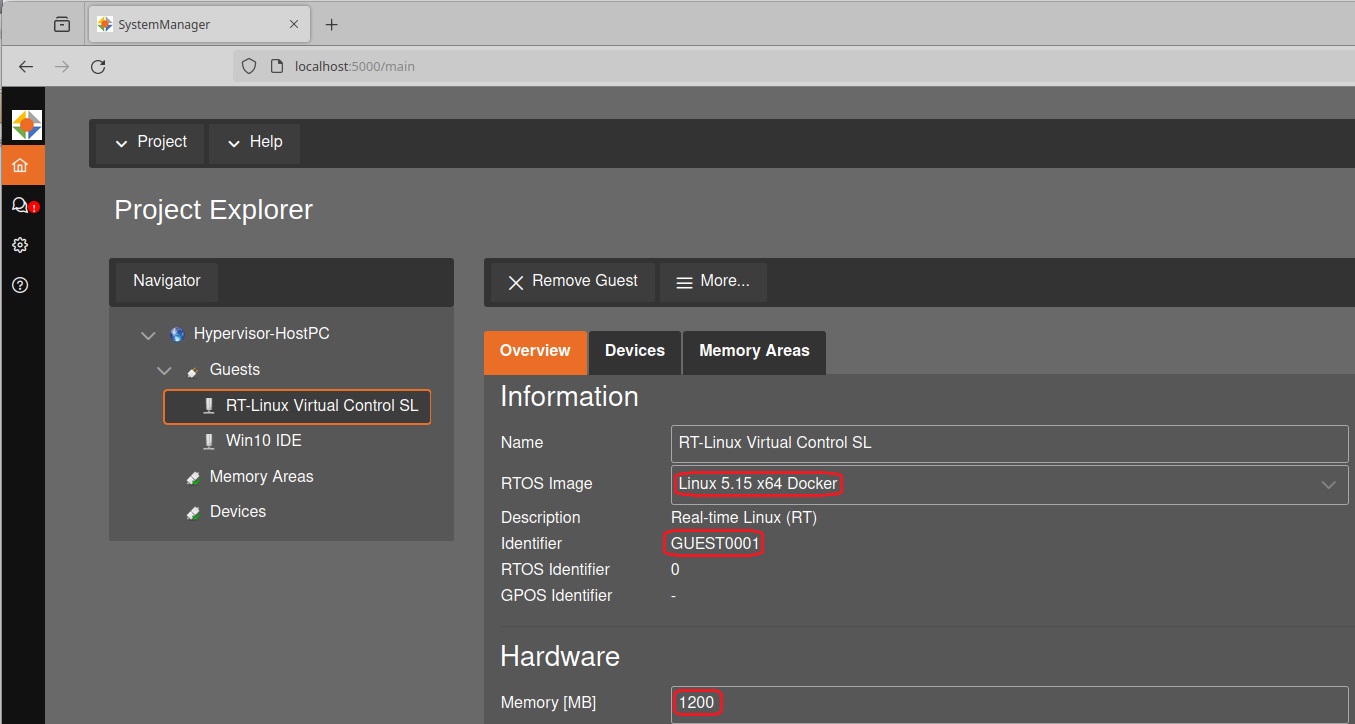
The CODESYS Virtual Control SL is started in a RT-Linux guest with Docker support. Ensure you have selected the appropriate RTOS image Linux 5.15 x64 Docker and allocated sufficient memory for the RT-Linux.
For this guide, we assume that the RT-Linux guest is located in /hv/guests/guest0001 and is initialized with 1200MB of memory.
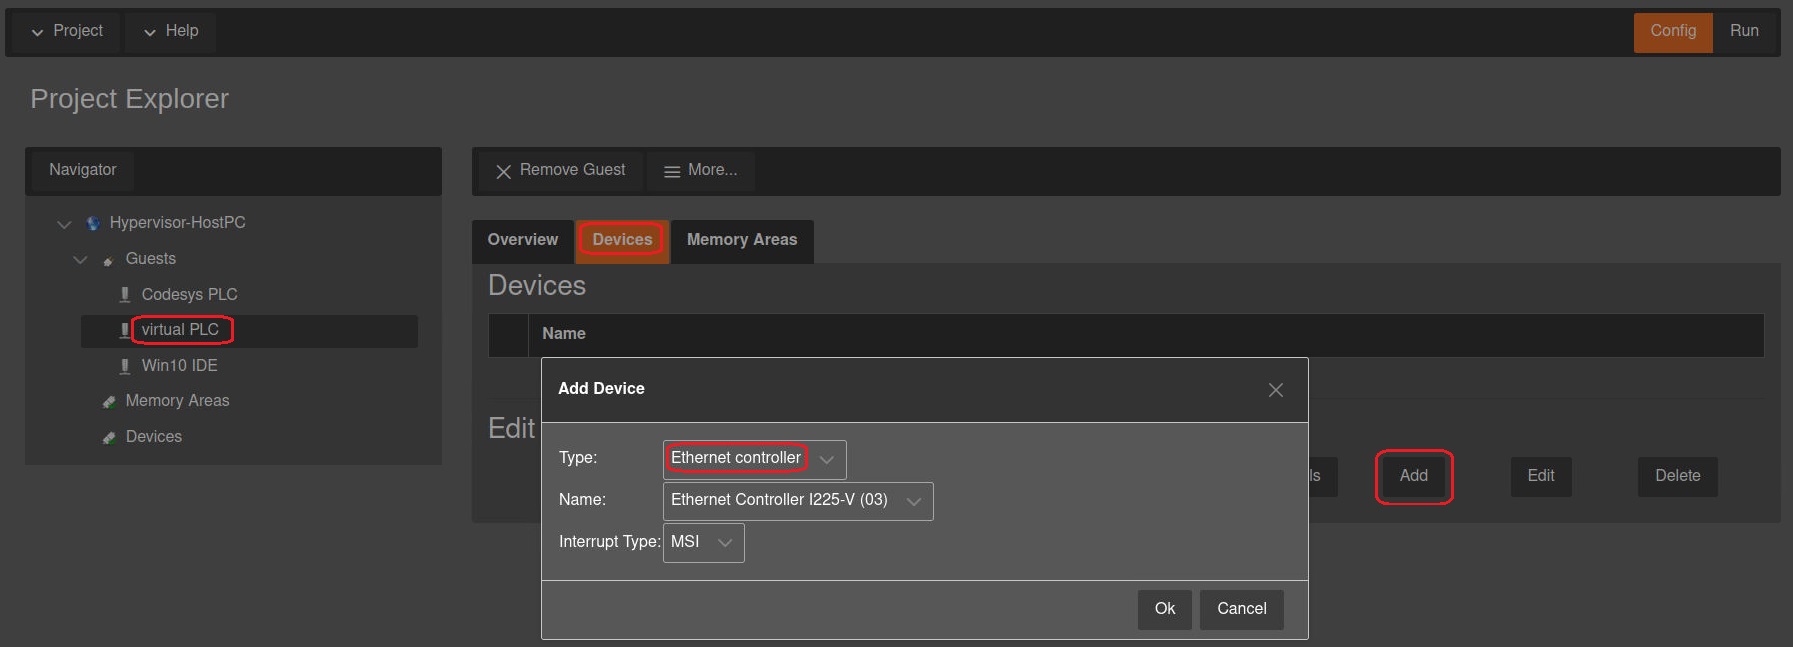
If you want to use a network interface with your Codesys instance, you need to pass this network interface from the host to the RT-Linux guest. After running sync and restarting the guest, you can log into the RT-Linux guest with SSH and get the name of the interface using the command ifconfig. You can use this interface name later in the virtual PLC configuration as the NIC.
For faster starting of the CODESYS Virtual Control environment, the polling rate should be set to 200µs. To do this, adjust the CommPollPeriodUs entry in usr.config.
Open the host configuration file:
cd /hv/config
mousepad usr.config
Add or Adjust the following lines:
[Host\Comm]
"CommPollPeriodUs"=dword:C8
Open the guest configuration file:
cd /hv/guests/guest0001
mousepad usr.config
Add or Adjust the following lines:
[Rtos1\Comm]
"CommPollPeriodUs"=dword:C8
Hint
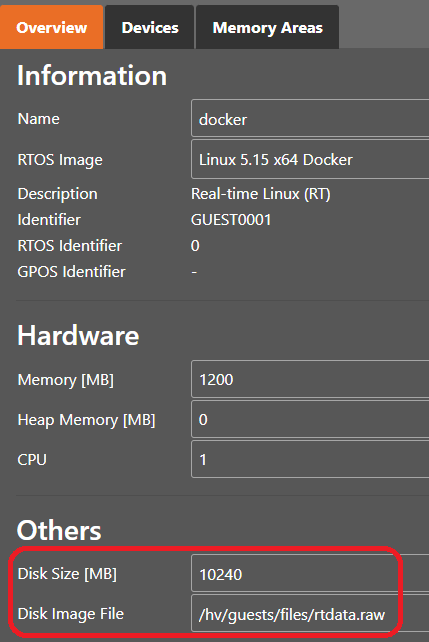
The CODESYS Virtual Control Docker environment is stored on a data file that is created during the first start of RT-Linux. By default, the data file is located at /hv/guests/guestxxxx/files/rtdataimage.raw. This data file is mounted into the RT-Linux filesystem at /mnt/rtdata when RT-Linux starts and unmounted when RT-Linux is shut down.
Caution
The data file will only be created when the RT-Linux guest is started and no existing data container file is found.
Once the container file is created, its size cannot be changed. The size should be large enough for your complete CODESYS Virtual Control SL environment.
If the default path and filename for the container file shall be changed, you need to assure that it must be located below the /hv/guest folder!
Configure the size of the data file. In this guide, we will create a data file with a size of 10GB (10240MB).
You can configure the data container path, filename and size using the System Manager:
Or, alternatively, using the usr_guest_config.sh file:
cd /hv/guests/guest0001
mousepad usr_guest_config.sh
Add or Adjust the following lines (in this case, the default path and filename will be used):
export rt_data_size_MB=10240
Start the RT-Linux guest and log in as root.
3.3. Virtual Control Docker Environment
The CODESYS Virtual Control Docker runtime is configured using the Codesys IDE. After starting RT-Linux, you can connect with the IDE to control the Docker environment.
3.3.1. Update CODESYS Virtual Control
Select the menu Tools\Codesys Installer in the IDE and switch to the Browse tab. Here, you can search for CODESYS Virtual Control for Linux SL and select the entry. Click on Install Selected to install the add-on and follow the instructions.
3.3.2. Install the Virtual Control Images
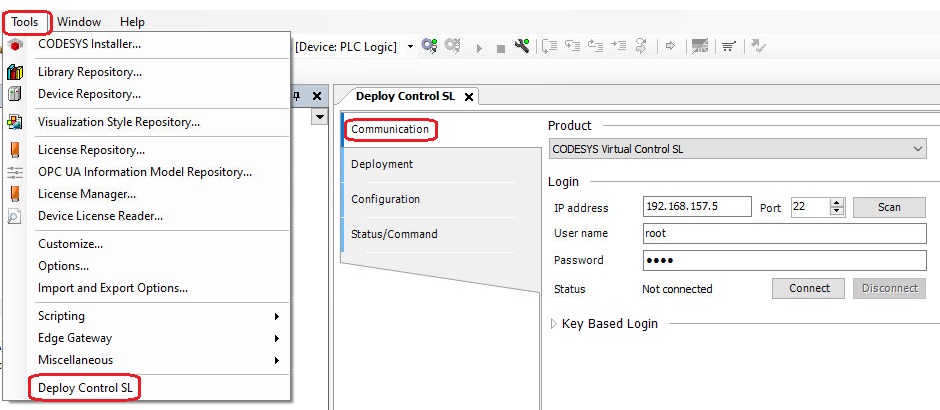
Select the menu Tools/Deploy Control SL. In the Communication section, enter the IP address of the RT-Linux (e.g., 192.168.157.2), username (root), and password (root). Then press the Connect button, and the status should change to connected.
In the Deployment section, select Install from local files and open the drop-down menu. Here, you will find the Docker images for Virtual Control and the gateway. Install both images by selecting each file from the drop-down menu and clicking the Install button.

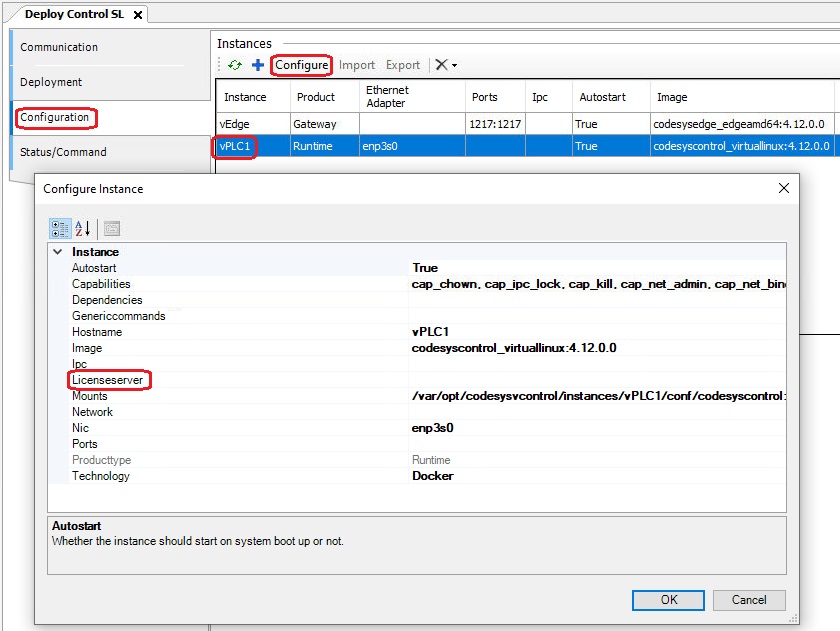
3.3.3. Configure Virtual Control
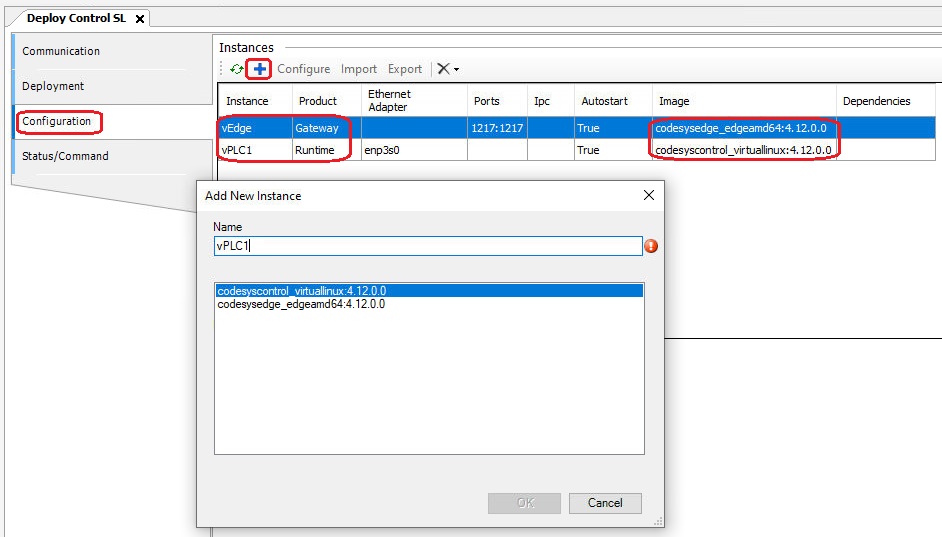
In the Configuration section, you can add and configure your instances. At least one Runtime and one Gateway instance should be configured. To add a new instance, click the blue plus button, select the image, and give it a name.
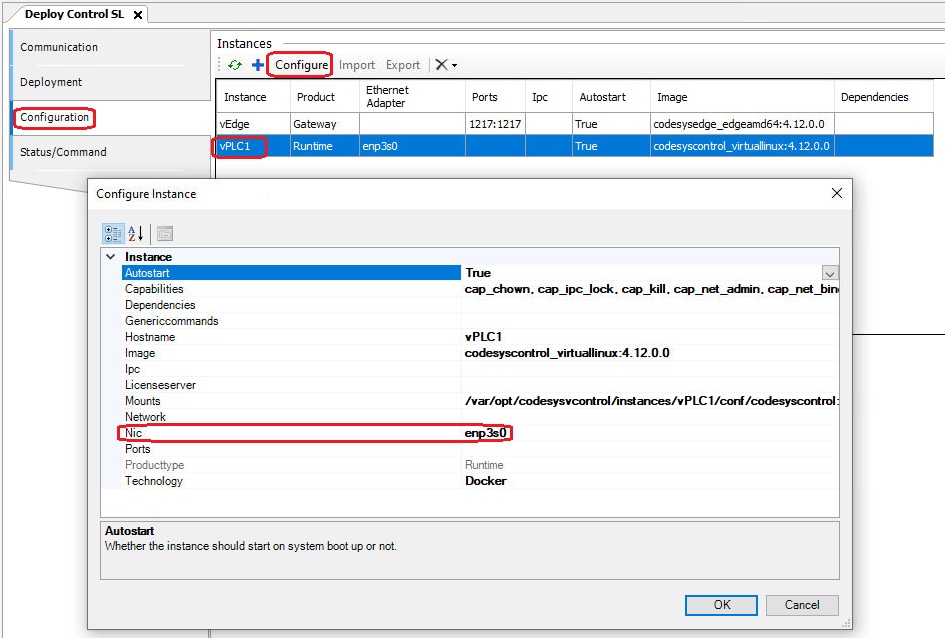
After adding an instance, you can configure it to fit your needs. If you are using EtherCat, a network interface (NIC) needs to be assigned to the runtime instance. It is assumed that a network interface was assigned to the RT-Linux using the system manager. In this guide, the network interface enp3s0 was assigned to the RT-Linux.
To configure the runtime instance, select it and click the Configure button to open the Configure Instance dialog. Here, you can enter the name of the NIC you want to assign to the instance.
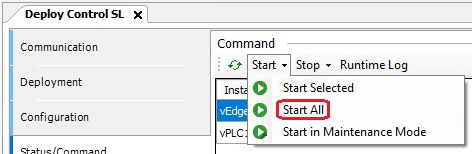
In the Status/Command section, you can check and change the status of your instances. Open the Start drop-down menu and select Start All. Click on Runtime Log to open the log file.
After finishing the setup, switch to the system manager and restart the RT-Linux guest by selecting Shutdown Guest and then Start Guest.
3.4. Codemeter License Server
CODESYS software is protected via a CodeMeter license server. The license server is specified in the configuration section of the instance.
3.5. Virtual Control Autostart
CODESYS Virtual Control after RT-Linux has booted.First, check or configure the RT-Linux data file where the Virtual Control environment will be installed. In this guide, we will create a data file with a size of 10GB (10240MB).
cd /hv/guests/guest0001
mousepad usr_guest_config.sh
Add or adjust the entry for rt_data_size_MB.:
export rt_data_size_MB=10240
/hv/guests/guest0001/files/autostart.shVirtualControlAPI.py to start the CODESYS Virtual Control during the startup of RT-Linux.# set IP address
ifconfig eth0 192.168.10.10
# run CODESYS Virtual Control
python3 ~/VirtualControlAPI.py -r vPLC1
python3 ~/VirtualControlAPI.py -r vEdge
If you want the PLC application to run automatically after CODESYS is started, you need to create a Boot Application. You need to select the PLC application, log in into the PLC, download and run the application. Then create the Boot Application.
3.6. Virtual Control Logfile
In case of PLC issues, you can check the log file.
To open the log file in the IDE, go to the menu Tools/Deploy Control SL. In the Status/Command section, select the instance and click on Runtime Log.
The following command on the RTOSVisor Host will store the log file from within the running RT-Linux docker instance into the local filesystem in the file vplc1.log. You may need to adjust the IP address of the RT-Linux and the instance name (VPLC1). The required password is root:
ssh root@192.168.157.2 /mnt/rtfiles/etc/rt-linux/files/codesys-virtualControl/show_codesys_log.sh vPLC1 | tee vplc1.log
4. Windows Guest
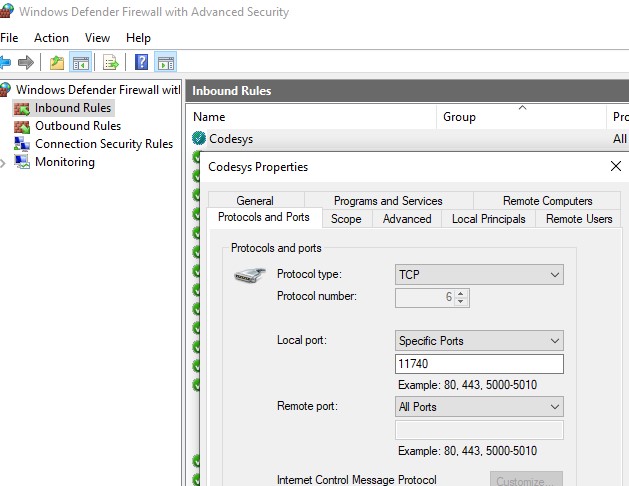
4.1. CODESYS Windows VM Port Forwarding
If the CODESYS development system shall be connected with the PLC runtime system, this can be accomplished using the Windows VM IP address and enabling port forwarding. The following steps have to be executed (in the Hypervisor Host).
Replace the file guest_gateway.config in the windows guest folder
/hv/guests/guestxxxxcd /hv/guests/guestxxxx [ ! -f guest_gateway.config.orig ] && mv guest_gateway.config guest_gateway.config.orig cp /hv/guests/etc/rt-linux/files/codesys/guest_gateway.config .Check or add the following line in /hv/config/hv.config. Replace
guestxxxxwith your Windows Guest folder name.#include "/hv/guests/guestxxxx/guest_gateway.config"
4.2. Diagnosis shortcuts
For diagnosis purposes additional shortcuts can be placed on the Windows desktop.
Start the Windows guest
cd /hv/guests/guestxxxx
hv_guest_start -view
Open the Explorer
Switch to folder
\\10.0.2.4\qemu\etc\rt-linux\files\codesys\CodesysDesktopShortcutsCopy all the shortcuts onto your desktop (you may have to adjust the shortcuts based on your Windows version and language)
Caution
These shortcuts will not work with virtualPLC
Hint
To avoid being asked to allow execution any time you start such shortcut, you may adjust the related Windows settings.
Open the Control Panel
Select Internet Options
Select security
Select local intranet
Select sites
Select advanced
Add
\\10.0.2.4\qemu
4.3. Connection to RT-Linux
Hint
This shortcut executes the following command.
%RTE_ROOT%\RtosUpload.exe -attach -osid 1
To automatically attach the communication layer, please copy this shortcut into the Windows startup folder.
-  Press the Windows key as well as the R key
-  Enter the following command: shell:startup
-  Copy the shortcut
Running this command can be accelerated by adding the following registry key:
[HKEY_CURRENT_USER\Software\Microsoft\Windows\CurrentVersion\Explorer\Serialize]
"StartupDelayInMSec"=dword:00000000
4.4. Execute PLC commands
This section shows how to execute PLC control commands (e.g. PLC status check).
Caution
This requires the putty ssh client application being installed and security keys being exchanged.
Download and install .. https://www.putty.org/
Open putty and connect to
192.168.157.2, accept the connection (do not login)Close putty (we only need to execute this step to accept the security keys, they are needed to run the RT-Linux application)