18. RTOS-32 Legacy information
Caution
This documentation is not valid for RTOSVisor V8.1!
The below documentation is an excerpt from RTOSVisor V8.0.
Some of the files can be found in /hv/guests/etc/rtos-32.
18.1. On Time RTOS-32 container
- Directories:
/hvthis root directory contains all RTOSVisor files and executables.
/hv/rtos-32RTOS-32 configuration files and start/stop scripts as well as OS binaries.
/hv/rtos-32/rtfilesdirectory for your
.dlmfiles.
- Most important bash scripts:
/hv/rtos-32/realtimedemo.shstarts RTOS-32 VM and the acontis tool measuring context switch and interrupt latencies.
/hv/rtos-32/realtimedemo-debug.shstarts debug monitor that awaits requests from a remote debugger on a Windows PC with installed EcWin, Visual Studio, and RTE Plugin.
/hv/rtos-32/ecmasterdemo.shstarts RTOSVisor RTOS-32 VM and EtherCAT MasterStack demo.
hv_guest_stopstops VM and RTOSVisor.
/hv/rtos-32/dbgcon.shopens interactive RTOS-32 VM console, so you can interact with your app here.
- Specific command used for debugging:
hv_brvnetsetcreates a virtual network bridge on Hypervisor Host to forward debugger TCP/IP/UDP packets from LAN1 to RTOS-32 VM. It is required to start this script if you need to perform remote debugging of a RTOS-32 app from another machine.
Hint
See chapter “Bridge virtual and physical network” in the Hypervisor Manual for details how to configure the bridge.
hv_vnetclrdeletes bridge, after the RTOS-32 VM has been stopped.
Start a RTOS-32 container using the rtos-32.sh script.
18.1.1. How to run a sample preconfigured RTOS-32 App (Realtimedemo)
RTOSVisor has a special tool (RealtimeDemo), which can accuratelly measure the real-time capabilities of a machine and the
hypervisor. This tool can be also used as a first sample realtime app, to play with the RTOSVisor.
To start it, execute /hv/rtos-32/realtimedemo.sh script. This script loads/starts RTOSVisor VM, RTOS-32 OS Image and starts RealtimeDemo.dlm.
Execute hv_guest_stop script to stop everything.
Most important parameters here are: Interrupt Delay and Task Delay (in microseconds). These parameters show the realtime capabilities of the Hypervisor Host and RTOSVisor.
You can press Ctrl + C to exit from the console into Linux Terminal. Please execute dbgcon.sh script to return to the RTOS-32 console again.
It is also easily possible to run the realtime demo in the background, completely detached from the console. So, use dbgcon.sh script in this
case, to open interactive RTOS-32 terminal from a new console.
18.1.2. How to run EcMasterDemo that uses a network card and the EtherCAT stack
It is assumed that your Hypervisor Host has two ethernet ports LAN1 and LAN2. The first one can be used for a TCP/IP traffic and/or to establish a debug connection with a DevPC.
It is also assumed, that your second LAN port was already assigned to RTOSVisor, as it is described in this Hypervisor.pdf in the PCI/PCIe device assignment section.
Execute the following steps:
Connect LAN2 port to a EtherCAT slave.
cd/hv/rtos32sudo./ecmasterdemo.sh
All required files like EcMasterDemo.dlm, EcMaster.dlm, emllRTL8169.dlm are already in the rtfiles/ecmaster subdirectory.
18.1.3. How to remotely debug a RTOS-32 app from a Windows PC with Visual Studio
It is assumed, that you also have a second Windows PC (DevPC), where you installs Visual Studio + EcWin + RTE Plugin. DevPC is used to develop your RTOS-32 Application and perform a remote debugging of this app on the Hypervisor Host.
acontis has developed a special Visual Studio plugin that provides the possibility to create a RTOS-32 project, compile, debug it (local or remote) and configures a Visual Studio environment for you.
Requirements for a Windows PC:
* Visual Studio 2015 or newer should be installed
* acontis Rtos32Win/EcWin should be installed
Topics like creating a new RTOS-32 Project are out of scope of this document. Please refer to the official acontis RTOS-32 documentation to find details.
Before we start, it is important to understand, how RTOS-32 Apps work in the RTOS-32 VM. Every app consists of a Loader part (/hv/rtos-32/Loader.bin) and a dynamically loaded module in a .dlm
format (/hv/rtos-32/rtfiles/yourapp.dlm). Loader.bin is provided with full source code and comes as a separate Visual Studio project. It is automatically generated by the RTE Visual Studio Plugin using the method described
above.
But an application, that is is supposed to be debugged, should use a separate bootloader called RTOS-32 Monitor (/hv/rtos-32/debug/Monvmf.bin).
The monitor starts in RTOS-32 VM and listens to a TCP/IP traffic from the remote Visual Studio debugger.
The second important thing: all Monitor settings (like an IP address to listen to) are always embedded into the Monvmf.bin file. So, copy Monvmf.bin to the Hypervisor Host from DevPC every time when you change
remote IP address in the System Manager (the part of EcWin/Rtos32Win).
Network Configuration:
The Hypervisor Host should be configured to peform the remote debugging; scripts and configuration files should contain specific IP addresses/masks/subnets. The requirement is that DevPC, Hypervisor Host and
RtosVM are in the same subnet, in our example 172.17.x.x.
Our sample network configuration:
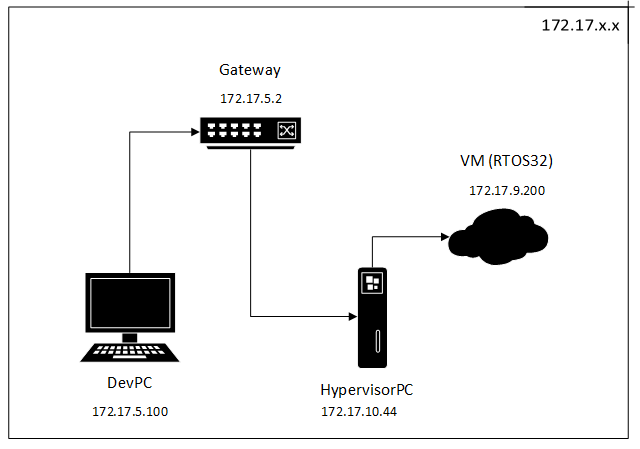
All these IP addresses should be set here: /hv/config/brvnetconfig.sh
In our example, the gateway is a simple router with running DHCP server, that assigns static 172.17.5.\* addresses to development PCs in the
office and dynamic 172.17.10.\* addresses to all other computers connected to the router.
VM with address 172.17.9.200 is in a separate subnet, not physically connected to the router. But Hypervisor Host accepts MASK 172.17.255.255 on
its virtual network bridge (read below) and can forward all traffic to and from a VM from the 172.17.x.x network.
By simple words, the DevPC communicates always with VM. In the VM a special debug stub is started (called RTOS-32 Debug Monitor) that listents to the 172.17.9.200 IP address.
Open project of a sample demo app (we describe here how to debug RealtimeDemo):
DevPC: open System Manager and right click
RTOS #1\Applicationand chooseCreate New Application Project (Debug Only)Choose
RealtimeDemoand click button. Visual Studio projects are generated now and copied toRtFilesand other subdirectories of your System Manager workspace.
Prepare a debugger bootloader (RTOS-32 Monitor):
DevPC: Select and click button near to a grayed IP text field.
Enter
172.17.9.200in the IP text field and press button. Please note, now the new RTOS-32 Monitor binary (Monvmf.bin) is generated and the target IP addresss is embedded into the binary.
Compile the .dlm project:
DevPC: Click button.
In the Visual Studio two projects are available in the solution explorer:
LoaderandRealtimeDemo.Right click every project and click
Copy binaries to the Hypervisor Host:
Copy
RealtimeDemo.dlmfrom theRtFilesdirectory in your workspace on DevPC to/hv/rtos-32/rtfiles/debug/directory.Copy
projects/monvmf/Monvmf.binto/hv/rtos-32/debug/directoryMake sure
/hv/rtos-32/realtimedemo-debug.configfile has correct settings. It should have a valid file server directory (hv/rtos-32/rtfiles/debug/) and it should of course include.configfile for a PCI Card for LAN2 port, that is assigned to the RTOS VM.
Start RTOS-32 VM and the RTOS-32 Monitor (Hypervisor Host):
Execute
/hv/rtos-32/realtimedemo-debug.sh. Please note, the.dlmmodule was already added to therealtimedemo-debug.configin theRtos\Loadersection.You should see a RTOS-32 Monitor output. It listens to the IP address
172.17.9.200to receive the remote debugger traffic.
Please check all your network setings here: /hv/config/brvnetconfig.sh
Please note, vnet0 virtual network adapter is created on Hypervisor Host, when the VM is started. Please consider this adapter as a virtual PCI network card inside the RTOS-32 VM,
that is visible in Hypervisor Host as vnet0.
By default the 192.168.178.1 address is assigned to this adapter on a Linux side.
Configure a virtual bridge network adapter
Configure a virtual bridge network adapter to forward all incoming debugger traffic from LAN1 to the virtual network adapter vnet in the RTOS VM.
Please execute /hv/hvctl/brvnetset.sh script. The virtbr network adapter is created on the linux side.
Start debugging (DevPC):
In Visual Studio open file
Loader.cpp.Locate
main()functionSet a breakpoint.
Press F5 key to start debug.
How to repeat/stop debugging:
There is no need to restart the RTOS-32 Monitor if you want to stop the debugging.
Simply click Stop in the Visual Studio and then press F5 again.
It is not needed to copy the RTOS-32 Monitor binary (
Monvmf.bin) every time you make changes in the loader or a.dlmproject. Only when the IP address is changed.- If you found a bug in your
.dlmmodule and need to upload a new verison into the Hypervisor Host, please do the following: compile project
copy changed
.dlmbinary to the/hv/rtos-32/rtfiles/debug/directory.
- If you found a bug in your
- If you want completely stop your VM, make it in the following sequence:
Execute
/hv/hvctl/brvnetclr.shto remove the bridgeExecute
hv_guest_stop