1. Introduction
This guide describes how to set up an Ubuntu guest in the acontis RTOSVisor. Similar Linux-based operating systems like Debian can be installed in the same way. The Linux-based non Real-time guests are running in a virtual machine, which is powered by QEMU/KVM.
Hint
The functionality, behavior, appearance, and availability of commands can vary significantly depending on the distribution and display manager being used (e.g., Gnome, KDE, XFCE, etc.). This guide is written with the assumption of a default Ubuntu installation, using its standard settings and configurations. Adjustments may be necessary if you are using a different distribution or display manager.
It is assumed, the steps listed in the Hypervisor Quick Start Guide have been successfully executed.
The last chapter describes how to set up an additional Ubuntu guest, if 2 (or more) Ubuntu guests are to be used.
2. Copy Ubuntu ISO installation media to Hypervisor Host
In a first step, we need to copy the Ubuntu installation media (ISO file) from a Windows (or Linux) system into the Hypervisor Host filesystem.
2.1. Using Filezilla (recommended)
With this setup, you can upload the Windows installation .iso-file via SFTP from a PC to the Hypervisor Host.
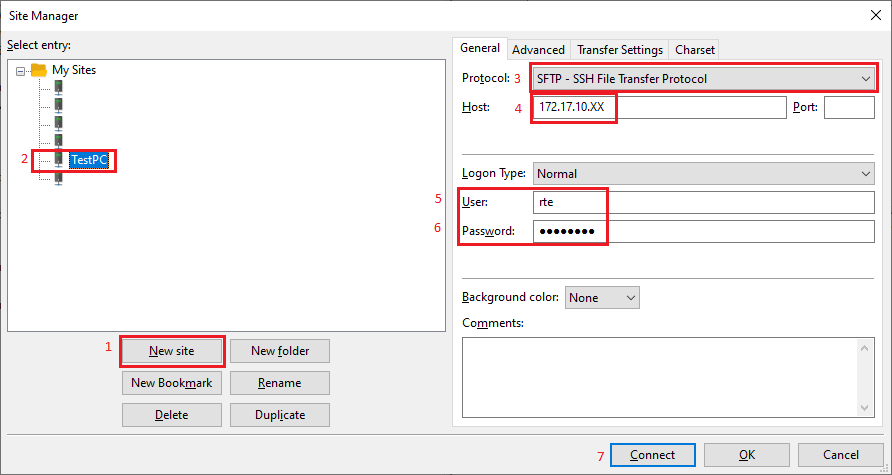
Open a shell (right click on desktop and select ‘Open Terminal here’ or press CRTL + ALT + T) on the Hypervisor Host Host.
Determine the IP address of the Hypervisor Host (with
ifconfigcommand and throughinetentry):rte@RTV-TP104:~$ ifconfig enp2s0: flags=4163<UP,BROADCAST,RUNNING,MULTICAST> mtu 1500 inet 172.17.10.5 netmask 255.255.0.0 broadcast 172.17.255.255 inet6 fe80::ccbb:85f1:38d3:fa2a prefixlen 64 scopeid 0x20<link> ether 90:1b:0e:18:c9:83 txqueuelen 1000 (Ethernet) RX packets 4618420 bytes 4033770375 (4.0 GB) RX errors 0 dropped 8865 overruns 0 frame 0 TX packets 1460482 bytes 96608727 (96.6 MB) TX errors 0 dropped 0 overruns 0 carrier 0 collisions 0 lo: flags=73<UP,LOOPBACK,RUNNING> mtu 65536 inet 127.0.0.1 netmask 255.0.0.0 inet6 ::1 prefixlen 128 scopeid 0x10<host> loop txqueuelen 1000 (Local Loopback) RX packets 6864 bytes 427092 (427.0 KB) RX errors 0 dropped 0 overruns 0 frame 0 TX packets 6864 bytes 427092 (427.0 KB) TX errors 0 dropped 0 overruns 0 carrier 0 collisions 0 vnet0: flags=99<UP,BROADCAST,NOTRAILERS,RUNNING> mtu 1500 inet 192.168.157.1 netmask 255.255.255.0 broadcast 192.168.157.255 ether 00:60:c8:00:00:00 txqueuelen 1000 (Ethernet) RX packets 765775 bytes 74216258 (74.2 MB) RX errors 0 dropped 0 overruns 0 frame 0 TX packets 767935 bytes 74780268 (74.7 MB) TX errors 0 dropped 0 overruns 0 carrier 0 collisions 0
In this example the IP address is 172.17.10.5.
Hint
The device name enp2s0 differs on different PC/IPC’s!
Open Filezilla (get current version from https://filezilla-project.org/) and create new connection entry:
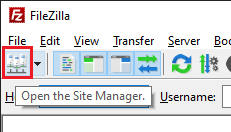
Push New site button
Give a qualified name
Select SFTP - SSH File Transfer Protocol
Give Hypervisor Host IP/name. In the screenshot above the last byte is
X-ed out. Replace it with the ‘detected’ IP address.Enter User name (same as at Hypervisor install)
Enter password (same as at Hypervisor install)
Push Connect button
Select the installation media file (the
.isoimage) in the Local tab on the left and upload it to/hv/isointo the Server tab on the right.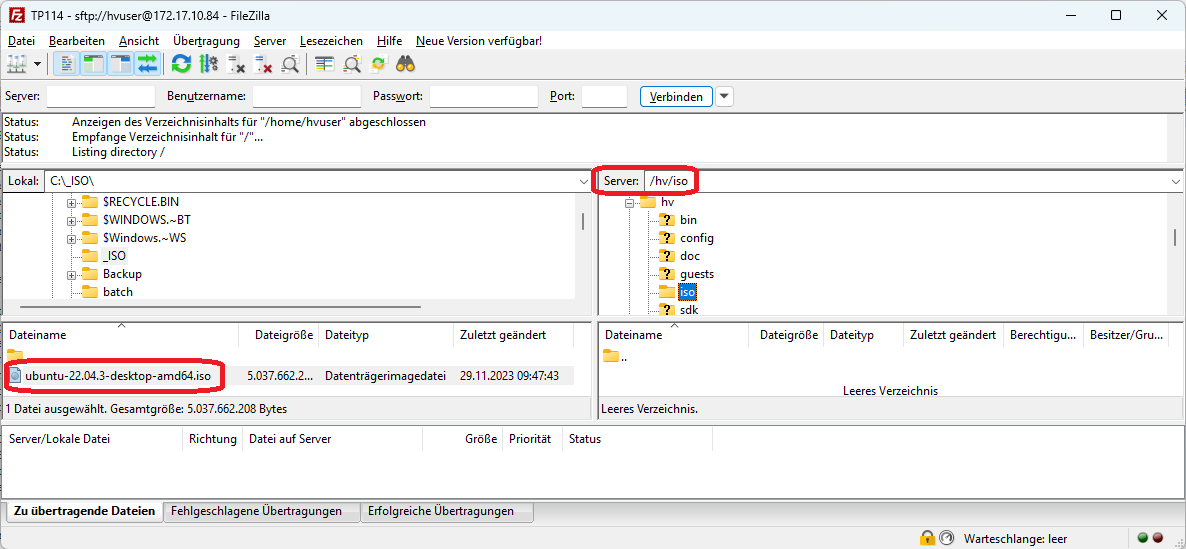
3. Guest Configuration
Hint
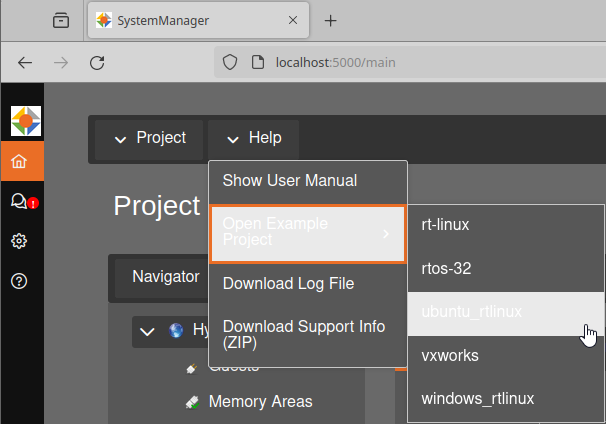
This guide focuses on the Ubuntu example guest. Initially, the Hypervisor Host does not provide any example guest folders. To switch to the Ubuntu guest example, you need to perform the suitable initialization.
3.1. Open Example Project in System Manager
3.1.1. Browser Start
The Firefox browser can be launched directly on the Hypervisor Host. Click the top left icon and select Web Browser.

127.0.0.1 and connect to port 5000.http://127.0.0.1:5000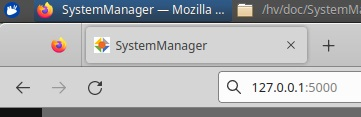
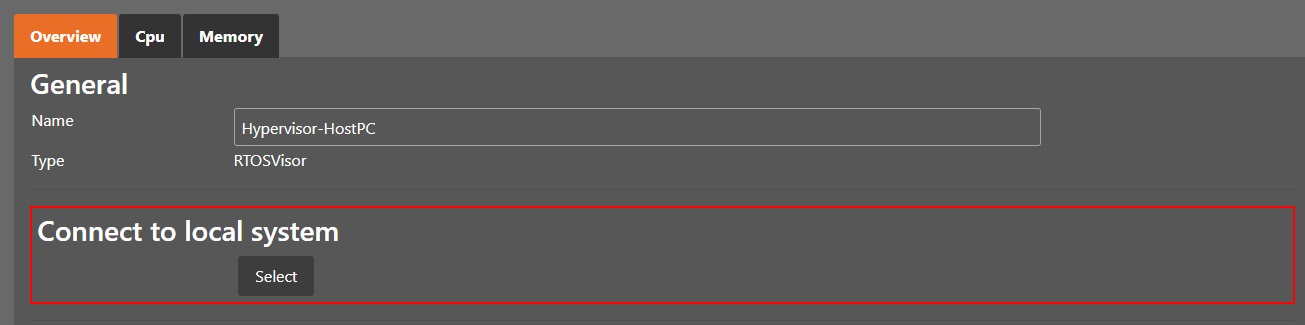
3.1.2. Local Connection
To connect the browser with the Hypervisor backend, please select Local Connection and the respective hypervisor type (RTOSVisor).
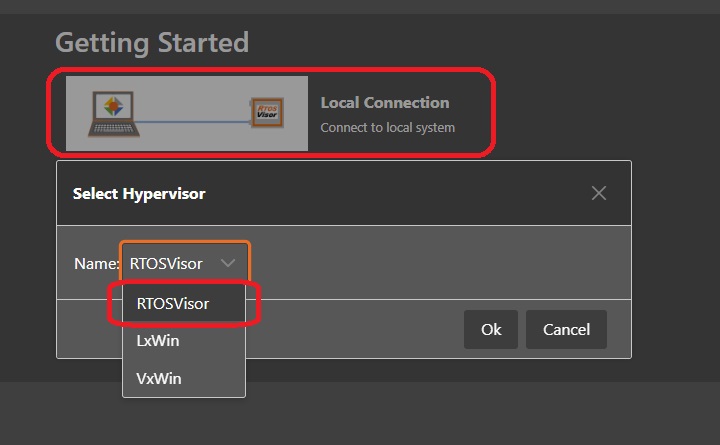
After acknowledging Connect to local system, the Hypervisor Host connection dialog will be shown.
You should provide an appropriate name for this Hypervisor Host and click the Select button.
3.1.3. Initial Synchronization
When you have started the System Manager for the first time, you need to run an initial synchronization step.
Click the synchronization button.

A confirmation popup will then appear, where you need to press the ‘Apply’ button.
3.2. Ubuntu Guest Example
Open the Ubuntu Example project, it includes an Ubuntu guest and a RT-Linux guest.
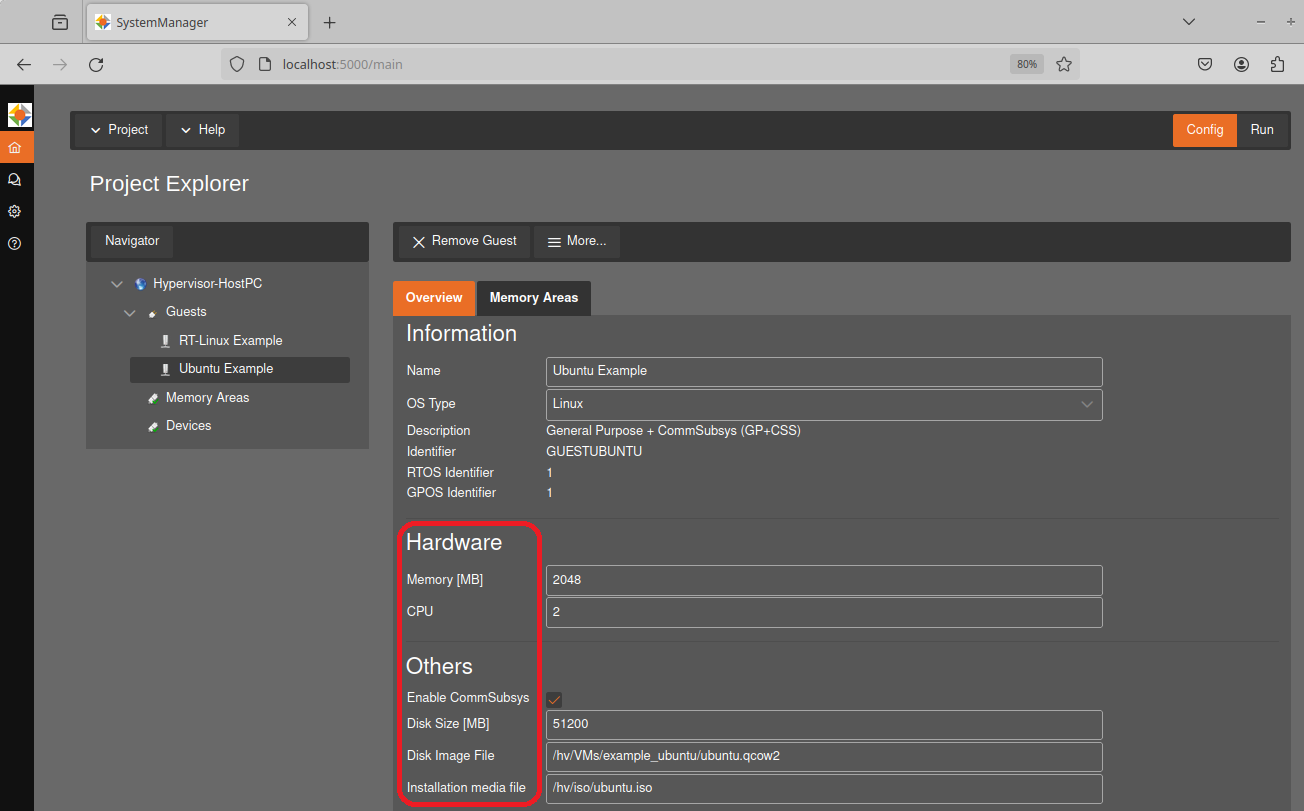
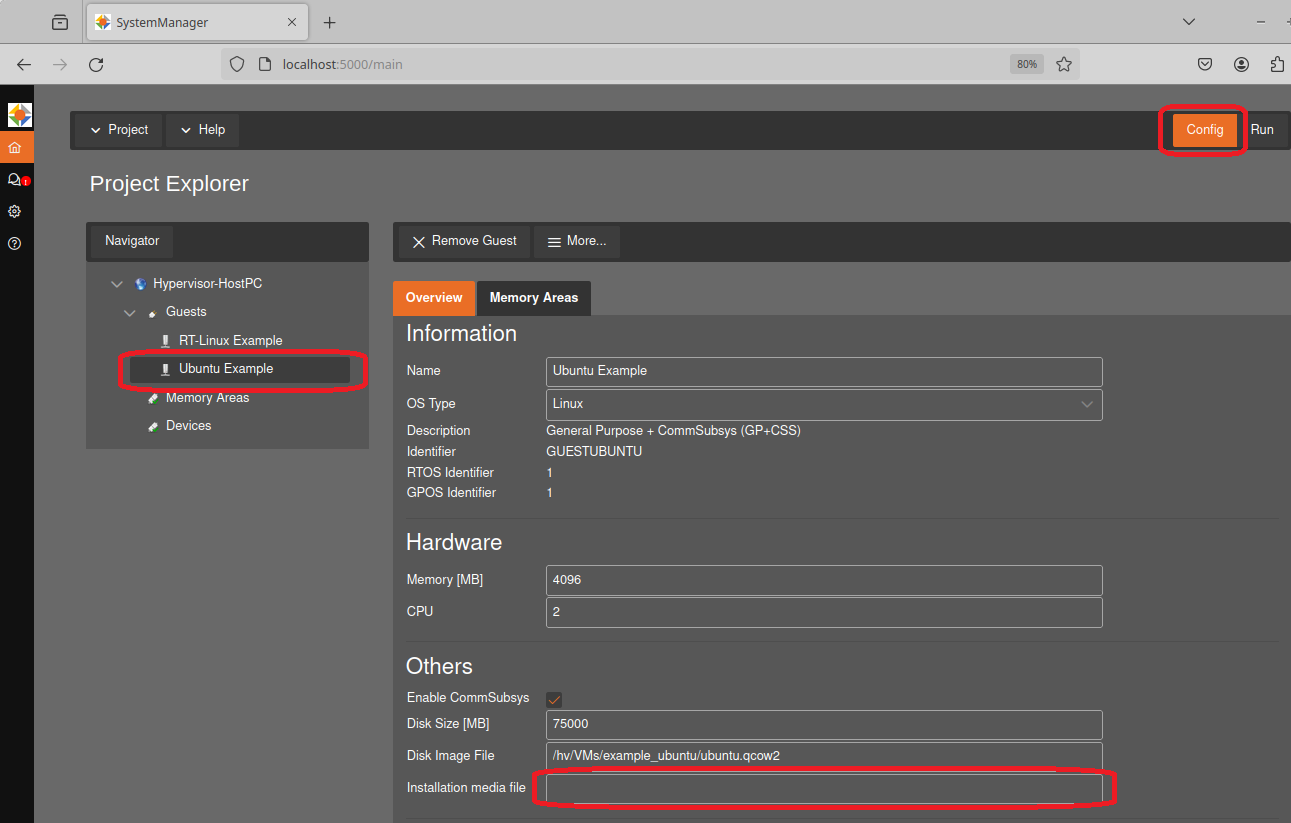
Before installing the guest operating system, it’s necessary to set up the corresponding virtual machine, including configuring settings like the number of CPU cores and network options.
For the example Ubuntu Guest setup, the installation media should be located at
/hv/iso/ubuntu.iso. You have the option to rename your existing.isofile to match this location on the Hypervisor host, or you can modify theInstallation Media filesetting to point to your file.By defining the
Disk Image File, you can specify the location and name of the guest’s image files. This setting should include a path beginning with/hv/VMsand a filename ending with the.qcow2extension, such as/hv/VMs/example_ubuntu/ubuntu.qcow2. This makes it possible to copy image files and use them in various projects without having to reinstall the Ubuntu operating system.Ensure the number of CPU cores allocated does not exceed the number of physical cores available on the system that are not allocated to Real-time guests. For instance, if you’re using a quad-core CPU and two cores are dedicated to Real-time guests, the maximum number of cores you can allocate to an Ubuntu guest is two. The default settings should be suitable for most situations.
Tailor the memory allocation to meet the requirements of the Ubuntu guest, ensuring not to allocate more RAM than what is physically available on the Hypervisor Host.
Increase Disc Size if necessary
After making changes to a project, it’s essential to perform the synchronization step again and click ‘Apply’ in the confirmation popup. This process commits the configurations to the Hypervisor Host.
Once synchronization is successful, the Hypervisor Host has to be rebooted.
After rebooting the system, repeat the steps from the beginning.
Start the browser
Connect to 127.0.0.1:5000
Select
Local ConnectionSelect
Connect to local systemClick the
Syncbutton andApply
3.3. Command Line operation
This chapter demonstrates how to use the example projects using the command line instead of the System Manager.
For the Ubuntu Guest example setup, the installation media should be located at /hv/iso/ubuntu.iso. Use the mv command to rename your existing .iso file if required.
mv /hv/iso/copiedUbuntuISOname.iso /hv/iso/ubuntu.iso
hv_open_example ubuntu_rtlinux
hv_sync_example ubuntu_rtlinux
cd /hv/guests/guestubuntu
Prior to installing the guest, we need to configure the respective virtual machine (e.g. number of CPU cores, network settings etc.).
The configuration files guest_config.sh and usr_guest_config.sh are located in the guest folder (e.g. /hv/guests/guestubuntu).
The meaning of each configuration setting is explained in detail in those files.
You need to edit these files and adjust them according to your needs and environment.
Caution
You must not change the guest_config.sh file (the content may be overwritten by the System Manager), instead uncomment the respective settings in usr_guest_config.sh.
The number of CPU cores must not exceed the number of physical cores available in the system and not assigned to Real-time guests. For example, if on a quad core CPU, you need 2 cores for Real-time guests, the number of cores for the Ubuntu guest must not exceed 2. The default parameters should fit for most cases.
mousepad /hv/guests/guestubuntu/usr_guest_config.sh
# Adapt following lines to your system and needs:
vmname=...
vmid=...
windows_guest=0 # 0 if guest is not Windows (e.g. Ubuntu), 1 for Windows
cdrom_iso=...
num_cpus=...
ramsize=...
hdsize=...
shutdown_timeout=...
perfmon=...
You have to set the cdrom_iso parameter to the appropriate folder where the installation media ISO file had been copied before.
By default, the network connection is set up automatically (using DHCP). Please check the Hypervisor Manual for other settings.
Caution
Automatic network setting will only work, if the Ethernet cable is connected!
Caution
Please do not configure more CPUs than physically available (CPUs used for the Real-time OS are not available for the Ubuntu guest).
Example: The maximum number of of CPUs on a quad-core CPU where 1 CPU is used for the Real-time OS is 3.
Caution
Please do not configure more RAM than available. The VM may unexpectedly crash if too much RAM is configured. You can determine the available RAM as follows:
cat /proc/meminfo | grep MemAvailable
4. Guest installation
After VM configuration you need to start the guest for the first time. The guest console will be shown then (the guest output or desktop).
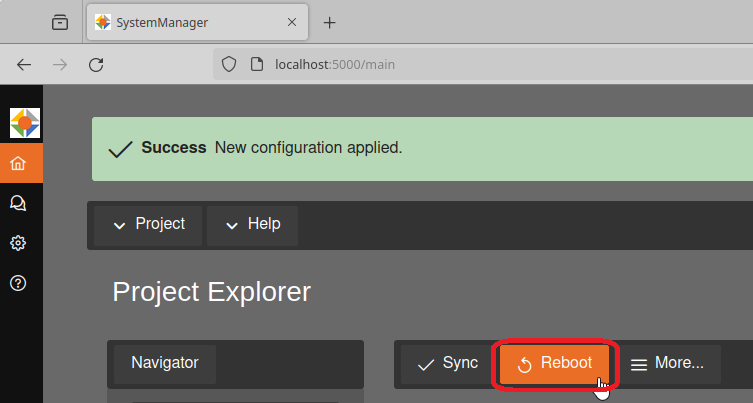
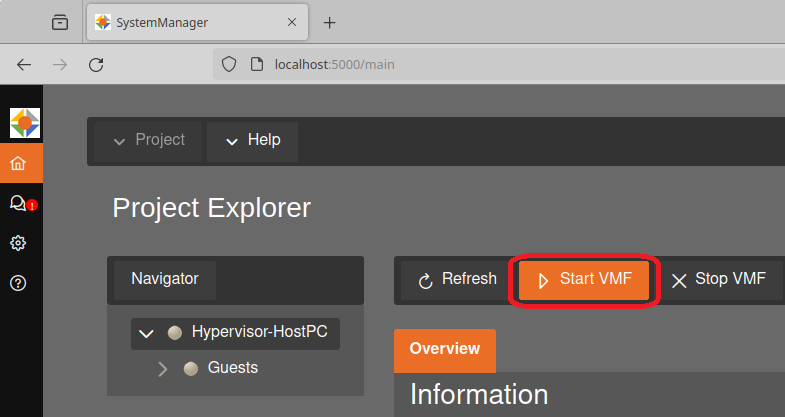
Change to Run mode.

Start the Virtual Machine Framework (VMF). Starting the VMF will load the configuration for all guests. Real-time guests can only be launched when the VMF is running.
Ubuntu Example guest in the Navigator on the left side.Start Guest Button.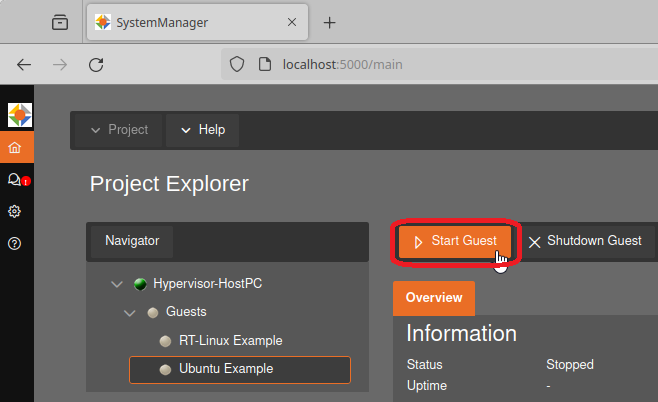
More.../Start Guest Viewer to open the guest viewer, where you can see the Ubuntu guest’s output or desktop.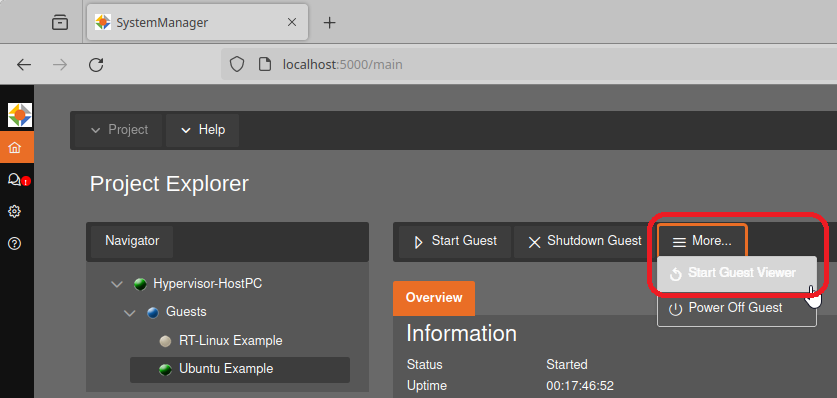
Optional: The Ubuntu guest operating system can be launched using the command line interface, too.
cd /hv/guests/guestubuntu
hv_guest_start -view
The installation media iso file will be detected by the virtual bios, you need to press a key to boot from it:

Hint
In case no key was pressed in time or the installation media was not found, the EFI shell will be started.
Option a) You can enter the BIOS by entering
exit. Once you leave the BIOS the boot begins again and you can press a key to boot from CD.- Option b) You can manually start the CD’s bootloader by entering
$ FS0:$ \EFI\BOOT\BOOTX64.EFI
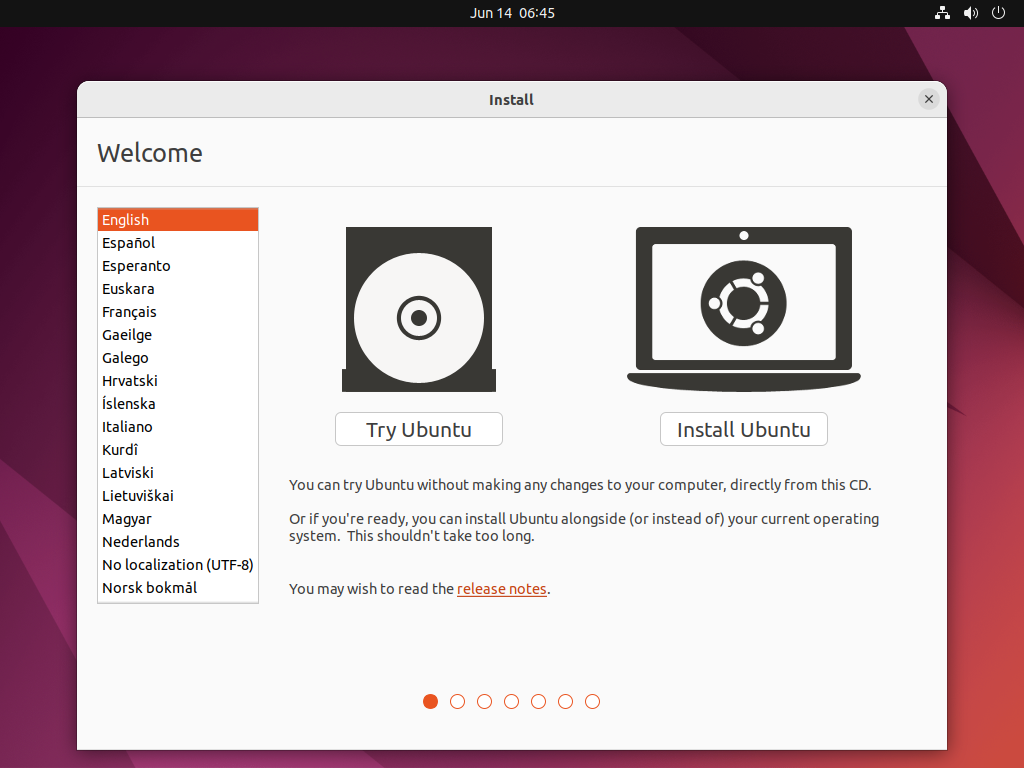
5. Ubuntu Installation
Follow the steps as usual for Ubuntu. In this guide the default cases are used where applicable.
GRUB selection menu
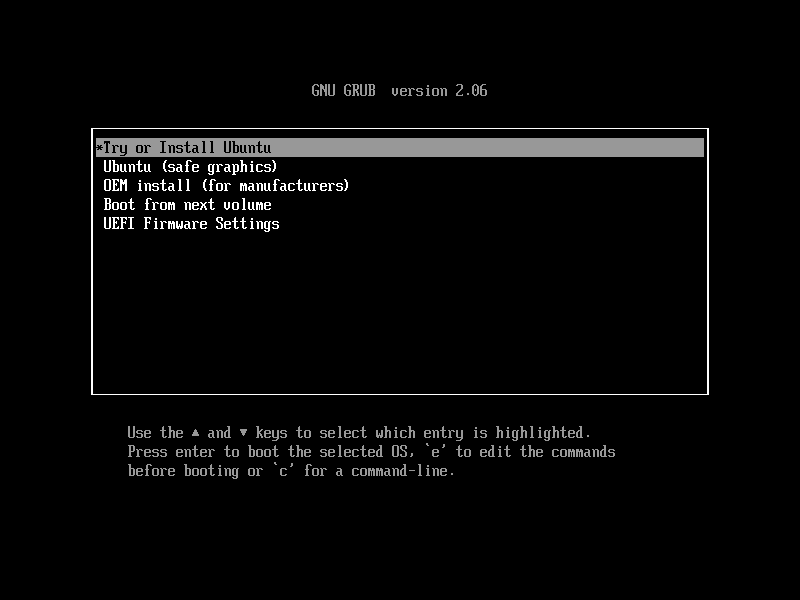
Fig. 5.1 Select
Try or Install Ubuntuat GRUB selection menu.Select Install Ubuntu
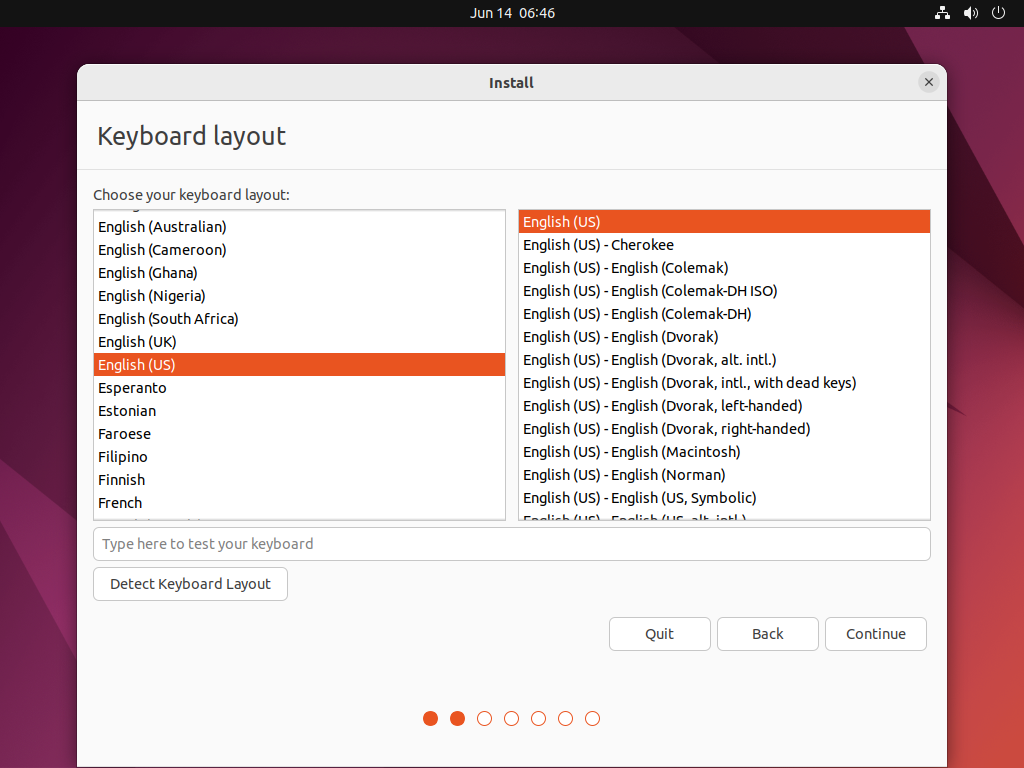
Select your Keyboard layout –> Continue
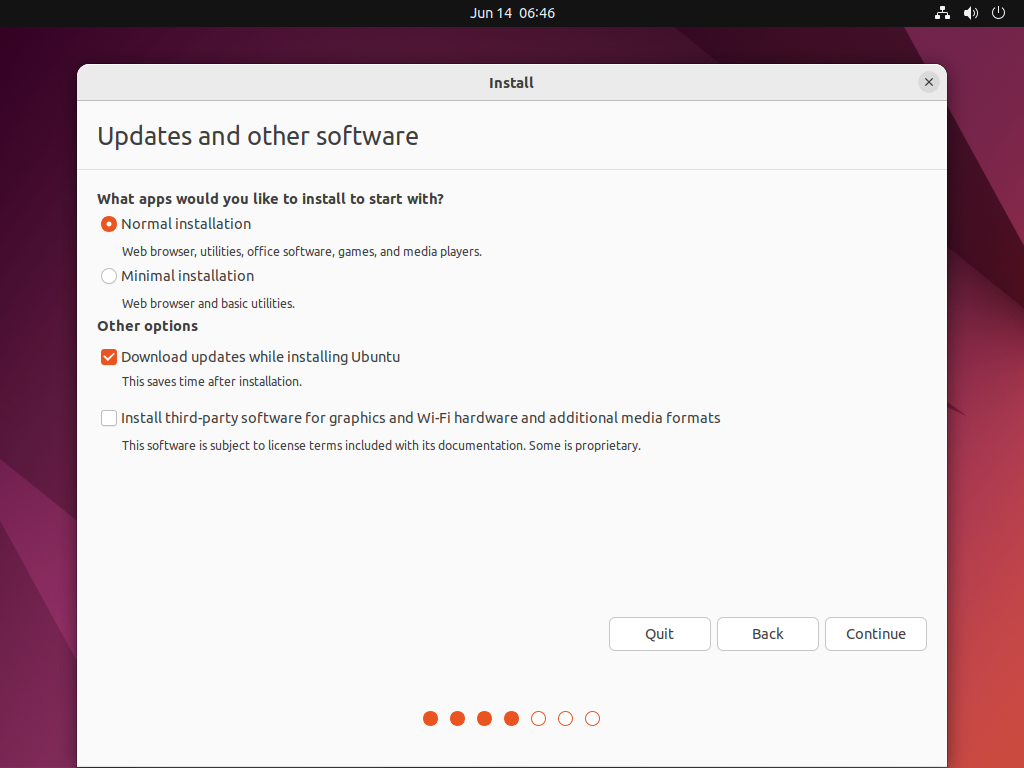
Updates and other software (default state) –> Continue
Installation type –>
Erase disk and install Ubuntu–> InstallNow
Fig. 5.5 Select
Erase disk and install Ubuntuat installation type page.Confirm
Write the changes to disks?dialog –> Continue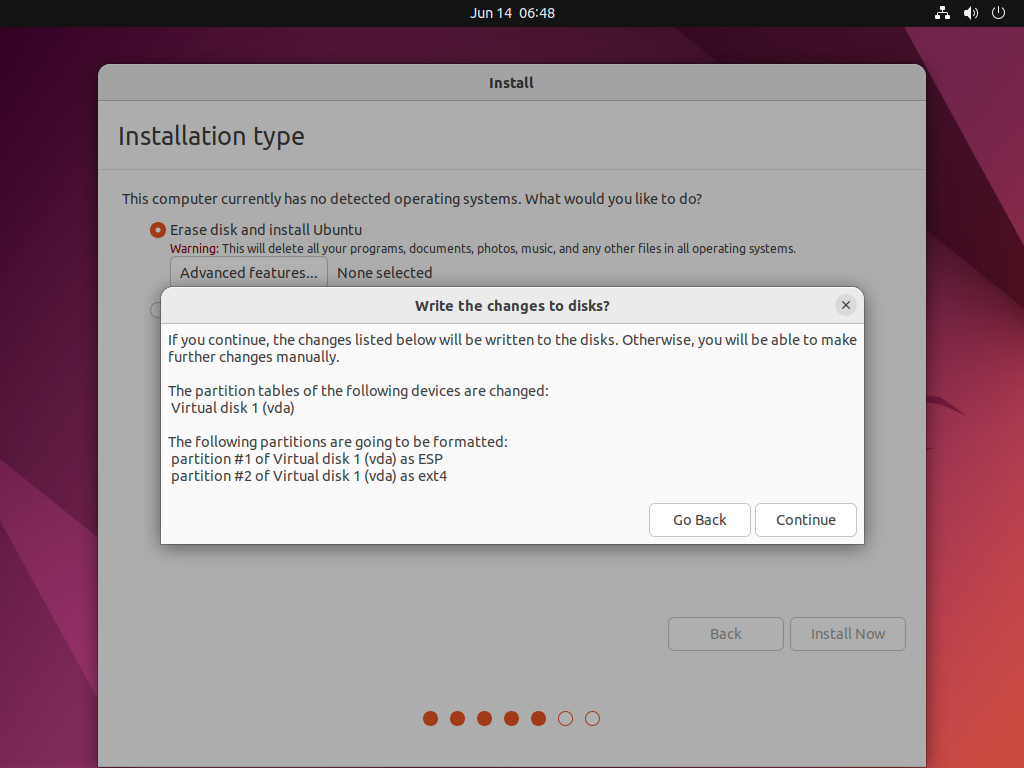
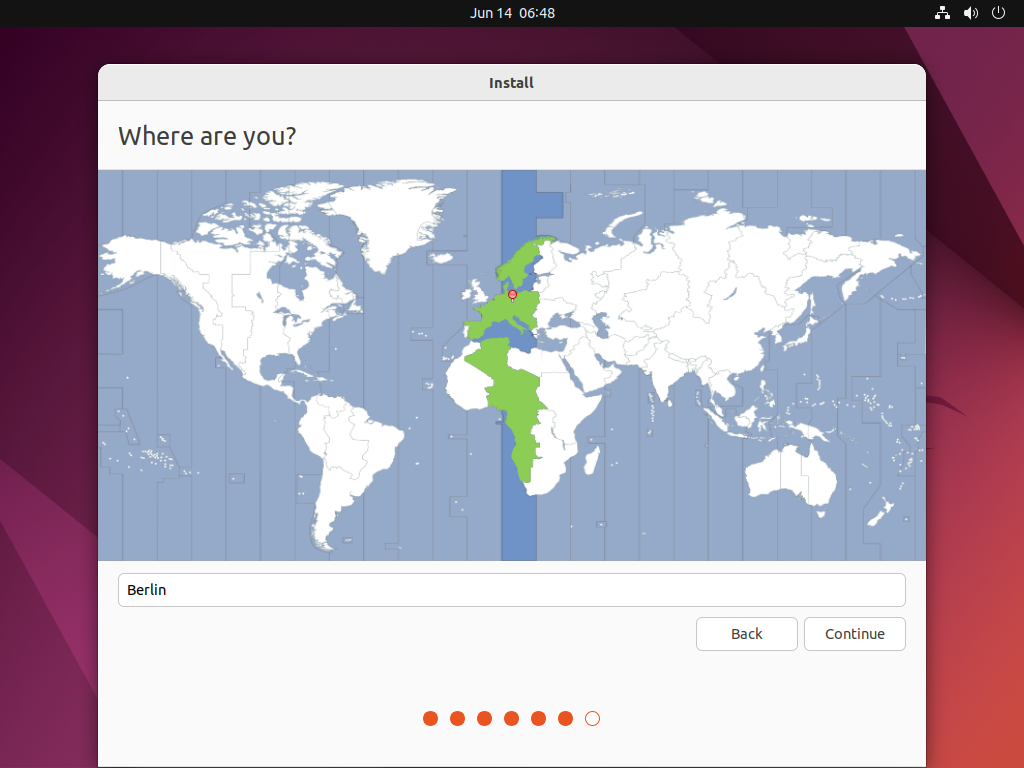
Where are you –> Continue
Create credentials –> Continue
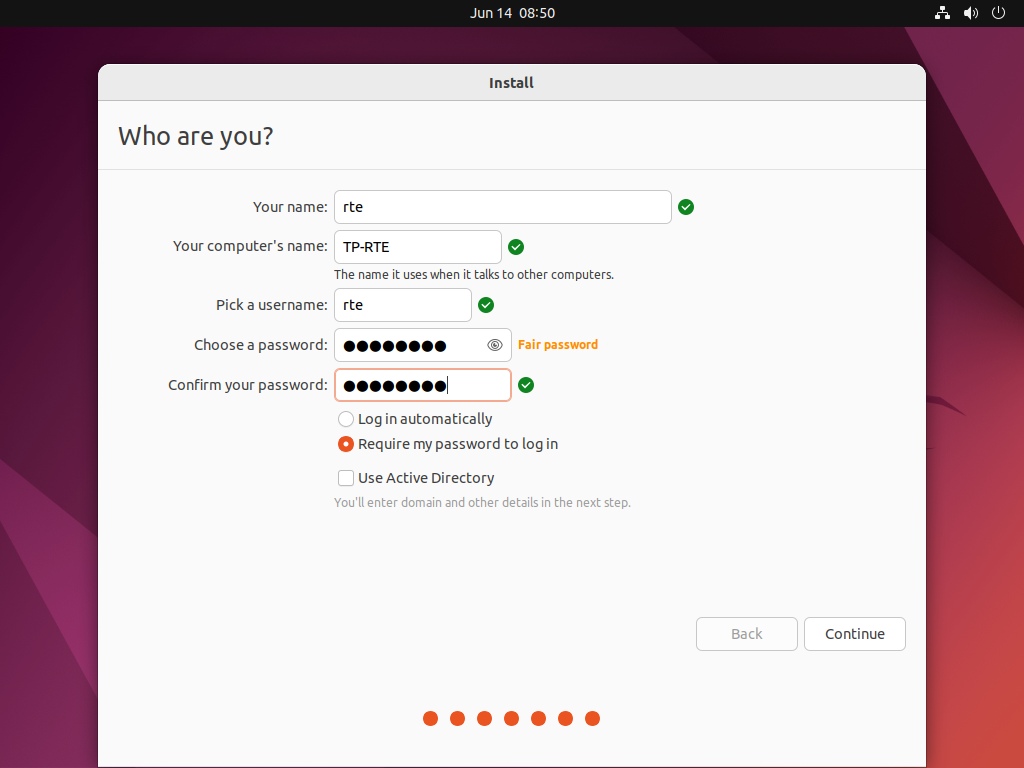
Hint
In this guide the default user used is rte. It’s recommended to supply a password.
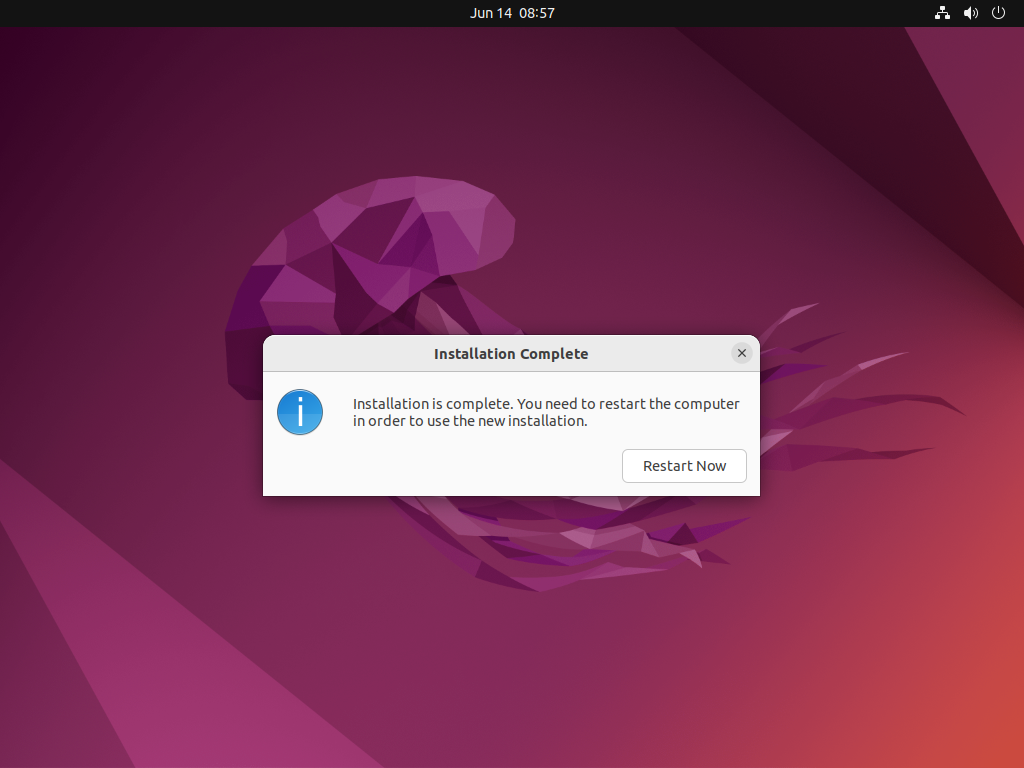
Restart –> RestartNow
Press enter –> ENTER

Login (in this guide we are using rte and the supplied password)

OPTIONAL Update guest –> InstallNow
- Shutdown UbuntuAfter successfully installing Ubuntu, you need to shutdown Ubuntu.
Important
You need to shutdown the guest (do NOT reboot Ubuntu!). If this is not possible inside the guest, please run
hv_guest_stopin the guest folder (/hv/guests/guestubuntu). You may power off the guest by runninghv_guest_stop -killin the guest folder.
6. Final Ubuntu Startup
The following steps should be executed once after Ubuntu has been installed.
6.1. System Manager Operation Case
Clear the “Installation media file” entry field to remove the .iso file, preventing the system from booting from the installation media again. You need to switch into Config mode first, then select the Ubuntu Example guest and finally clear this entry.
Hint
If you manually edited usr_guest_config.sh, you need to set cdrom_iso back to the empty string.
Then you need to synchronize the updated settings with the Hypervisor backend. Switch to the Hypervisor HostPC entry in the Navigator tab and press the
Syncbutton again.
A confirmation popup will then appear, where you need to click the ‘Apply’ button.
Change to
Runmode.
Select the
Ubuntu Exampleguest in theNavigatoron the left side.Click the
Start GuestButton.
6.2. Command Line operation case
If you had set up the example project via the command line, then you will have to manually adjust the configuration again. You need to remove installation media file setting in the configuration and reboot the Ubuntu example guest using the command line instead of the System Manager.
Adjust the file
usr_guest_config.sh(to avoid booting the installation media again)mousepad /hv/guests/guestubuntu/usr_guest_config.shcomment "cdrom_iso" with #
Start the Ubuntu guest
hv_guest_start -view
6.3. Ubuntu specific notes
Hint
Due to hardware changes, Ubuntu may automatically reboot once. Mouse and desktop may still not work properly. In this case, please install all of the latest Ubuntu updates.
7. Debian 12
In this section some recommendations can be found for setting up a Debian 12 Linux guest after finishing the installation.
7.1. sudo
Very often, you will need to run applications using root privileges. This can be accomplished by running these commands with the sudo prefix. If you enabled the root user when installing Debian 12, this is not enabled. Follow these steps to enable sudo support:
su - # switch to root user, need to type in the root password
nano /etc/sudoers
# add the following line at the end of the file
hvuser ALL=(ALL) ALL
7.2. PATH
Various management commands (e.g. for the network configuration) are located in /usr/sbin. By default, this folder is not included in the PATH variable.
Add this to the PATH variable by editing the ~/.bashrc file:
nano ~/.bashrc
# add the following line at the end of the file
PATH="$PATH:/usr/sbin"
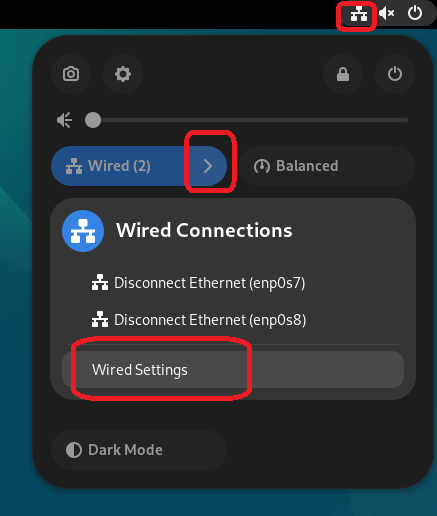
7.3. Network Configuration
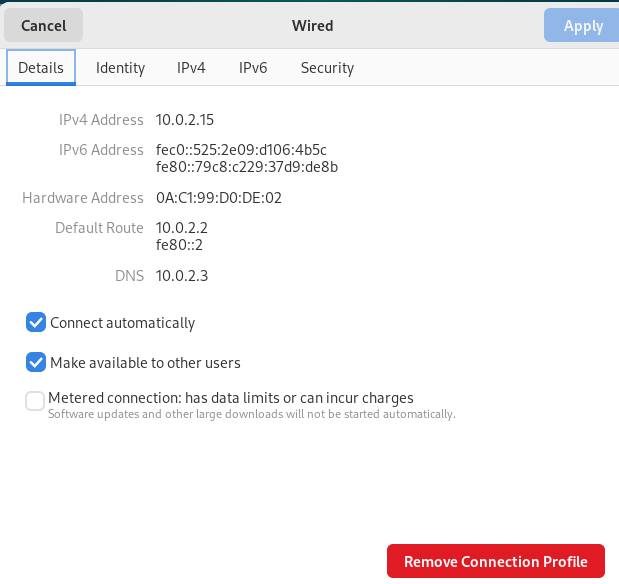
It is recommended to re-create the network connection profiles in a first step. Open the Network Manager and select Wired Settings:
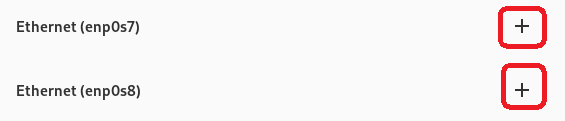
Remove the existing Connection Profiles for all Ethernet devices:
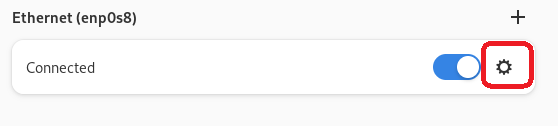
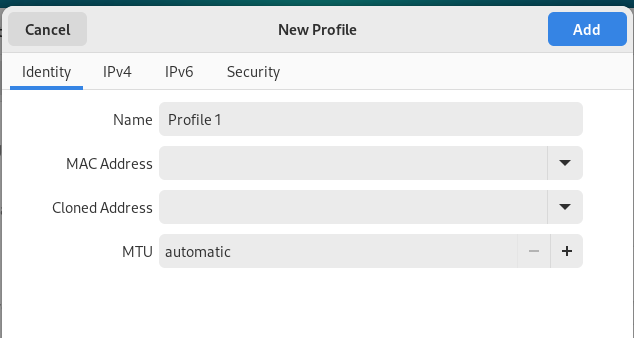
Create new Connection Profiles for all Ethernet devices. You may keep automatic or manual settings for IPv4 and IPv6 in the respective tabs:
Check, if you can now connect to the Internet.
ping -c 3 8.8.8.8
ping -c 3 www.acontis.com
The first ping command should always work as long as the Hypervisor host can connect to the Internet. If the second ping does not work, you need to manually enter the DNS address into the /etc/resolv.conf file (add a new nameserver entry):
sudo nano /etc/resolv.conf
nameserver 8.8.8.8
You may also install the resolver service if you are using DHCP:
sudo apt install systemd-resolved
7.4. Virtualization Packages
For a better user experience (e.g. copy/paste from and to the VM) you need to install the following packages and then reboot the VM.
sudo apt install spice-vdagent qemu-guest-agent
sudo reboot
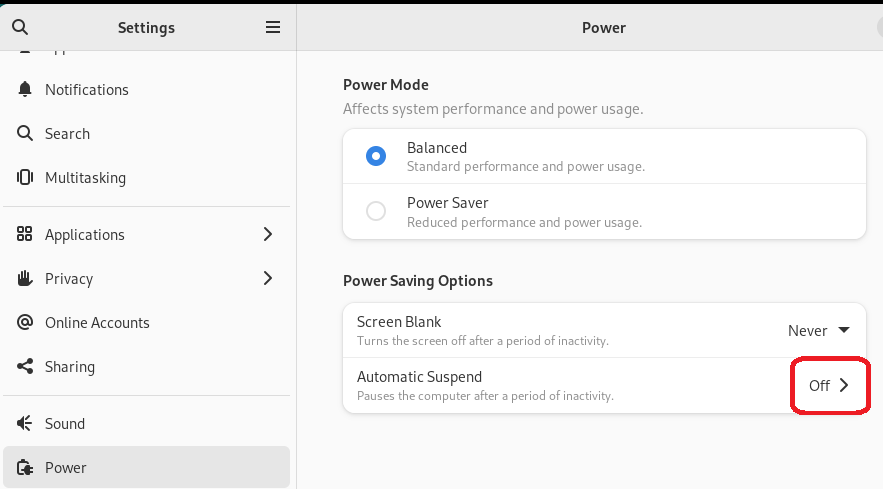
7.5. Turn off Power Saving
Power Saving is not properly supported by the Hypervisor host. To avoid issues, please turn off Automatic Suspend in the Power Saving Options
8. RTOS Communication Support
8.1. Installation
To communicate with an RTOS via the Hypervisor we need to run install_attach.sh which will install the required drivers and packages.
The installation is provided in a mountable directory. To access this directory we need to install the network client software (cifs-utils) and mount the SMB drive from QEMU where the installation is located.
Open a console prompt in the Ubuntu guest and enter the following:
sudo apt-get update
sudo apt-get install cifs-utils
sudo mkdir /mnt/qemu
sudo mount -t cifs //10.0.2.4/qemu /mnt/qemu -o guest
sudo /mnt/qemu/files/LinuxTools/install_attach.sh
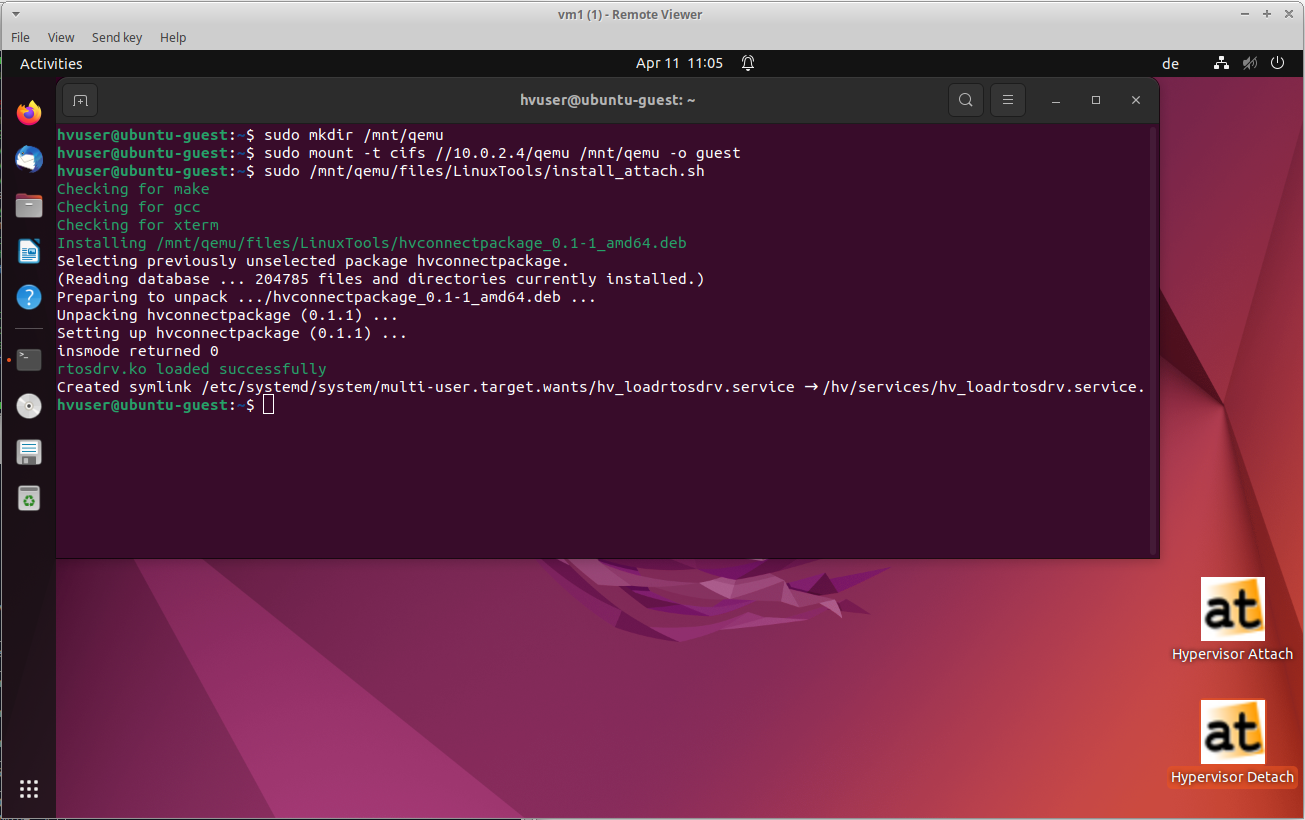
With the installation process, the directory /hv is created. This is where all the essential binaries and files, required for the hypervisor in the Ubuntu guest environment, are stored.
Hint
If you encounter problems like hvconnectpackage depends on <package-name> when running the command install_attach.sh, you may have to install missing packages.
Read the messages to see which package is missing. Then install the missing package. Before you can call install_attach.sh skript again you must first remove the aborted installation.
Step 1: Run Ubuntu console
Step 2: Input the command in the window:
sudo dpkg -r hvconnectpackageand press Enter.Step 3: Input the command in the window:
sudo apt install <fill in missing packages here>and press Enter.Step 4: Input the command in the window:
sudo /mnt/qemu/files/LinuxTools/install_attach.shand press Enter.
8.2. Load the driver at startup
With executing install_attach.sh in the previous chapter a service to load the driver ist installed. This service triggers the execution of the script /hv/bin/load_rtosdrv.sh. The purpose of this script is to verify the compatibility of the driver, recompile it if necessary, and then initiate it. This process guarantees the ability to load the driver even in the event of an operating system update.
Hint
For enabling communication between the Hypervisor Host and other RTOS systems on the hypervisor the driver /hv/bin/rtosdrv.ko needs to be loaded. To accomplish this you can start the service manually with /hv/bin/load_rtosdrv.sh or link the service /hv/services/hv_loadrtosdrv.service to the autostart function and enable it.
With executing install_attach.sh the service to load the driver ist alreadey installed. If needed you can do this manually by open a console prompt in Ubuntu guest and enter the following:
sudo ln -s /hv/services/hv_loadrtosdrv.service /etc/systemd/system/hv_loadrtosdrv.service
sudo systemctl start hv_loadrtosdrv.service
sudo systemctl enable hv_loadrtosdrv.service
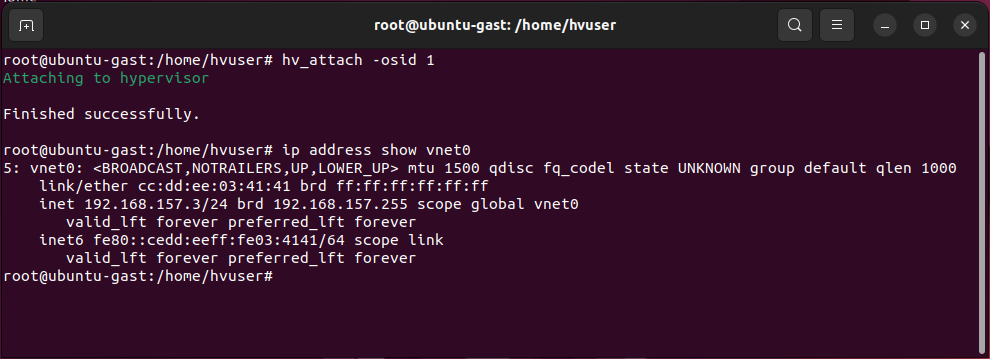
8.4. Verify installation
To verify whether the installation was successful, you can invoke the driver with the command hv_attach -osid <OSID>. The needed OSID was set with export rtosOsId=<OSID> in guest_config.sh when installing the Ubuntu guest. If hv_attach responds with ‘Finished successfully’, it indicates that the driver was correctly loaded and a connection was successfully established.
In this case, you can also check if a virtual network has been set up using ip address. Here you should see a vnet address.
9. Ubuntu and Real-time guest in parallel
In this step, we will run Ubuntu and Real-Time Linux in parallel.
Shutdown
Ubuntu, do NOT reboot!Run the
Real-Time Linuxguest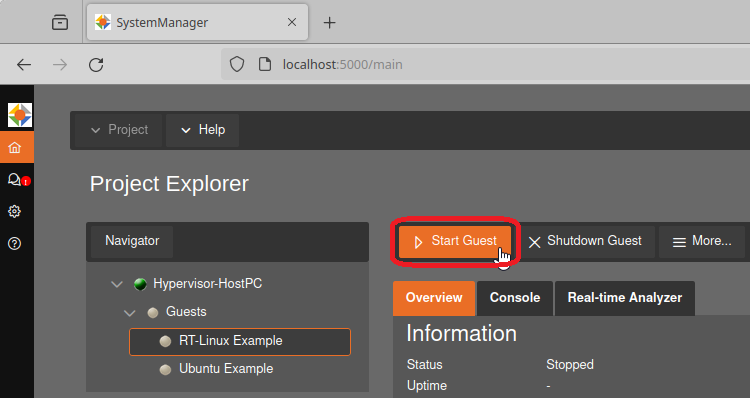
Start the
Ubuntuguest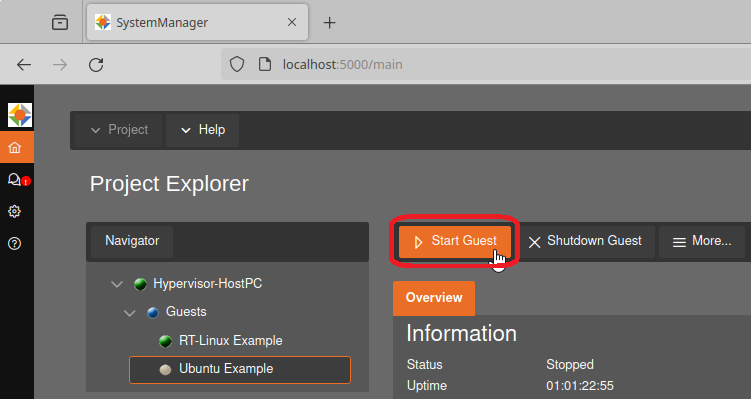
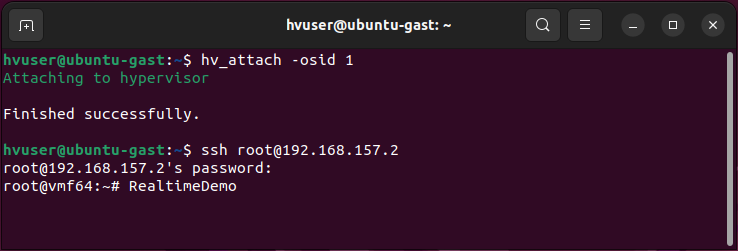
- After logging in into Ubuntu, execute “Hypervisor Attach” (Desktop icon)or open a shell and call
hv_attach -osid OSIDThe required OSID is shown in the System Manager settings of the Ubuntu Example Guest

To open the RT-Linux shell in Ubuntu guest: execute
ssh root@192.168.157.2in Ubuntu shell
Hint
With hv_attach, the driver establishes a virtual TCP/IP connection to the Hypervisor Host and the initiated RTOS systems on the hypervisor using the built-in rtosvnet driver.
The IP Address is configured in guest.config:
[Rtos2\Vnet\0]
"IpAddress"="192.168.157.3"
"MacAddress"="AA:BB:CC:DD:EE:03"
Log into
Real-Time Linuxand run the Real-time demo:vmf64 login: root password: root RealtimeDemo