2. Installation and basic configuration
The hypervisor has to be installed onto an empty installation media. It is directly booted from the BIOS. Side-by-side installation with an existing Windows or Linux is not recommended, but possible. If an existing Windows or Linux system shall be used, assure a free partition for booting the hypervisor is required. The minimum required size for the installation media is 10 GByte.
2.1. USB stick boot medium creation
We simply recommend the Rufus tool to create the boot medium stick.
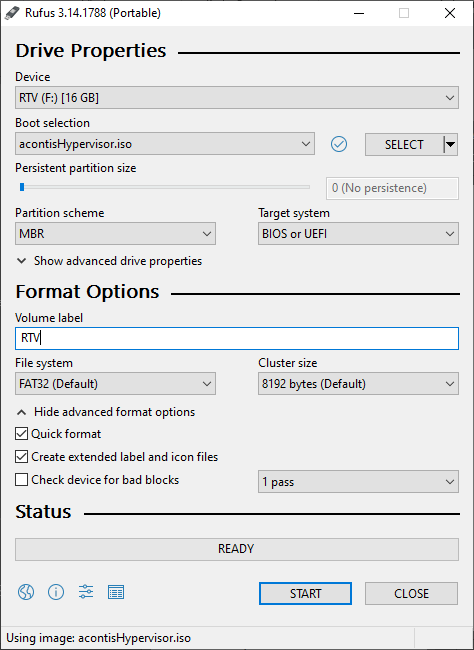
Fig. 2.1 Settings to create an acontis Hypervisor BOOT stick.
2.2. Installation
Currently, a light-weight Ubuntu derivate (Xubuntu) is used for hypervisor installation. Select Install Xubuntu to install the Hypervisor, other options are not supported.
A user account must be created while installing the hypervisor.
Note
A password MUST be defined!
After the installation has finished, you have to reboot the system;
Follow the installation instructions.
After reboot the default entry Ubuntu is selected, keep this and do not boot the Hypervisor entry. This entry will be activated automatically after the first-time configuration.
2.3. For your convenience
It’s recommended to access the hypervisor system through xrdp, if a Windows development PC is used. It’s easier to copy-paste the successive shell commands through (x)RDP.
The following steps must be done in case of xrdp:
Open shell (right click on desktop and select ‘Open Terminal here’ or press CRTL + ALT + T)
sudo apt-get update
sudo apt-get upgrade
sudo apt-get install xrdp
sudo adduser xrdp ssl-cert
sudo systemctl restart xrdp
sudo ufw allow 3389
sudo apt-get install xorgxrdp-hwe-18.04
2.4. Basic system configuration
Open shell (right click on desktop and select ‘Open Terminal here’ or press CRTL + ALT + T)
Next step we need the memory assignment (rtos-depend!) through the autoconf script:
cd /hv/config
sudo ./autoconf.sh 64 8
The first parameter of the autoconf.sh describes the amount of assigned memory of the Rtos and the second one the shared memory pool size in MB.
Caution
If you get the message WARNING: CPU frequency not stable... through the execution of the autoconf.sh script, you did not properly disable power settings in the BIOS.
Please follow the respective instructions above (Prerequisites).
A second run of the autoconf script may help in that case after! a reboot.
2.5. Setup processor count
The setup of our hypervisor assigns the last core automatically to the Rtos. In a multi OS enviroment more than the last core is needed by the Rtos’es. In this case for each additional Rtos 1 core is subtracted from the remaining count for the hypervisor.
Edit grub configuration:
gedit /etc/grub.d/40_custom
Search entry linux /boot/... and adjust parameter maxcpus to maxcpus=2. This is the default value in our example configuration (quad-core) in this tutorial.
For a quad-core CPU the first 2 cores are assigned to the hypervisor and the next 2 cores each to 1 Rtos.
Update grub:
sudo update-grub
2.6. Setup memory.config
The file memory.config describes the memory distribution of the hypervisor and the guest OS. The supplied values are in hex.
sudo gedit /hv/config/memory.config
Change entry [Rtos] "MemorySize" to value 2000000
 [Rtos]
     "MemorySize"=dword:2000000              ; 1st RTOS
 [Rtos-End]
2.7. Setup cpu.config
The file cpu.config describes, which CPU core is assigned exclusivly to which Rtos. This is a bit mask (flags) and the supplied values are in hex.
sudo gedit /hv/config/cpu.config
The default in this tutorial is based on a quad-core CPU. Core 1 and 2 are assigned to the Hypervisor (0x3), core 3 to RTOS2 (0x4) and Core 4 to RTOS (0x8).
;-----------------------------------------------------------------------
; HV guest and Windows guest
;-----------------------------------------------------------------------
[Windows]
  "ProcessorMask"=dword:3      ; 0x3 = 0011b = core 0 + core 1 to hypervisor

;-----------------------------------------------------------------------
; RTOS
;-----------------------------------------------------------------------
[Rtos]
  "ProcessorMask"=dword:8      ; 0x8 = 1000b = core 4 to RTOS      (bit mask, bit 0 = core 0, bit 1 = core 1, ...)

[Rtos2]
  "ProcessorMask"=dword:4      ; 0x4 = 0100b = core 3 to RTOS2     (bit mask, bit 0 = core 0, bit 1 = core 1, ...)
2.8. Setup hwdevbase_rtos2.config
Caution
This section shouldn’t be modified - only in special cases!
sudo gedit /hv/config/hwdevbase_rtos2.config
Change all entries (at least 4 occurences) of [...\Rtos2\...] "Destination" to value 0x4.
Example:
 [Devices\Rtos2\RTOS Local Apic Timer\Interrupt\1]
     "Type"=dword:2
     "Id"=dword:1A
     "LocalApicType"=dword:0
     "DestinationFormat"=dword:0
     "Destination"=dword:4
     "Vector"=dword:F6
2.9. Reboot system
To get the changes effective, a reboot is required:
sudo reboot