1. Introduction
EC-Win(RT-Linux) (hereinafter referred to as “EC-Win”) is a bundle of the acontis EtherCAT-Master Stack (EC-Master) for RT-Linux and the acontis LxWin real-time extension for Windows 7 / 8 / 10 / 11 (32-Bit / 64-Bit).
The acontis LxWin enables RT-Linux to share a single computer with a Microsoft Windows desktop operating system while maintaining RT-Linux hard real-time determinism and performance. Both operating systems operate independent from each other, and, therefore, RT-Linux operation is immune to desktop Windows exceptions and faults.
The acontis EC-Master for RT-Linux is a full featured high performance EtherCAT Master Stack. EC-Master provides hardware drivers for several Ethernet Controllers (Intel / Realtek). By using of the so-called Optimized Link Layer’s EC-Master can access the Ethernet Controller directly and offers outstanding real-time performance.
This document gives you an overview about the EC-Win software bundle. In this document, a step-by-step walkthrough is given how to setup the LxWin real-time extension and get our EtherCAT example program (“EtherCAT demo”) running under RT-Linux. In the last chapter, we give brief instructions how the shipped SDK examples can be built with Visual Studio.
The EC-Win package comes with the following components:
- Real-time extension runtime
Kernel driver for virtual network adapter between Windows and RT-Linux
Kernel driver to assign hardware resources to the real-time OS (RT-Linux)
Virtual Machine Framework (Runtime shared by Windows and RT-Linux
Ready to Run RT-Linux OS Image + SDK.
- SDK’s for the real-time extension and the EC-Master
Libraries and header files for developing your own C/C++ applications, using our RTOS framework. E.g., you can develop applications that can communicate between Windows and RT-Linux through shared memory and signals.
Libraries and Header files for developing your own C/C++ EtherCAT-Master application that can drive an EtherCAT bus.
User mode drivers (EtherCAT Optimized Link Layer’s) for Intel and Realtek PCI or PCI-Express Ethernet Controllers.
EC-Master Class-A Add-On Package (Provides the following EC-Master features: Distributed Clocks, Distributed Clock Master Synchronization, EoE, VoE and AoE)
Extensible demo applications and examples (under
SDK/examples)
- Tools and Utilities
EC-SlaveTestApplication (EC-STA). This is a powerful test and monitoring tool that can be very helpful during development of EtherCAT applications and hardware (under
Bin/Windows/x86/ECSlaveTestApp.exe).System Manager. This is the primary configuration tool for EC-Win.
1.1. Documentation
For introductive information about the EtherCAT technology and EC-Master please read our EC-Master_QuickStart_Guide.pdf.
The EC-Master user’s manual (EC-Master_ClassB.pdf) provides detailed information about EC-Master in general and describes the EC-Master API.
The EC-Master Class-A Add-on manual EC-Master_ClassA.pdf provides detailed information about advanced EC-Master features like Distributed Clocks, Distributed Clock Master Synchronization, EoE, VoE and AoE.
For detailed information about the real-time extension (LxWin), please read the LxWin.pdf manual.
The LxWin API is described in the RtosVM-UserManual.pdf document.
1.2. Architecture of EC-Win
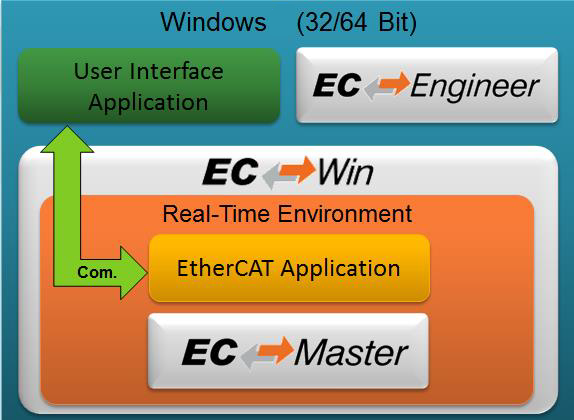
Fig. 1.1 High level diagram of the EC-Win architecture
Description of the Components:
Windows 7 / 8 / 10 / 11 (32/64 Bit): All applications are non-deterministic. We support Windows 7 / 8 / 10 / 11 (32-/64-Bit).
User Interface Application: An optional Windows application that uses the real-time extension API to communicate with the real-time (RT-Linux) part.
EC-Engineer is the EtherCAT configuration and diagnosis tool from acontis (https://www.acontis.com/en/ecdownloads.html). It is an extensible alternative to the Beckhoff ET9000 tool. You will need a configuration tool for generating the EtherCAT Network Information File (ENI, according to ETG.2100) from the EtherCAT device description files (ESI). The ENI is the input configuration to the EC-Master.
Real-Time Environment: Real-time part running on separate real-time platform (RT-Linux). Our real-time extension can be setup so that Linux-RT runs on an exclusive CPU, in a SMP system or shares CPU/CPU‘s with Windows.
EtherCAT Application: E.g. motion control application that drives the EtherCAT bus, using the EC-Master. In the next chapter we describe how our EtherCAT example application can be used as a starting point / template for an own application.
EC-Master: EtherCAT master stack for RT-Linux.
Visual Studio is used for development/debugging of the Windows and real-time (RT-Linux) part.
2. Getting Started - step-by-step tutorial
This manual will guide you through the following steps:
Hardware/Software setup including the Intel PRO/1000 network adapter, several EtherCAT slaves. (See Chapter Prerequisites)
Scan the EtherCAT network and configure the network. (See chapter Network configuration: creating the ENI file)
Bring the network into operational mode. (See chapter Run the demo application in operational mode)
Create and Debug the master stack demo application using Visual Studio. (See chapter Build and run EC-Master demo using Visual Studio)
Important
It’s recommended, that the default paths, which are mentioned in this document, are used.
Important
This tutorial is using primarily RT-Linux 32-Bit. The same applies to the RT-Linux 64-Bit with architecture-specific adjustments (like sub-paths, etc.).
2.1. Prerequisites
2.1.1. The following acontis products must be installed on the PC:
LxWin V7.1.0.01 or above
EC-Master for EC-Win(RT-Linux) V3.1.0.18 or above
EC-Engineer V3.3.3 or above
LxWin: The default installation path is
C:\Program Files\acontis_technologies\LxWin\
EC-Master for EC-Win(RT-Linux): Please extract the content of the zip file into
C:\Program Files\acontis_technologies\EC-Master_ECWinRT-Linux\.
EC-Engineer: The default installation path is
C:\Program Files (x86)\acontis_technologies\EC-Engineer
2.1.2. The following third party products must be installed on the PC:
plink.exe
plink.exe is a command-line tool which used to start EC-Master demo application on Linux remotely using SSH protocol.
It is part of the PuTTY package, you can get latest version from the official download page.
The batch scripts assume that plink.exe is part of the PATH environment (and it can be called without using the full path).
If necessary, the directory where plink.exe is located should be added to the PATH environment variable.
Caution
The very first time when a ssh connection to an unknown destination is made an user action will be required!
plink.exe will ask for saving the SSH key into its cache!
2.2. Setup the Real-time Extension Runtime
This chapter describes how to setup the basic parameters of the real-time extension via the supplied System Manager tool. Start the System Manager, at the very first time you need to choose a place for the System Manager workspace. Selecting the default loction is recommended.
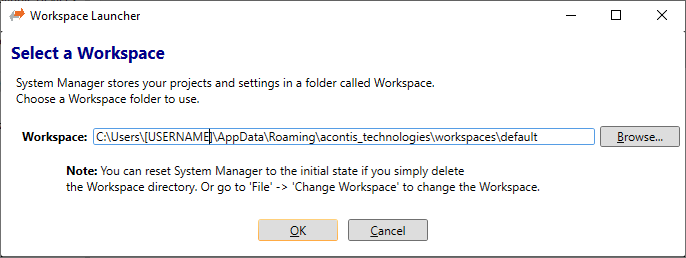
Fig. 2.1 Select the workspace.
Next step is Add RTOS. In this example it’s Linux 4.9. After adding the RTOS switch to the CPU Assignment tree element.
If started first and Windows 10 32-BIT is used all available CPUs are assigned to Windows 10 and the first CPU is additionally assigned to RT-Linux. (Fig. 2.2) This CPU Assignment may be valid, however it isn’t recommended. To achieve a recommended CPU Assignment either assign all CPU’s to Windows, except the last one or use the Recommended button. The last CPU has to be assigned to Linux 4.9 (Fig. 2.3)
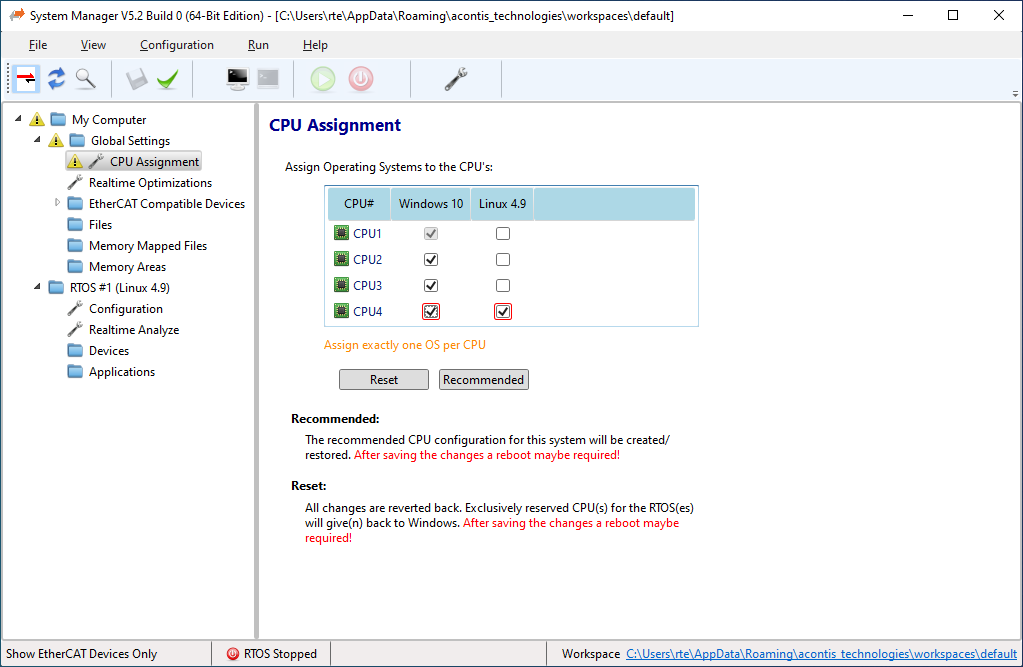
Fig. 2.2 CPU Assignment is yet invalid.
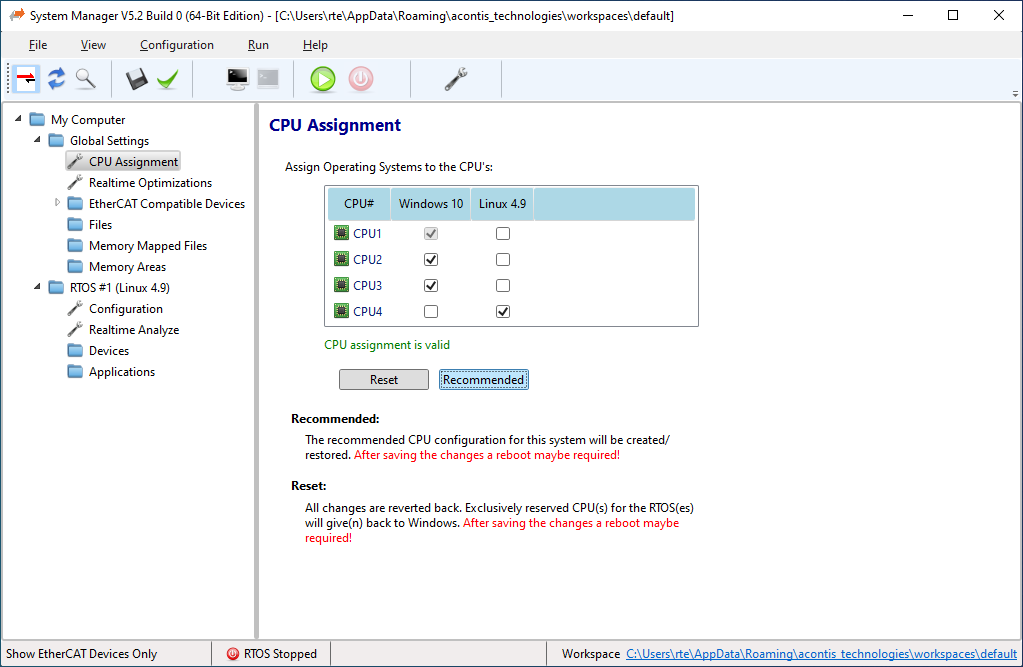
Fig. 2.3 CPU Assignment is now valid.
If Windows 7 / 8 / 10 / 11 64-Bit is used, the real-time part must use at least one CPU exclusively. To achieve this use the Recommended button. The CPU assignment will be changed in such a way that the real-time part has at least one CPU exclusively. After doing this the CPU assignment should be valid.
Important
The message beyond the CPU table is green and the CPU assignment is valid!
The System Manager will show a reboot message box, if some changes require a reboot after save settings has been pushed.
Hint
Press the Reset button to return all CPUs back to Windows, which were previously assigned to the RTOS.
2.3. Network Controller Setup
It is necessary to assign the Intel PRO/1000 network device to RT-Linux before attempting to run the EtherCAT example.
Hint
It is possible to use a Realtek network controller as well.
Reassignment of hardware in EC-Win is a two-step process: Isolate the device interrupts (usually not needed for EtherCAT) and install the EC-Win RtosPnp device driver. See also the RTOS VM User Manual for more information about real-time device management. The System Manager will do most of the work.
Please see the EC-Master user manual for a description of the two EtherCAT operation modes (Polling vs. Interrupt).
As the default operation mode in EtherCAT systems is polling (no interrupts) mode, the interrupt configuration can be skipped. Thus, interrupt mode description is not included here in this document.
2.3.1. Identify your Network Controller
The System Manager is aware of all available and supported network controllers. Please apply the following to identify a suitable/compatible network controller:
Open the System Manager.
Expand the Global Settings.
Expand the EtherCAT Compatible Devices.
Select the desired network adapter (if a compatible network adapter was found!)
Right click of the desired network adapter and select Assign to RTOS (Interrupt disabled).
Please see Fig. 2.4.
Hint
By default, the System Manager only shows EtherCAT compatible hardware. When selecting the “EtherCAT” icon in the icon bar all available devices that may be assigned to Linux will be shown.
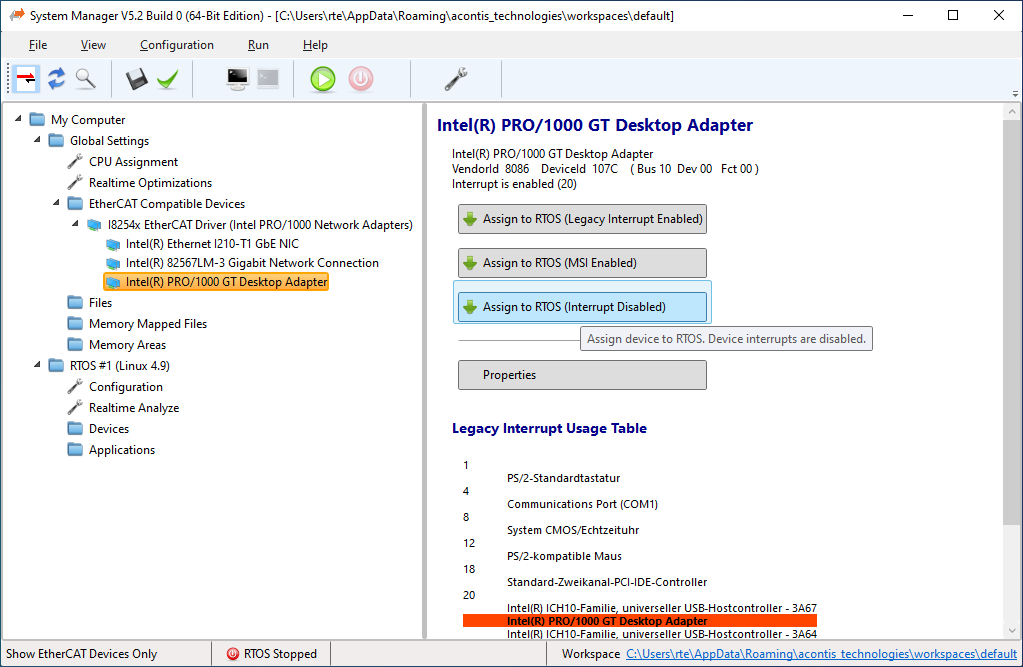
Fig. 2.4 Assign the device to the Rtos.
Note
After successfully assigning devices to the RTOS, they will be listed under the Real-time OS Devices tree node under the node Devices.
Warning
DURING ASSIGNMENT OF THE DEVICE A REBOOT MAY BE REQUIRED. IN THAT CASE RESTART THE SYSTEM MANAGER AFTER THE REBOOT AND CHECK IF THE DESIRED NETWORK CARD IS ASSIGNED CORRECTLY TO THE RTOS!
2.4. Copy the demo application
Copy all files in the .\Bin\Linux\x86 respective .\Bin\Linux\x64 folder of the EC-Win (RT-Linux) package into the RtFiles folder of your LxWin default workspace.
Example:
xcopy “C:\Program Files\acontis_technologies\EC-Master_ECWinRT-Linux\Bin\Linux\x86\*”
%HOMEDRIVE%%HOMEPATH%\AppData\Roaming\acontis_technologies\workspaces\default\RtFiles
or respectively for x64 Linux:
xcopy “C:\Program Files\acontis_technologies\EC-Master_ECWinRT-Linux\Bin\Linux\x64\*”
%HOMEDRIVE%%HOMEPATH%\AppData\Roaming\acontis_technologies\workspaces\default\RtFiles
2.5. EC-Win Architecture
The following diagram shows a typical EC-Win setup.
PC running EC-Win
GUI application and/or EC-Engineer running in Windows
Controller application running in RT Linux
Ethernet NIC connected with the ETherCAT network

Fig. 2.5 EC-Win setup.
3. Running the EC-Master Demo Application
3.1. Assumption
EC-Engineer and LxWin are installed on the same machine
3.2. Network configuration: creating the ENI file
We show how to create the EtherCAT network configuration that is needed to bring the master stack into operational mode.
Copy all files from
C:\Program Files\acontis_technologies\EC-Master_ECWinRT-Linux\Bin\Linux\x86(32-bit Linux) or respective\x64(64-bit Linux) into thertfilesfolder in your workspaceAssure the network adapter is assigned to Linux
Connect some EtherCAT slaves to the Ethernet port
Start LxWin and log in into the VIO shell. (The VIO shell is started automatically when LxWin is started).
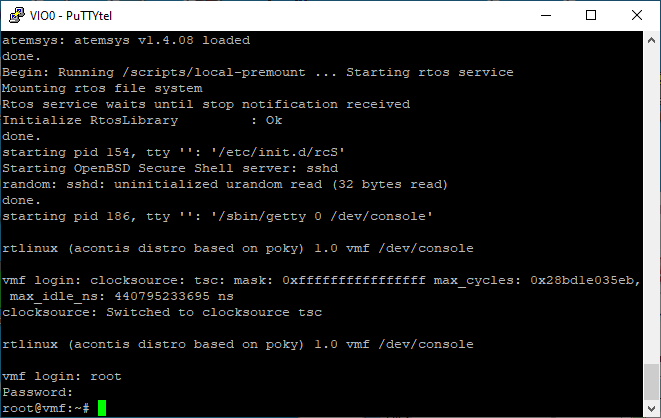
Fig. 3.1 VIO shell.
login: root
password: root
Change into the
rtfilesfolder (in shell):cd /mnt/rtfilesIf you run the master stack with the Intel Gigabit network adapter: start the demo (through shell):
./EcMasterDemo -i8254x 1 1 -sp 6000If you run the master stack with the Realtek Gigabit network adapter: start the demo (through shell):
./EcMasterDemo -rtl8169 1 1 -sp 6000If the master stack is up and running you can connect EC-Engineer running on Windows. For that purpose you need to select Remote Configuration in the main page, select Class A master and use the virtual network IP address:
192.168.157.2.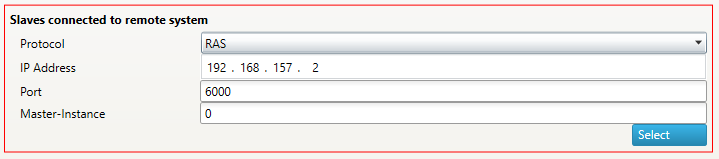
Fig. 3.2 Configure remote system.
You should no be able to connect to the master stack running within LxWin.
Right click the Class A Master in the left pane of EC-Engineer and select Scan EtherCAT Network
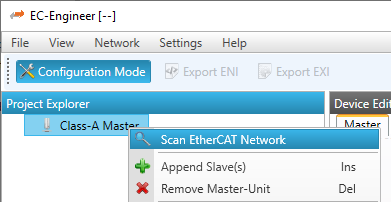
Fig. 3.3 Context menu of EC-Engineer.
After successfully scanning the network, please select Export ENI
Store the ENI file into the
rtfilesfolder of your workspace, use the nameeni.xml
3.3. Run the demo application in operational mode
After creating the ENI file according to the stepse before it is possible to bring the master stack into operational mode.
Restart LxWin and log in again or, in case it is still running, stop the EtherCAT demo application using CTRL – C command
Change into the
rtfilesfolder (in shell):cd /mnt/rtfilesIf you run the master stack with the Intel Gigabit network adapter: start the demo (through shell):
./EcMasterDemo -f /mnt/rtfiles/eni.xml -i8254x 1 1 -sp 6000If you run the master stack with the Realtek Gigabit network adapter: start the demo (through shell):
./EcMasterDemo -f /mnt/rtfiles/eni.xml -rtl8169 1 1 -sp 6000Reconnect EC-Engineer again
Now you can change into Diagnosis Mode
4. Build and run EC-Master demo using Visual Studio
Assumption: the system is set up according to the steps described in the previous part of this document
To create a Visual Studio project based on the EC-Master EtherCAT demo application, you should follow the basic steps described in the LxWin Manual (chapter 3.4, “How to work with Visual Studio”).
More information about the examples can be found in the related EC-Master documentation.
4.1. Visual Studio Project settings for the acontis EtherCAT master stack
The following settings show how to set include directories, libraries, and debug settings appropriate for the demo application shipped together with the acontis EC-Master EtherCAT master stack. It is assumed a VisualGDB project is created below the EcMasterDemo application shipped with EC-Master.
- Set Additional Include Directories:
..\..\..\..\SDK\INC
..\..\..\..\SDK\INC\Linux
..\..\..\..\Sources\Common
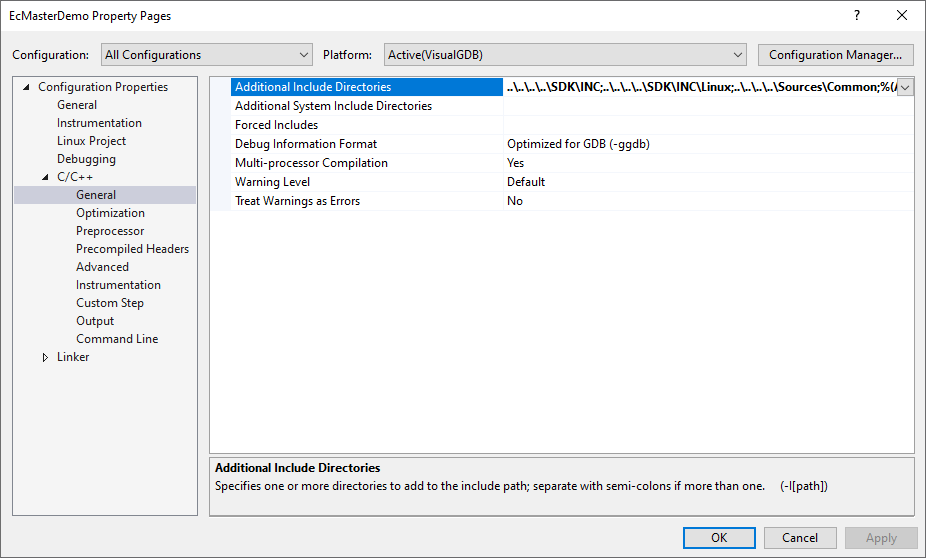
Fig. 4.1 Include Directories
- Library Search Directories:
..\..\..\..\SDK\Lib\Linux\x86
C:\Program Files\acontis_technologies\LxWin\SDK\lib\Linux\x86
Additional Library Names: EcMaster;AtemRasSrv;pthread;dl;rt;rtos
- Note:
EcMaster and AtemRasSrv libraries delivered with EtherCAT master stack.
Librtos.so delivered with LxWin product.
pthread, dl and rt are Linux system libraries
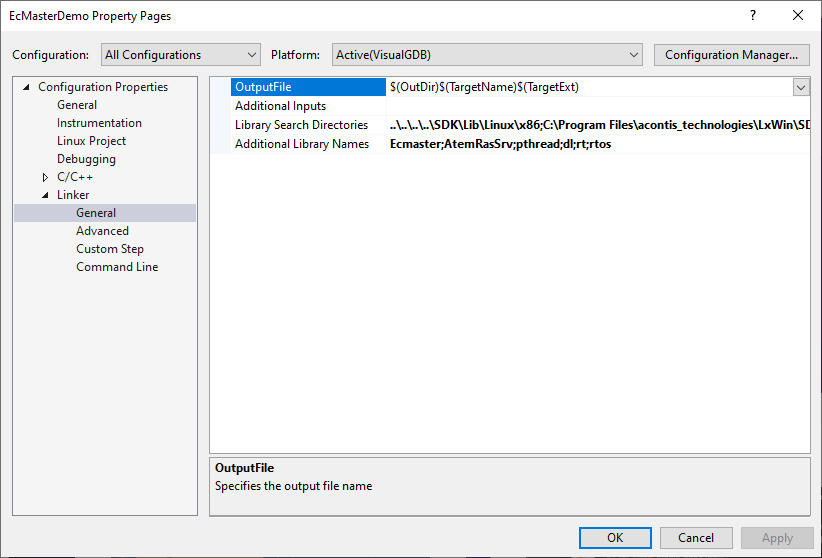
Fig. 4.2 Additional Directories
VisualGDB settings result:
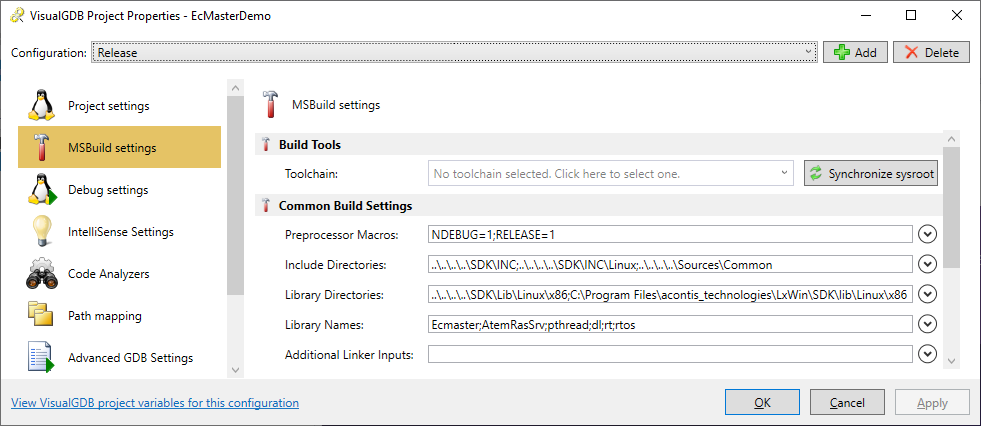
Fig. 4.3 VisualGDB Settings
VisualGDB Debug Settings
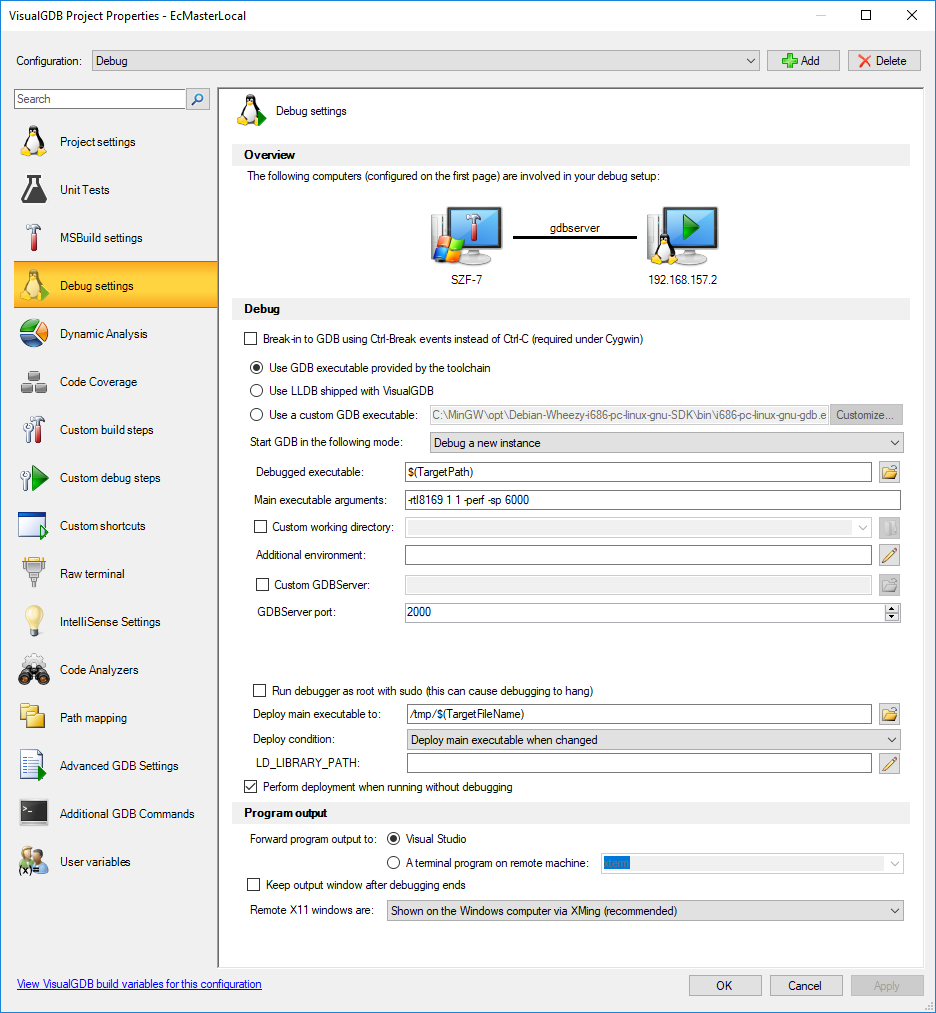
Fig. 4.4 VisualGDB Debug Settings
VisualGDB Custom debug step: copy shared object files to target
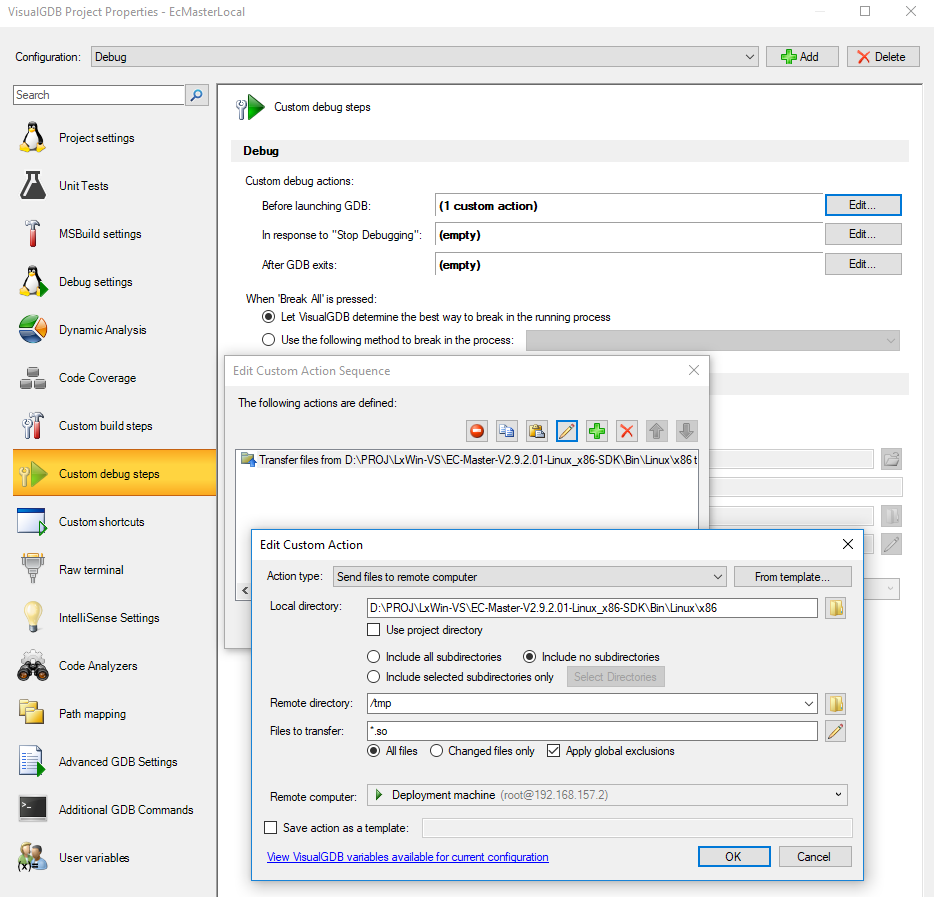
Fig. 4.5 VisualGDB Custom debug steps
When you debug the demo, you can stop debugging in Visual Studio or using Ctrl+C in console window.
4.2. Executing the demo from within Visual Studio
To execute the demo from within Visual Studio, the following steps have to be executed
Copy the ENI file (
eni.xml) into the appropriate location (e.g. into thertfilesfolder in your workspace). In that case, the command line parameter for finding the ENI file is-f /mnt/rtfiles/eni.xml.Set the appropriate command line arguments in the Debug settings dialog of VisualGDB.
Note
if you run the master stack with Intel Gigabit network adapter, the arguments for the demo application are
-i8254x 1 1. For Realtek Gigabit network adapter they are-rtl8169 1 1Example:
-f /mnt/rtfiles/eni.xml -i8254x 1 1 -perf -sp 6000
If the master stack is up and running you can connect EC-Engineer running on Windows. For that purpose you need to select the remote connection using the virtual network (IP address defaults to
192.168.157.2).