2. System Setup
2.1. Hardware Requirements
Ressource |
Recommended |
|---|---|
CPU |
Minimum:
Important Do not enable Hyperthreading. Important CPU must support VT technology! |
Memory |
4GB for host and RTOS + minimum 4GB for Windows (as a guest). |
GPU |
|
2nd GPU |
|
Disk Space |
50GB for host + minimum 50GB for Windows (as a guest). |
Hint
For installation purposes is it recommended to use an USB stick with at least 4GB. Further informations could be found at the quickstart guide!
2.2. Installation and Configuration
Hint
The hypervisor could be installed either exclusively on a PC or side by side with an existing OS. The default case is exclusively. The side by side installation is described at next chapter Side By Side Installation!
2.2.1. Side By Side Installation
If the hypervisor has been installed in parallel to Windows or Linux, the file setrootuuid.sh has to be adjusted. The original defaultBoot values need
to be incremented by 1, e.g. set to 3 and 3, respectively.
Enter gedit setrootuuid.sh to adjust these values, they are near the end of the file:
# update default boot configuration
###################################
defaultbootRE='\(GRUB_DEFAULT=\)[0-9]*'
[ -d /sys/firmware/efi ] && defaultBoot=3 \|\| defaultBoot=3 # 2 for UEFI, 2 for Legacy BIOS
Caution
The above numbers (2, 3) may change depending on the hypervisor version!
Restart the system by entering:
sudo reboot
Attention
Start/Stop of the guests after installation is described in chapter Run shipped RTOS container!
2.3. Hypervisor Files and Directories
2.3.1. Directories
Basic configuration settings including helper scripts are stored in directory /hv/config.
Directory |
SubDir |
Content |
|---|---|---|
|
|
Root dir |
|
Contains all global configuration files |
|
|
Contains all global configuration files |
|
|
Contains the vm guests 1..n |
|
|
|
Contains the LxWin files, scripts and executables |
|
Contains the RTOS-32 files, scripts and executables |
|
|
Contains the VxWorks files, scripts and executables |
2.3.2. Configuration Files
Basic configuration settings including helper scripts are stored in directory /hv/config.
The following table shows the locations of the main .config files of the supplied rtos and demos.
Directory |
SubDir |
.config file |
Description |
|---|---|---|---|
|
|
|
Main configuration file to start the RT-Linux RTOS |
|
|
Contains the RTOS-32 demo configuration file |
|
|
Contains the realtime demo configuration file |
||
|
Contains the EC-Master demo configuration file |
||
|
|
Contains the VxWorks main configuration |
2.3.3. Brand Labeling
In case if you need to do brand labeling the shipped product, here is the list of image files for wallpapers, boot logos etc
Directory |
SubDir |
graphic file |
Description |
|---|---|---|---|
|
|
|
OS Boot logo |
|
|
Background image |
|
|
lsb-release |
Contains name RTOSVisor |
2.4. Additional device handling possibilities to RTOS
2.4.1. Remove device (from the RTOS)
You should remove include of <RTOS device name>.config from the main configuration file (/hv/vx/vxworks.config, etc).
Remove reference of <RTOS device name>.sh file in /hv/config/hvpart.sh.
After system restart device will be automatically used by the host. If you want to return the device to the host without rebooting you should
call <RTOS device name>.sh script with parameter delete:
rtos_eth.sh delete
Now you can delete <RTOS device name>.sh and <RTOS device name>.config files.
2.5. USB device access for RT-Linux guests
rtlinux515.x64-usbip.bin image file.cd /hv/lx
rm rtlinux.bin
ln -s rtlinux515.x64-usbip.bin rtlinux.bin
cd /hv/hvctl
sudo ./hvusbip.sh -init
sudo ./hvusbip.sh -list
Hint
The call with the -init parameter is only required once.
A list of USB devices will be shown.
 1device list
 2***********
 3 - busid 3-2 (046d:c52b)
 4   Logitech, Inc. : Unifying Receiver (046d:c52b)
 5
 6 - busid 3-3 (046d:c52f)
 7   Logitech, Inc. : Unifying Receiver (046d:c52f)
 8
 9 - busid 3-5 (0e8d:0608)
10   MediaTek Inc. : unknown product (0e8d:0608)
11
12 - busid 3-8 (064f:2af9)
13   WIBU-Systems AG : CmStick (HID, article no. 1001-xx-xxx) (064f:2af9)
14
15 - busid 4-4 (18a5:0243)
16   Verbatim, Ltd : Flash Drive (Store'n'Go) (18a5:0243)
cd /hv/config
gedit usbip_exposed_device.sh
# one single device currently can be exposed to the RTOS
export vendev=064f:2af9  # WIBU CodeMeter USB dongle
Hint
/hv/lx/usbip_gen_init.sh script will dynamically create the /hv/lx/rtfiles/usbip_init.sh script./hv/lx/rtfiles/autostart.sh script.Caution
You must not adjust the /hv/lx/rtfiles/usbip_init.sh script manually, it will be overwritten when RT-Linux is started!
You may insert specific autostart activities when the RT-Linux guest starts.
cd /hv/lx
gedit usbip_gen_init.sh
At the very bottom an example of such autostart activity is shown. Please adjust the script /hv/lx/usbip_gen_init.sh accordingly.
# insert usbip specific autostart activities here
if [ $vendev == "064f:2af9" ]; then
    # echo "start codemeter daemon"
    echo "start-stop-daemon --start --quiet --chuid root --exec /usr/sbin/CodeMeterLin" >>./rtfiles/usbip_init.sh
    echo "to verify CodeMeter status run 'cmu --cmdust'" >>./rtfiles/usbip_init.sh
fi
Then, the usbip expose service needs to be enabled which will start the usbip server on the host:
sudo systemctl enable /hv/services/hv_usbip_expose.service
Finally you should start the service to make your changes effective. You may also reboot to do so.
sudo systemctl start hv_usbip_expose
Hint
Caution
usbip_init.sh) also have to be executed again.After you have started the service, you can check if the device is correctly exposed - before starting RT-Linux. Connect the USB device and then run the following command.
usbip list -r 127.0.0.1
A list of exportable USB devices will be shown. The one that you have set before should be shown.
Exportable USB devices
======================
 - 127.0.0.1
        3-3: WIBU-Systems AG : CmStick (HID, article no. 1001-xx-xxx) (064f:2af9)
           : /sys/devices/pci0000:00/0000:00:14.0/usb3/3-3
           : (Defined at Interface level) (00/00/00)
           :  0 - Human Interface Device / No Subclass / None (03/00/00)
Finally you can start RT-Linux, the USB device should be visible then. To verify this, you can run the following command.
usbip port
A list of imported USB devices will be shown. The one that you have set before should be shown.
Imported USB devices
====================
Port 00: <Port in Use> at Full Speed(12Mbps)
       WIBU-Systems AG : CmStick (HID, article no. 1001-xx-xxx) (064f:2af9)
       1-1 -> usbip://192.168.157.1:3240/3-3
           -> remote bus/dev 003/007
Hint
/hv/config/usbip_exposed_device.sh.# one single device currently can be exposed to the RTOS
# export vendev=064f:2af9 # WIBU CodeMeter USB dongle
Then you should disable the service.
sudo systemctl disable hv_usbip_expose
2.5.1. Hypervisor host usbip low level services
Loading kernel modules:
sudo modprobe usbip_host
sudo modprobe usbip_core
Start the usbip daemon:
sudo usbipd -D
Show all USB connected devices:
usbip list -l
Expose a specific USB device:
sudo usbip bind -b busid
Show all currently exposed USB devices that are not in use:
usbip list -r 127.0.0.1
Stop exposing a specific USB device:
sudo usbip unbind -b busid
2.5.2. RT-Linux usbip low level services
Loading kernel modules:
modprobe vhci-hcd
Show exposed devices:
usbip list -r 192.168.157.1
Attach exposed device:
usbip attach -r 192.168.157.1 -b "Device bus ID"
Show ports in use by attached devices:
usbip port
Detach a specific port:
usbip detach -p "port"
2.6. Network Forwarding from Windows to the RTOS
If the RTOS (or any other OS connected to the virtual network) shall be accessed via TCP/IP from a single external system, traffic can be forwarded to the virtual network. Execute the following steps to forward traffic from a specific external computer to the RTOS:
enable network forwarding in the Hypervisor host:
sudo sysctl -w net.ipv4.ip_forward=1determine the IP address of the Hypervisor host. You can use the
ifconfigcommand to accomplish this.open a Command Window with Administrator rights on your Windows PC
run the following command (replace AAA.BBB.CCC.DDD with the appropriate IP address of the Hypervisor host):
route add 192.168.157.0 mask 255.255.255.0 AAA.BBB.CCC.DDD
Caution
2.7. Bridge virtual and physical network
If the RTOS (or any other OS connected to the virtual network) shall be accessed via TCP/IP from any external system, the virtual network and the respective physical network has to be bridged.
In the folder /hv/hvctl you can find the template configuration file brvnetconfig.sh for the bridge configuration.
Note, the IP address of the virtual network inside the RTOS guest need to be adjusted appropriately, see below for more details.
Create the bridge
/hv/hvctl) and execute the brvnetset.sh script.- Remove the bridge
Change into the guest directory (
/hv/hvctl) and execute thebrvnetclr.shscript.
2.7.1. Bridge configuration
First step: determine, which network adapter should be bridged. Search for <link> entry and get the adapter name.
ifconfig -a
In this case it’s enp2s0. The current $IP$ address of enp2s0 is inet 172.17.10.53 and the network mask is 255.255.0.0.
 rtv@rtv-TEST:~$ ifconfig -a
 enp2s0: flags=4163<UP,BROADCAST,RUNNING,MULTICAST>  mtu 1500
     inet 172.17.10.53  netmask 255.255.0.0  broadcast 172.17.255.255
     inet6 2a02:590:801:2c00:7170:3747:f835:a1cb  prefixlen 64  scopeid 0x0<global>
     inet6 fe80::fe6f:c5f8:c5cd:e3cd  prefixlen 64  scopeid 0x20<link>
     inet6 2a02:590:801:2c00:96b0:b8a:2c58:6c91  prefixlen 64  scopeid 0x0<global>
     ether 90:1b:0e:18:c9:83  txqueuelen 1000  (Ethernet)
     RX packets 116751  bytes 22127837 (22.1 MB)
     RX errors 0  dropped 0  overruns 0  frame 0
     TX packets 74453  bytes 551331072 (551.3 MB)
     TX errors 0  dropped 0 overruns 0  carrier 0  collisions 0

 enp3s5: flags=4099<UP,BROADCAST,MULTICAST>  mtu 1500
     ether 74:ea:3a:81:4b:1d  txqueuelen 1000  (Ethernet)
     RX packets 0  bytes 0 (0.0 B)
     RX errors 0  dropped 0  overruns 0  frame 0
     TX packets 0  bytes 0 (0.0 B)
     TX errors 0  dropped 0 overruns 0  carrier 0  collisions 0

 lo: flags=73<UP,LOOPBACK,RUNNING>  mtu 65536
     inet 127.0.0.1  netmask 255.0.0.0
     inet6 ::1  prefixlen 128  scopeid 0x10<host>
     loop  txqueuelen 1000  (Local Loopback)
     RX packets 201  bytes 14798 (14.7 KB)
     RX errors 0  dropped 0  overruns 0  frame 0
     TX packets 201  bytes 14798 (14.7 KB)
     TX errors 0  dropped 0 overruns 0  carrier 0  collisions 0

 vnet0: flags=99<UP,BROADCAST,NOTRAILERS,RUNNING>  mtu 1500
     inet 192.168.157.1  netmask 255.255.255.0  broadcast 192.168.157.255
     ether 00:60:c8:00:00:00  txqueuelen 1000  (Ethernet)
     RX packets 0  bytes 0 (0.0 B)
     RX errors 0  dropped 0  overruns 0  frame 0
     TX packets 59  bytes 10381 (10.3 KB)
     TX errors 0  dropped 0 overruns 0  carrier 0  collisions 0
Next step: determine the default gateway.
ip route ls
You will get an output like default via 172.17.5.2 dev enp2s0 proto dhcp metric 100.
Next step: determine the DNS server.
resolvectl status | grep "Current DNS Server"
You will get an output like Current DNS Server: 172.17.5.9.
Next step: Adjust brvnetconfig.sh with the detected values of ifconfig:
gedit /hv/hvctl/brvnetconfig.sh
Values:
netif="enp2s0"defaultgw="172.17.5.2"dns="172.17.5.9"vnetbrip="172.17.10.53"vnetbrnm="255.255.0.0"#vnetbrmac=comment in and adjust value only if there are collisions with ‘same’MAC-IDson the network.
 #!/bin/bash

 # Ethernet network interface to bridge with VM.
 # ethernet interface to bridge with vnet
 netif="enp2s0"

 # Default gateway
 # How to determine the default gateway:
 #       Use the command ip route ls
 #           default via 172.17.5.2 dev enp2s0 proto dhcp metric 100
 #           172.17.0.0/16 dev enp2s0 proto kernel scope link src 172.17.10.4 metric 100
 #       The default gateway here is "172.17.5.2"
 defaultgw="172.17.5.2"       # default gateway

 # DNS server
 # How to determine the default gateway:
 #       Use the following command: resolvectl status | grep "Current DNS Server"
 #            Current DNS Server: 172.17.5.9
 #       The DNS server here is "172.17.5.9"
 dns="172.17.5.9"

 # Bridge settings
 # The bridge replaces the former network device used by the hypervisor to connect to the network.
 # See above results provided by the ifconfig -a command
 #       enp2s0: flags=4163<UP,BROADCAST,RUNNING,MULTICAST>  mtu 1500
 #               inet 172.17.10.53  netmask 255.255.0.0  broadcast 172.17.255.255
 #       In this example, the bridge IP address is 172.17.10.53 and the network mask is 255.255.0.0
 vnetbrip="172.17.10.53"
 vnetbrnm="255.255.0.0"

 # the values below are default values, typically not to be changed
 vnetip="192.168.157.1"
 vnetnm="255.255.255.0"
 #vnetbrmac="54:52:00:ac:30:10       # by default, the MAC address of the physical network is used
 vnet="vnet0"
 vnetbr="vnetbr"
2.7.1.1. RT-Linux Guest IP address settings
If the network is bridged, the IP address of RT-Linux must be adjusted properly.
The settings are stored in /hv/lx/linux.config.
The IpAddress has to be set to a unique address in your company network, assure the entries are uncommented!
The MacAddress has to be adjusted to a unique value only if more than one RT-Linux guest is bridged, in that case, please adjust the last value from 12 to 13, 14 etc.
 ; This must be set correctly if the vnet device is bridged in the Hypervisor host
 [Rtos\Vnet\0]
     "IpAddress"="172.17.10.239"
     "MacAddress"="AA:BB:CC:DD:E0:12"
2.8. Windows or Linux Guest basic settings
Attention
See chapter Installation and Configuration for tutorial HV-WindowsGuest-Guide.
The following subitems describes some technical background and edge cases.
2.8.1. Guest Ethernet
In the vmconfig.sh script, two guest Ethernet controllers can be configured.
One is used for directly connecting to the external physical network via network bridging.
To enable this network, set external_nw to a value of 1.
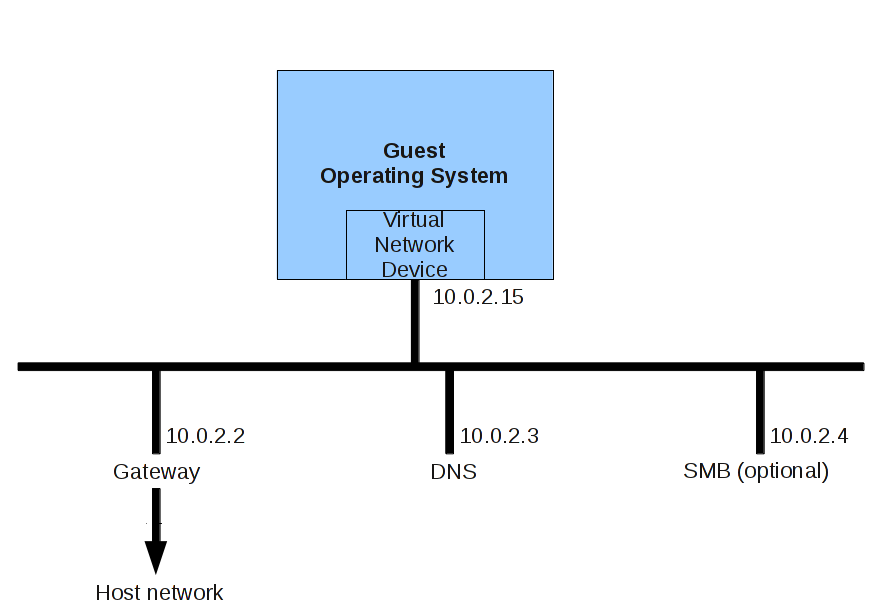
The second is used as a private network, which is connected to the external physical network via NAT. This connection is safer, but much slower. It is also used for file sharing with the hypervisor host. The architecture of the private network looks as follows:
2.8.1.1. Guest Ethernet MAC address
In the folder /hv/VMs/vm1 the script vm1_setmac.sh defines the Ethernet MAC address for the virtual network adapters inside the guest. By
default, if this file does not exist, this script file is automatically generated using random local administered addresses. You will have to
change these addresses by an official address related to your company.
The content of this file looks as follows:
export ethmacVM1=0A:C0:FD:20:39:01
export ethmacVM2=0A:C1:FD:20:39:01
The ethmacVM1 address belongs to the bridged Ethernet controller (bridged to the external network).
The ethmacVM2 address belongs to the private (internal) Ethernet controller (using NAT).
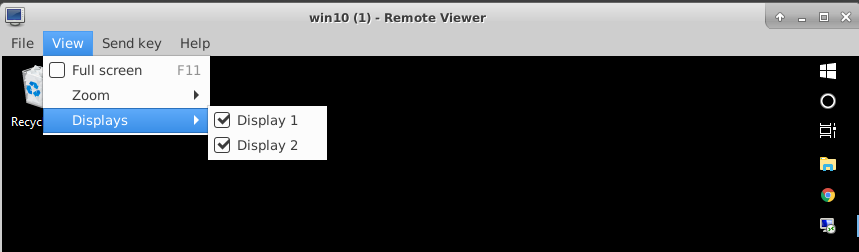
2.8.2. Guest Multiple monitors
If more than one monitor is connected to the system, these can also be used for VM guests (up to a maximum of 4 monitors).
For Windows guests, the following settings are required in vmconfig.sh:
export windows_guest=1
export num_monitors=# (where # is the number of monitors)
To enable additional monitors being displayed, select the displays via the View – Displays menu in the viewer application.
2.9. Windows installation
Attention
See chapter Installation and Configuration for tutorial HV-WindowsGuest-Guide.
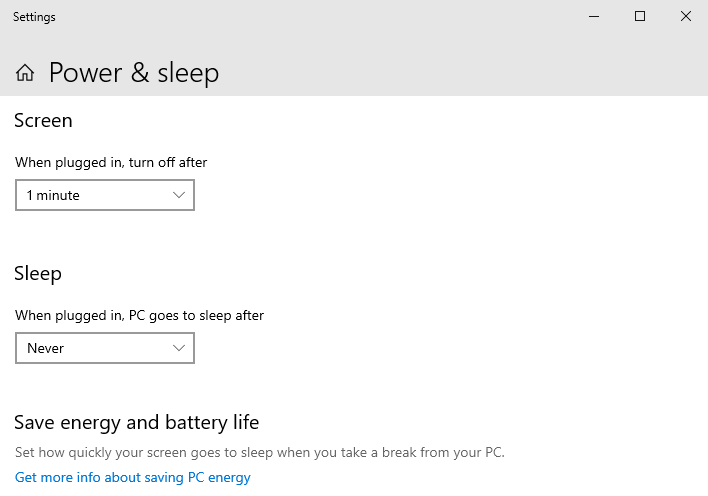
2.9.1. Additional action on the Windows guest:
Disable Sleep ():
2.10. PCI Device passthrough (Windows/Linux)
2.10.1. Why pass-through
Typically, Windows or Linux guest operating systems will run in a sandbox like virtual machine with no direct hardware access. There are scenarious when this is not sufficient, for example some PCI devices (e.g. CAN cards) will not be virtualized and thus would not be visible in such guest OS. There may also be significant performance impacts in some cases if virtual hardware is used (especially for for graphics hardware). To overcome these limitations, the guest will have to use the real physical hardware instead of virtual hardware. PCI Device passthrough will directly assign a specific PCI device to a Windows or Linux guest.
It is madatory to have hardware support for IOMMU (VT-d). VT-d should be supported by your Processor, your motherboard and should be enabled in the BIOS.
Virtual Function I/O (VFIO) allows a virtual machine to access a PCI device, such as a GPU or network card, directly and achieve close to bare metal performance.
The setup used for this guide is:
Intel Core I5-8400 or I3-7100 (with integrated Intel UHD 630 Graphics) - this integrated graphics adapter will be assigned to the Windows VM.
AMD/ATI RV610 (Radeon HD 2400 PRO) – optional, as a second GPU, only needed to have display output for Linux host. Later, the host is reached only via SSH.
Intel I210 Gigabit Network Card - optional, to demonstrate how to pass through a simple PCI device to a Windows VM
2.10.2. Ethernet PCI Card/Custom PCI device assignment
Some manual work is required to pass through the PCI Device to a Windows VM.
2.10.2.1. Understanding IOMMU Groups
In order to activate the hardware passthrough we have to prevent the ownership of a PCI device by its native driver and assign it to the vfio-pci driver instead.
In a first step, an overview of the hardware and related drivers is required. In the below example we want to passthrough the I210 Ethernet Controller to the guest VM.
rte@rte-System-Product-Name:~$ lspci
00:00.0 Host bridge: Intel Corporation 8th Gen Core Processor Host Bridge/DRAM Registers
00:01.0 PCI bridge: Intel Corporation Xeon E3-1200 v5/E3-1500 v5/6th Gen Core Processor
00:02.0 VGA compatible controller: Intel Corporation Device 3e92
00:14.0 USB controller: Intel Corporation Cannon Lake PCH USB 3.1 xHCI Host Controller
00:14.2 RAM memory: Intel Corporation Cannon Lake PCH Shared SRAM (rev 10)
00:16.0 Communication controller: Intel Corporation Cannon Lake PCH HECI Controller
00:17.0 SATA controller: Intel Co`rporation Cannon Lake PCH SATA AHCI Controller (rev 10)
00:1c.0 PCI bridge: Intel Corporation Device a33c (rev f0)
00:1c.5 PCI bridge: Intel Corporation Device a33d (rev f0)
00:1c.7 PCI bridge: Intel Corporation Device a33f (rev f0)
00:1f.0 ISA bridge: Intel Corporation Device a303 (rev 10)
00:1f.4 SMBus: Intel Corporation Cannon Lake PCH SMBus Controller (rev 10)
00:1f.5 Serial bus controller [0c80]: Intel Corporation Cannon Lake PCH SPI Controller
01:00.0 VGA compatible controller: [AMD/ATI] RV610 [Radeon HD 2400 PRO]
01:00.1 Audio device: [AMD/ATI] RV610 HDMI Audio [Radeon HD 2400 PRO]
03:00.0 Ethernet controller: Intel Corporation I210 Gigabit Network Connection (rev 03)
04:00.0 Ethernet controller: Realtek Semiconductor Co., Ltd. RTL8111/8168/8411 PCI Express Gigabit Ethernet Controller (rev 15)
The I210 device is determined as 03:00.0
Caution
The IOMMU has to be activated, you can verify this as follows:
sudo dmesg | grep -e "Directed I/O"
DMAR: Intel(R) Virtualization Technology for Directed I/O
Hint
In case the IOMMU is activated, all devices are divided into groups. The IOMMU Group is an indivisible unit. All devices in the same group must be passed through together, it is not possible to only pass through a subset of the devices.
In the next step, we need to get an overview of the IOMMU architecture and determine to which group the device we want to pass through belongs to.
for a in /sys/kernel/iommu_groups*; do find $a -type l; done | sort --version-sort
/sys/kernel/iommu_groups/0/devices/0000:00:00.0
/sys/kernel/iommu_groups/1/devices/0000:00:01.0
/sys/kernel/iommu_groups/1/devices/0000:01:00.0
/sys/kernel/iommu_groups/1/devices/0000:01:00.1
/sys/kernel/iommu_groups/2/devices/0000:00:02.0
/sys/kernel/iommu_groups/3/devices/0000:00:14.0
/sys/kernel/iommu_groups/3/devices/0000:00:14.2
/sys/kernel/iommu_groups/4/devices/0000:00:16.0
/sys/kernel/iommu_groups/5/devices/0000:00:17.0
/sys/kernel/iommu_groups/6/devices/0000:00:1c.0
/sys/kernel/iommu_groups/7/devices/0000:00:1c.5
/sys/kernel/iommu_groups/8/devices/0000:00:1c.7
/sys/kernel/iommu_groups/9/devices/0000:00:1f.0
/sys/kernel/iommu_groups/9/devices/0000:00:1f.4
/sys/kernel/iommu_groups/9/devices/0000:00:1f.5
/sys/kernel/iommu_groups/10/devices/0000:03:00.0
/sys/kernel/iommu_groups/11/devices/0000:04:00.0
The I210 device (03:00.0) belongs to the IOMMU group 10.
It is important to know that all devices in a single group are shared.
No other device belongs to this IOMMU group so we can pass through the I210 device to the guest.
We need to determine the PCI vendor and device ID of the I210 device now:
rte@rte-System-Product-Name:~$ lspci -s 03:00.0 -vvn
03:00.0 0200: 8086:1533 (rev 03)
    ...
    Kernel driver in use: igb
    Kernel modules: igb
Add to the linux kernel command line parameters the following: vfio-pci.ids=8086:1533. To edit kernel parameters edit /etc/grub.d/40_custom file and then execute update-grub and reboot.
sudo gedit /etc/grub.d/40_custon

menuentry 'Hypervisor' --class ubuntu --class gnu-linux --class gnu --class os $menuentry_id_option 'gnulinux-simple-8b4e852a-54b3-4568-a5a2-dec7b16b8e07' }
        recordfail
        load_video
        gfxmode $linux_gfx_mode
        insmod gzio
        if [ x$grub_platform = xxen ]; then insmod xzio; insmod lzopio; fi
        insmod part_gpt
        insmod ext2
        set root='hd0,gpt2'
        if [ x$feature_platform_search_hint = xy ]; then
          search --no-floppy --fs-uuid --set=root --hint-bios=hd0,gpt2 --hint-efi=hd0,gpt2 --hint-baremetal=ahci0,gpt2  8b4e852a-54b3-4568-a5a2-dec7b16b8e07
        else
          search --no-floppy --fs-uuid --set=root 8b4e852a-54b3-4568-a5a2-dec7b16b8e07
        fi
        linux   /boot/vmlinuz-5.15.0-41-generic root=UUID=8b4e852a-54b3-4568-a5a2-dec7b16b8e07 ro  quiet splash $vt_handoff find_preseed=/preseed.cfg auto noprompt priority=critical locale=en_US memmap=8k\$128k memmap=8M\$56M memmap=256M\$64M memmap=16M\$324M maxcpus=3 intel_pstate=disable acpi=force idle=poll nohalt pcie_port_pm=off pcie_pme=nomsi cpuidle.off=1 intel_idle.max_cstate=0 noexec=off noexec32=off nox2apic intel_iommu=on iommu=pt intremap=off vfio_iommu_type1.allow_unsafe_interrupts=1 vfio-pci.ids=10ec:8168
        initrd  /boot/initrd.img-5.15.0-41-generic
}
sudo update-grub
sudo reboot
Hint
Normally no other steps are needed to to replace the native driver by the vfio-pci driver. If you have conflicts between
these two drivers, it may be required to disable the loading of the native driver. Add the parameter module_blacklist=igb to a kernel command line in that case.
Hint
As mentioned before, device passthrough requires IOMMU support by the hardware and the OS. It is needed to add intel_iommu=on iommu=pt to
your kernel command line. These parameters are automatically added by Hypervisor when executing the inithv.sh script.
Typically, one or multiple PCI devices will also be assigned to a RTOS, for example Real-time Linux. In such case (one or more PCI devices are passed through to a Windows or Ubuntu guest as well as one or multiple PCI devices are assigned to a RTOS) it is required to deactivate IOMMU Interrupt Remapping in the Linux Kernel.
The following kernel command line parameters usually are added as well by the inithv.sh script into the GRUB Entry “Hypervisor” in the /etc/grub.d/40_custom file.
You may verify and add these parameters if they are missing. In that case it is also required to execute update-grub and then reboot.
intremap=off vfio_iommu_type1.allow_unsafe_interrupts=1
2.10.2.2. VM configuration
Last step is to edit the /hv/VMs/VM1/vmconfig.sh file and add the PCI Etherner Card information here.
Uncomment #export OTHER_HW variable and set it to:
export OTHER_HW=" -device vfio-pci,host=03:00.0"
2.10.3. Intel Integrated Graphics (iGVT-d) assignment
To use graphics passthrough, less steps compared to standard PCI hardware passthrough are required, because Hypervisor automates most of the steps.
2.10.3.1. Understanding GPU modes UPT and Legacy
There are two modes “legacy” and “Universal Passthrough” (UPT).
Hypervisor uses only Legacy mode, but it could be important to understand the difference.
UPT is available for Broadwell and newer processors. Legacy mode is available since SandyBridge. If you are unsure, which processor you have, please check this link https://en.wikipedia.org/wiki/List_of_Intel_CPU_microarchitectures
In Legacy it is meant that IGD is a primary and exclusive graphics in VM. Additionally the IGD address in the VM must be PCI 00:02.0, only 440FX chipset model (in VM) is supported and not Q35. The IGD must be the primary GPU for host as well (please check your BIOS settings).
In UPT mode the IGD can have another PCI adress in VM and the VM can have a second graphics adapter (for example qxl, or vga).
Please read here more about legacy and UPT mode: https://git.qemu.org/?p=qemu.git;a=blob;f=docs/igd-assign.txt
There a lot of other little things, why IGD Passthrough could not work. For ex. In legacy mode it expects a ISA/LPC Bridge at PCI Adress 00:1f.0
in VM and this is a reason, why Q35 chip does not work, because it has another device at this adress.
In UPT mode, there is no output support of any kind. So the UHD graphics can be used for accelerating (for ex. Decoding) but the Monitor remains black and there is a non-standard experimental qemu vfi-pci command line parameter x-igd-opregion=on, which can work.
2.10.3.2. Blacklisting i915 driver on Host
The standard Intel Driver i915 is complex and it is not always possible to safely unbind the device from this driver, that is why this driver is
blacklisted by Hypervisor when executing inithv.sh script.
2.10.3.3. Deactivating Vesa/EFI Framebuffer on Host
Please also know, when i915 driver is disabled, there are other drivers which are ready to jump on the device to keep the console working.
Depend on your BIOS settings (legacy or UEFI) two other drivers can occupy a region of a video memory: efifb or vesafb.
Hypervisor blacklists both by adding the following command line parameter:
video=vesafb:off,efifb:off
Please also check if it works: cat/proc/iomem. If you still see that one of this driver still occupies a part of a video memory, please
try manually another combination:
video=efifb:off,vesafb:off.
2.10.3.4. Legacy BIOS, pure UEFI and CSM+UEFI in Host
It plays also significant role, in which mode your machine is booted: Legacy BIOS, pure UEFI or UEFI with CSM support. In pure UEFI (on host)
QEMU cannot read video ROM. In this case you could extract it manually (for ex. Using Cpu-Z utility or just boot in CSM mode, when iGPU is a
primary GPU in BIOS), patch it with correct device id and provide it to qemu as romfile= parameter for vfi-pci. Please google for rom-parser
and rom-fixer for details.
2.10.3.5. SeaBIOS and OVMF (UEFI) in VM
It also plays role which BIOS you use in the VM itself. For QEMU there are two possibilities: SeaBIOS (legacy BIOS, which is default for qemu) and OVMF (UEFI). You can download and build OVMF itself, but easier to install precompiled binaries from here: https://www.kraxel.org/repos/.
For your convenience, Hypervisor installs precompiled OVMF binaries to /hv/bin directory: OVMF_CODE.fd OVMF_VARS.fd
By default, OVMF UEFI does not support OpRegion Intel feature, which is required to have a graphics output to a real display. There are three
possibilities how to solve this problem and the easiest one seems to be the using special vbios rom vbios_gvt_uefi.rom, please read more
here https://wiki.archlinux.org/index.php/Intel_GVT-g.
For your convenience, we have already included this file into the Hypervisor package and it can also be located in /hv/bin directory.
Hypervisor uses OVMF (UEFI) for graphics pass-through.
2.10.3.6. How to do it in Hypervisor
The final working configuration which we consider here:
CPU Graphics is a primary GPU in BIOS (host)
Host boots in pure UEFI mode
OVMF is used as BIOS in Windows VM
vbios_gvt_uefi.romis used as VBIOS inromfileparameter forvfio-pciLegacy mode for IGD, so the Windows VM has only one graphics card Intel UHD 630
Which commands should be executed in Hypervisor to do a pass-through of a Intel Integrated Graphics to a Windows VM?
None! Almost everything is done automatically. When executing inithv.sh script (which is required to install real-time linux kernel
and to reserve kernel memory for hypervisor needs), a separate GRUB entry “Hypervisor + iGVT-d” is created.
This entry contains already all necessary linux kernel parameters required to do a graphics pass-through: blacklisting intel driver,
disabling interrupt remapping, assigning a VGA device to a vfio-pci driver and other stepts.
But one step should be done once, configuring your VM.
Change /hv/VMs/VM1/vmconfig.sh script. Two variables should be uncommented and activated:
export uefi_bios=1
export enable_vga_gpt=1
Just reboot your machine, choose “Hypervisor+iGVT-d” menu item. If everything is correct, the display of your Host should remain black.
Connect to the machine using SSH connection or use a second graphics card for Host (read next chapter) and then execute /hv/VMs/vm1/vmrun.sh
Wait 30-60 seconds and.. display remains black? Of course. Windows does not have Intel Graphics drivers.
Remember we configured Windows for a Remote Desktop Access in previous steps? Connect to Windows VM via RDP and install latest Intel Drivers https://downloadcenter.intel.com/product/80939/Graphics
If everyting is done correctly, your display should now work and display a Windows 10 Desktop.
2.10.3.7. Using Second GPU Card for Host
X-Windows on the hypervisor host does not work properly, when the primary GPU in the System is occupied by the vfi-pci driver. It detects
the first GPU, tries to acquire it, fails and then aborts. We should let it know, that it should use our second GPU card instead.
Log in to the hypervisor host (Press Ctrl + Alt + F3, for example), shutdown LightDM manager sudo service lightdm stop.
Execute sudo X –configure, it creates xorg.conf.new file in the current directory. When this command is executed, X server enumerates all
hardware and creates this file . By default, in modern systems, Xserver does not need the xorg.conf file, because all hardware is detected quite
good and automatically. But the config file is still supported.
Look at this file, find a section “Device” with your second GPU (look at the PCI Adress). Copy content of this section to a separate file
/etc/X11/xorg.conf.d/secondary-gpu.conf. Save and reboot.
Section "Device"
    ### Available Driver options are:-
    ### Values: <i>: integer, <f>: float, <bool>: "True"/"False",
    ### <string>: "String", <freq>: "<f> Hz/kHz/MHz",
    ### <percent>: "<f>%"
    ### [arg]: arg optional
    #Option "Accel" # [<bool>]
    #Option "SWcursor" # [<bool>]
    #Option "EnablePageFlip" # [<bool>]
    #Option "SubPixelOrder" # [<str>]
    #Option "ZaphodHeads" # <str>
    #Option "AccelMethod" # <str>
    #Option "DRI3" # [<bool>]
    #Option "DRI" # <i>
    #Option "ShadowPrimary" # [<bool>]
    #Option "TearFree" # [<bool>]
    #Option "DeleteUnusedDP12Displays" # [<bool>]
    #Option "VariableRefresh" # [<bool>]
    Identifier "Card0"
    Driver "amdgpu"
    BusID "PCI:1:0:0"
EndSection
2.10.3.8. Assigning external PCI Video Card to Windows VM
External PCI Video Cards are not automatically recognized by inithv.sh script (unlike the CPU integrated video),
so this entry is not added to the grub boot menu.
So if you want to pass the external GPU to a VM through, you first need to create a separate GRUB entry or modify an existing one.
Let’a assume we’ve already executed inithv.sh script (as described in previous chapters) and it created a
“Hypervisor” boot entry.
Boot computer using this “Hypervisor” entry.
- Open
/boot/grub.cfg, find its corresponding menuentry 'Hypervisor'
section
- Edit it and rename the menu entry name to:
menuentry 'Hypervisor + Nvidia Quadro Passthrough'
The kernel command line in this section should like like:
linux   /boot/vmlinuz-5.4.17-rt9-acontis+ root=UUID=ebbe5511-f724-4a1d-b5a5-e8dafecaf451 ro  quiet splash $vt_handoff find_preseed=/preseed.cfg auto noprompt priority=critical locale=en_US
        memmap=8k\$128k memmap=8M\$56M memmap=256M\$64M memmap=16M\$384M maxcpus=7 intel_pstate=disable acpi=force idle=poll nohalt pcie_port_pm=off pcie_pme=nomsi cpuidle.off=1
        intel_idle.max_cstate=0 noexec=off nox2apic intremap=off vfio_iommu_type1.allow_unsafe_interrupts=1 intel_iommu=on iommu=pt
First thing, we should discover the topology of PCI devices
find it out, which PCI slot is used for our external PCI card. type lspci
00:00.0 Host bridge: Intel Corporation Device 9b53 (rev 03)
00:02.0 VGA compatible controller: Intel Corporation Device 9bc8 (rev 03)
00:08.0 System peripheral: Intel Corporation Xeon E3-1200 v5/v6 / E3-1500 v5 / 6th/7th Gen Core Proc
00:12.0 Signal processing controller: Intel Corporation Device 06f9
00:14.0 USB controller: Intel Corporation Device 06ed
00:14.1 USB controller: Intel Corporation Device 06ee
00:14.2 RAM memory: Intel Corporation Device 06ef
00:16.0 Communication controller: Intel Corporation Device 06e0
00:17.0 SATA controller: Intel Corporation Device 06d2
00:1b.0 PCI bridge: Intel Corporation Device 06c0 (rev f0)
00:1b.4 PCI bridge: Intel Corporation Device 06ac (rev f0)
00:1c.0 PCI bridge: Intel Corporation Device 06b8 (rev f0)
00:1c.4 PCI bridge: Intel Corporation Device 06bc (rev f0)
00:1c.5 PCI bridge: Intel Corporation Device 06bd (rev f0)
00:1f.0 ISA bridge: Intel Corporation Device 0685
00:1f.4 SMBus: Intel Corporation Device 06a3
00:1f.5 Serial bus controller [0c80]: Intel Corporation Device 06a4
02:00.0 VGA compatible controller: NVIDIA Corporation GM206GL [Quadro M2000] (rev a1)
02:00.1 Audio device: NVIDIA Corporation Device 0fba (rev a1)
04:00.0 Ethernet controller: Realtek Semiconductor Co., Ltd. Device 8125 (rev 05)
05:00.0 Ethernet controller: Intel Corporation 82574L Gigabit Network Connection
Ok. 02:00.0 is our device. Let’s discover, which driver occupies this device.
type "lspci -s 02:00.0 -vv"

02:00.0 VGA compatible controller: NVIDIA Corporation GM206GL [Quadro M2000] (rev a1) (prog-if 00 [VGA controller])
      Subsystem: NVIDIA Corporation GM206GL [Quadro M2000]
      ...
      Kernel modules: nvidiafb, nouveau
So we know now, which drivers should be blacklisted in kernel: nvidiafb and noueveau.
But, it looks like we have an integrated audio device in 02:00.1. Most probably we should deactivate its driver as well.
Let’s investigate our IOMMU groups, type find /sys/kernel/iommu_groups/ -type l:
/sys/kernel/iommu_groups/7/devices/0000:00:1b.0
/sys/kernel/iommu_groups/15/devices/0000:05:00.0
/sys/kernel/iommu_groups/5/devices/0000:00:16.0
/sys/kernel/iommu_groups/13/devices/0000:02:00.0
/sys/kernel/iommu_groups/13/devices/0000:02:00.1
/sys/kernel/iommu_groups/3/devices/0000:00:12.0
/sys/kernel/iommu_groups/11/devices/0000:00:1c.5
/sys/kernel/iommu_groups/1/devices/0000:00:02.0
/sys/kernel/iommu_groups/8/devices/0000:00:1b.4
/sys/kernel/iommu_groups/6/devices/0000:00:17.0
/sys/kernel/iommu_groups/14/devices/0000:04:00.0
/sys/kernel/iommu_groups/4/devices/0000:00:14.1
/sys/kernel/iommu_groups/4/devices/0000:00:14.2
/sys/kernel/iommu_groups/4/devices/0000:00:14.0
/sys/kernel/iommu_groups/12/devices/0000:00:1f.0
/sys/kernel/iommu_groups/12/devices/0000:00:1f.5
/sys/kernel/iommu_groups/12/devices/0000:00:1f.4
/sys/kernel/iommu_groups/2/devices/0000:00:08.0
/sys/kernel/iommu_groups/10/devices/0000:00:1c.4
/sys/kernel/iommu_groups/0/devices/0000:00:00.0
/sys/kernel/iommu_groups/9/devices/0000:00:1c.0
so, we see, that our NVidia card belongs to a IOMMU group 13, together with its audio device.
So, repeat steps for audio device, type lspci -s 02:00.1 -vv:
02:00.1 Audio device: NVIDIA Corporation Device 0fba (rev a1)
...
Kernel modules: snd_hda_intel
Now all these 3 drivers should be blacklisted in your system.
add the following to your “Hypervisor” entry kernel command line: module_blacklist=nouveau,nvidiafb,snd_hda_intel
Assign devices to KVM.
In order to make it possible to pass NVidia VGA and Audio device to a Windows VM through we should assign a special driver vfi-pci to
each our drvice.
Let’s determine Vendor and Device IDs:
type "lspci -s 02:00.0 -n"
02:00.0 0300: 10de:1430 (rev a1)

type "lspci -s 02:00.1 -n"
02:00.1 0403: 10de:0fba (rev a1)
add the following to our kernel command line: vfio-pci.ids=10de:1430,10de:0fba
so our final command line should now look like:
linux   /boot/vmlinuz-5.4.17-rt9-acontis+ root=UUID=ebbe5511-f724-4a1d-b5a5-e8dafecaf451 ro  quiet splash $vt_handoff find_preseed=/preseed.cfg auto noprompt priority=critical locale=en_US
        memmap=8k\$128k memmap=8M\$56M memmap=256M\$64M memmap=16M\$384M maxcpus=7 intel_pstate=disable acpi=force idle=poll nohalt pcie_port_pm=off pcie_pme=nomsi cpuidle.off=1
        intel_idle.max_cstate=0 noexec=off nox2apic intremap=off vfio_iommu_type1.allow_unsafe_interrupts=1 intel_iommu=on iommu=pt module_blacklist=nouveau,nvidiafb,snd_hda_intel
        vfio-pci.ids=10de:1430,10de:0fba
if you boot the computer into the this new grub entry, you could check if vfio-pci driver successfully acquired our devices:
type "dmesg | grep vfio"

[    5.587794] vfio-pci 0000:02:00.0: vgaarb: changed VGA decodes: olddecodes=io+mem,decodes=io+mem:owns=none
[    5.606445] vfio_pci: add [10de:1430[ffffffff:ffffffff]] class 0x000000/00000000
[    5.626451] vfio_pci: add [10de:0fba[ffffffff:ffffffff]] class 0x000000/00000000
everything is ok.
3) Check if your PCI Card is not a primary graphics device in your system. Boot into BIOS and find the corresponding settings. For every BIOS there are own namings for this option.
Often there is no such option in BIOS and it then detects which HDMI ports are connected and if both Integrated GPU and the external PCI card are connected to monitors, then the integrated card is choosen by BIOS as a primary device. If not, then your PCI card is selected as the primary device.
If your card is not a primary device and integrated CPU graphics is used for host, skip the reading this section. But if not, you should disable frame buffer, because its drivers occupy video card PCI regions.
Add then `` video=efifb:off,vesafb:off disable_vga=1`` to your kernel command line.
This trick is also useful, when your PC has no integrated CPU graphics and the external PCI Video card is the only device in your system.
assign your VGA and Audio devices to your Windows VM (Qemu)
usually the VM configuation is located in this file: /hv/VMs/vm1/vmconfig.sh
find and change OTHER_HW line from
export OTHER_HW=$OTHER_HW
to
export OTHER_HW=$OTHER_HW" -device vfio-pci,host=02:00.0 -device vfio-pci,host=02:00.1 -nographic"
Note
Please note, you need to install your video card manufacturer drivers to a Windows VM, to make the graphics working.
Create a temporary VGA device or a Windows RDP/Qemu VNC connection to your VM to install graphics drivers.
2.10.4. Keyboard and Mouse assignment
Normally your Linux Host with RTOSVisor with Windows VM and Integrated Graphics passed through works in head-less mode. Windows VM outputs to a monitor durch DVI-D/HDMI connection and the Linux Host is controlled via SSH connection. Windows has a look and feel as it works without an intermediate hypervisor layer.
So, Windows needs a keyboard and mouse.
Go to /dev/input/by-id/ and find something that looks like a keyboard and mouse and it should containt “-event-” in its name.
ls -la

usb-18f8_USB_OPTICAL_MOUSE-event-if01 -> ../event5
usb-18f8_USB_OPTICAL_MOUSE-event-mouse -> ../event3
usb-18f8_USB_OPTICAL_MOUSE-if01-event-kbd -> ../event4
usb-18f8_USB_OPTICAL_MOUSE-mouse -> ../mouse0
usb-SEM_USB_Keyboard-event-if01 -> ../event7
usb-SEM_USB_Keyboard-event-kbd -> ../event6
configure your VM with these parameters by editing vmconfig.sh:
export vga_gpt_kbd_event=6
export vga_gpt_mouse_event=3
Please also note, disconnecting evdev devices, such as keyboard or mouse, can be problematic when using qemu and libvirt, because it does not reopen device when the device reconnects.
If you need to disconnect/reconnect your keyboard or mouse, there is a workaround, create a udev proxy device and use its event device instead. Please read more hier https://github.com/aiberia/persistent-evdev.
If everything works, you’ll find new devices like uinput-persist-keyboard0 pointing to /dev/input/eventXXX use use these ids as usual in:
export vga_gpt_kbd_event=XXX
export vga_gpt_mouse_event=ZZZ
2.11. Intel(c) VT and acontis Hypervisor
Intel(c) VT-x and VT-d are hardware virtualisation extensions for Intel Processors. Please take a look at official Intel page for full description of the technology: https://www.intel.com/content/www/us/en/virtualization/virtualization-technology/intel-virtualization-technology.html
In acontis Hypervisor, VT techonogy allows to activate so called “Shared Mode”. In Shared Mode is is possible to run a RTOS on the same CPU as Host (so, CPU is shared between two OS). Please note, that hard real time for RTOS is also achieved in this mode.
2.11.1. Activating VT
VT should be activated manually. In this example we configure 2 CPU system, where first CPU is used to run Linux Host and RTOS1 (so, in shared CPU mode) and second CPU will be used to run RTOS2 (as exclusive core).
Note
Before you start to change anything in your system, please make sure, you have executed inithv.sh script at least once.
This script installs necessary .deb packages, configures memory settings, reads ACPI tables and etc.
2.11.1.1. Linux Kernel grub parameters
IOMMU must be disabled in order to activate VT-D.
Add the following parameters to the linux kernel in grub.cfg: intremap=off intel_iommu=off maxcpus=1
Make sure these parameters have been removed: iommu=pt vfio_iommu_type1.allow_unsafe_interrupts=1
Currently only one shared cpu is supported. This is the reason, why maxcpus=1 is used.
2.11.1.2. Adapt .config files
- make sure this line presents in your
config: #include "../config/memmap820.config"it is a memory map of your system, created by
inithv.shscript.
- make sure this line presents in your
[Upload]"VersionDrv"=dword:9070000
[Vmf]"VtAllowed"=dword:1
[Rtos]"MemoryType"=dword:3
[Rtos1]"MemoryType"=dword:3
[Rtos\Vmf]"MapSystemTables"=dword:1
hwdevbase.configandhvdevbase_rtos2.configPlease make sure, that Destination parameter for first and second rtos has correct processor mask. Each interrupt should be forwarded to the correct CPU.
rtos_eth.configIf you use a network card, please make sure, that all interrupts from each card are forwarded to the correct CPU. Please make sure, that Destination parameter for first and second rtos has correct processor mask.
2.12. Windows or Linux Guest Operation
2.12.1. General Guest control
Boot
Change into the guest directory (/hv/VMs/vm1) and execute the vmrun.sh script. When executed the very first time,
the virtual hard disk image is created (e.g. file vm1.qcow2).
- Shutdown
Change into the guest directory (
/hv/VMs/vm1) and execute thevmshtdn.shscript.
- Reset
Change into the guest directory (
/hv/VMs/vm1) and execute thevmrst.shscript.
- Destroy the guest (in case it crashed)
Change into the guest directory (
/hv/VMs/vm1) and execute thevmkill.shscript.
- View guest output (in case the output Windows crashed or was closed)
Change into the guest directory (
/hv/VMs/vm1) and execute thevmview.shscript.
- Other control and monitoring commands
Change into the guest directory (
/hv/VMs/vm1) and execute thevmmon.shscript. Monitor commands are described in here: https://en.wikibooks.org/wiki/QEMU/Monitor
2.13. Windows/Linux USB guest access (non automatic mode)
In case the USB device is plugged in while the guest is already running, you need to start the guest monitor using the vmmon.sh command in the vm directory.
Using the info command, a list of connected USB devices can be found:
info usbhost
    Bus 1, Addr 11, Port 1, Speed 480 Mb/s
        Class 00: USB device 0951:1665, DataTraveler 2.0
    Bus 2, Addr 3, Port 4.2, Speed 5000 Mb/s
        Class ff: USB device 0b95:1790, AX88179
    Bus 1, Addr 8, Port 8, Speed 12 Mb/s
        Class ff: USB device 06cb:009a
    Bus 1, Addr 7, Port 7, Speed 480 Mb/s
        Class ef: USB device 04f2:b604, Integrated Camera
    Bus 1, Addr 9, Port 6, Speed 12 Mb/s
        Class e0: USB device 8087:0a2b
    Bus 1, Addr 4, Port 5, Speed 12 Mb/s
        Class 00: USB device 058f:9540, EMV Smartcard Reader
    Bus 1, Addr 2, Port 2, Speed 12 Mb/s
        Class 00: USB device 046d:c52b, USB Receiver
The following command will dynamically connect the USB device on host bus 1 and address 11 (an USB stick) with the guest:
device_add usb-host,id=MyUsbDevice,hostbus=1,hostaddr=11
The id value has to be unique in case multiple USB devices are connected.
2.14. Windows/Linux USB guest access (passthrough mode) for non Real-time guests
Caution
Depending on the USB type (USB1/2 or USB3) there will be different values even if the same physical port is used.
Caution
Hint
More information can be found here:
2.14.1. USB1/2 devices
Connect an USB2 stick to the USB port you want to passthrough and execute the following on the Linux Host:
lsusb -t
You will get a result similar to
1/:  Bus 02.Port 1: Dev 1, Class=root_hub, Driver=xhci_hcd/6p, 10000M
2/:  Bus 01.Port 1: Dev 1, Class=root_hub, Driver=xhci_hcd/12p, 480M
3    |__ Port 4: Dev 18, If 0, Class=Mass Storage, Driver=usb-storage, 480M
4    |__ Port 6: Dev 4, If 0, Class=Wireless, Driver=btusb, 12M
5    |__ Port 6: Dev 4, If 1, Class=Wireless, Driver=btusb, 12M
2.14.2. USB3 devices
Connect an USB3 stick to the USB port you want to passthrough and execute the following on the Linux Host:
lsusb -t
You will get a result similar to
1/:  Bus 02.Port 1: Dev 1, Class=root_hub, Driver=xhci_hcd/6p, 10000M
2    |__ Port 5: Dev 18, If 0, Class=Mass Storage, Driver=usb-storage, 5000M
3/:  Bus 01.Port 1: Dev 1, Class=root_hub, Driver=xhci_hcd/12p, 480M
4    |__ Port 6: Dev 4, If 0, Class=Wireless, Driver=btusb, 12M
5    |__ Port 6: Dev 4, If 1, Class=Wireless, Driver=btusb, 12M
2.14.3. USB hubs
If devices are connected behind an USB hub, you will see multiple nested ports behind which the device can be found.
Example 1: USB3 device behind a hub
1/:  Bus 02.Port 1: Dev 1, Class=root_hub, Driver=xhci_hcd/6p, 10000M
2    |__ Port 1: Dev 15, If 0, Class=Hub, Driver=hub/4p, 5000M
3        |__ Port 2: Dev 16, If 0, Class=Vendor Specific Class, Driver=ax88179_178a, 5000M
4/:  Bus 01.Port 1: Dev 1, Class=root_hub, Driver=xhci_hcd/12p, 480M
5    |__ Port 6: Dev 4, If 0, Class=Wireless, Driver=btusb, 12M
6    |__ Port 6: Dev 4, If 1, Class=Wireless, Driver=btusb, 12M
Example 2: USB2 device behind two hubs
1/:  Bus 02.Port 1: Dev 1, Class=root_hub, Driver=xhci_hcd/6p, 10000M
2/:  Bus 01.Port 1: Dev 1, Class=root_hub, Driver=xhci_hcd/12p, 480M
3    |__ Port 1: Dev 26, If 0, Class=Hub, Driver=hub/4p, 480M
4        |__ Port 1: Dev 29, If 0, Class=Hub, Driver=hub/4p, 480M
5            |__ Port 2: Dev 30, If 0, Class=Mass Storage, Driver=usb-storage, 480M
6    |__ Port 6: Dev 4, If 0, Class=Wireless, Driver=btusb, 12M
7    |__ Port 6: Dev 4, If 1, Class=Wireless, Driver=btusb, 12M
Caution
Some USB devices contain an internal USB hub to expose multiple USB device instances. Here, the same rules apply.
2.14.4. Guest configuration
vmconfig.sh.# USB host passthrough (automatic passthrough for any device connected to these ports).
# Note: on the same physical USB port, different values for hostbus,hostport pairs will show up for different USB speed!
export USB_HOST_ADAPTER1_PASSTHROUGH=""
export USB_HOST_ADAPTER1_PASSTHROUGH="$USB_HOST_ADAPTER1_PASSTHROUGH -device usb-host,bus=$USB_HOST_ADAPTER1_NAME.0,hostbus=1,hostport=4"
export USB_HOST_ADAPTER1_PASSTHROUGH="$USB_HOST_ADAPTER1_PASSTHROUGH -device usb-host,bus=$USB_HOST_ADAPTER1_NAME.0,hostbus=2,hostport=5"
export USB_HOST_ADAPTER1_PASSTHROUGH="$USB_HOST_ADAPTER1_PASSTHROUGH -device usb-host,bus=$USB_HOST_ADAPTER1_NAME.0,hostbus=2,hostport=1.2"
export USB_HOST_ADAPTER1_PASSTHROUGH="$USB_HOST_ADAPTER1_PASSTHROUGH -device usb-host,bus=$USB_HOST_ADAPTER1_NAME.0,hostbus=1,hostport=1.1.2"
Launch the guest and try to physically connect and disconnect a USB devices to the configured ports. The guest then should recognize such device automatically.
2.15. Windows/Linux COM port guest access
It is possible to passthrough a COM port to a guest VM.
It works and for both, legacy serial ports and for USB-to-Serial converters.
modify the vmconfig.sh file and change
export OTHER_HW=$OTHER_HW

to

export OTHER_HW=$OTHER_HW"  -serial /dev/ttyUSB0 -serial /dev/ttyS0"
this example creates COM1 Port in the VM and it uses USB-to-Serial converter on a Linux Host and
creates COM2 port in the VM and it is the real COM1 port on Linux Host.
2.16. Hypervisor host network configuration
The hypervisor host network can be configured using automatic IP address configuration (DHCP), manual IP address configuration or disabled network. To simplify the process, the netconf command is provided.
Hint
netconf is a link to the script /hv/config/netconf.sh.
Caution
/hv/VMs/vm1/vmconfig.sh).2.16.1. Automatic network configuration
This is the default mode. Nothing has to be changed if this mode shall be used. In case, the mode previously had been different, you can switch back to the automatic configuration as follows.
First, set the hypervisor host configuration appropriately.
cd /hv/VMs/vm1
netconf -auto
Then, configure the guest.
cd /hv/VMs/vm1
gedit vmconfig.sh
Change the configuration value.
netif_mode=1
2.16.2. Manual network configuration
If you want the hypervisor host to be configured manually, you need to adjust the settings accordingly.
cd /hv/VMs/vm1
netconf %DEVICE% -man IP-address netmask-bits gateway-IP dns-IP
For example:
netconf enp1s0 -man 192.168.178.188 24 192.168.178.1 8.8.8.8
Then, configure the guest.
cd /hv/VMs/vm1
gedit vmconfig.sh
Change the respective configuration values.
netif_mode=0
netif_m=...
defaultgw_m=...
dnsgw_m=...
brip_m=...
brnm_m=...
2.16.3. Disabled network
If you want the hypervisor host not to use the network, you need to adjust the settings accordingly.
In case the PC currently is connected with the LAN and you want to use this connection for a guest, you need to determine the device name before disabling the host network.
You may use the ifconfig command for that purpose.
sudo ifconfig
Next, disable the network of the hypervisor host.
cd /hv/VMs/vm1
netconf -off
You need to turn off IPv6 as follows.
sudo gedit /etc/sysctl.conf
Insert the following lines at the bottom of this file:
net.ipv6.conf.all.disable_ipv6=1
net.ipv6.conf.default.disable_ipv6=1
net.ipv6.conf.lo.disable_ipv6 = 1
Make this effective:
sudo sysctl -p
Then, configure the guest.
cd /hv/VMs/vm1
gedit vmconfig.sh
Change the respective configuration values.
netif_mode=2
netif_m=...
Caution
You must define the network device that shall be used in the guest by setting the parameter netif_m to the name you have determined above.
Hint
To re-enable the host network in automatic mode, run the netconf command again:
cd /hv/VMs/vm1
netconf -auto
And change the netif_mode configuration value.
cd /hv/VMs/vm1
gedit vmconfig.sh
netif_mode=1
2.16.4. Virtual network configuration
Hint
2.17. Backup
bkup.sh takes 3 arguments:arg 1: -vmimg optional: also include guest VM images
(backup will take a long time to finish and the backup file will be big!)
arg 2: -noinst optional: do not include all hypervisor installation files
(e.g. specific Linux kernel, Windows guest support installation)
arg 3: bkupfile backup file (only the prefix, e.g. mybackup, do not use the full filename like backup.tar.gz)
Run the following command to create a backup file.
cd /hv/config
sudo ./bkup.sh /tmp/mybackup
/tmp/mybackup.tar.gz (in case guest images are included using -vmimg, the extension would be tar).rstr.sh takes 3 arguments:arg 1: bkupfile backup file (only the prefix, e.g. backup, do not use the full filename like backup.tar.gz)
arg 2: restdir folder where to restore the previously taken backup
arg 3: -force if this option is given, existing files will be overwritten without any confirmation
/hv/config/rstr.sh and mybackup.tar.gz have been copied to the Downloads folder in the home directory.cd ~/Downloads
chmod +x rstr.sh
sudo ./rstr.sh mybackup /hv
Caution
You may have to re-run the auto configuration script after the backup has been restored