4. Docker Container
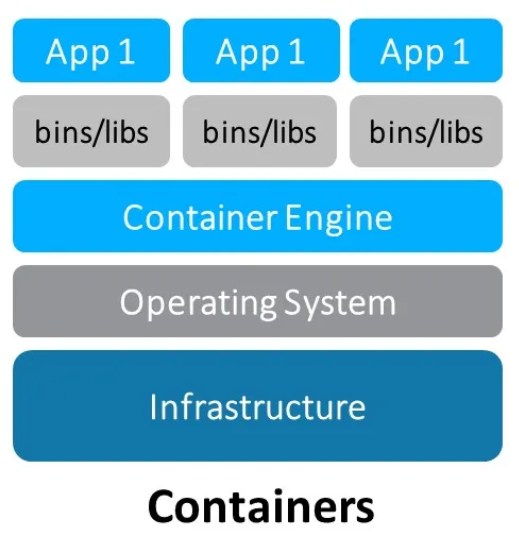
Container offer a powerful way to package applications along with their dependencies, creating lightweight and portable units that can run consistently across a wide variety of environments. Whether on a developer’s local machine, in a test environment, or on a production server, containers ensure that the application behaves the same everywhere.
One of the key advantages of containers is the isolation they provide. Applications running within a container are completely self-contained, with all necessary libraries and dependencies bundled inside. This eliminates conflicts with other software on the host system and guarantees consistent behavior regardless of the underlying infrastructure.
In addition to their portability and isolation, containers provide robust version control capabilities. docker images, which are the building blocks of containers, can be versioned. This allows developers to easily roll back to previous versions if an update causes issues or to update containers with minimal effort, ensuring smooth transitions between software versions.
See chapter Example Real-time Linux guest with Docker how to select a RT-Linux image with docker container support. This chapter also shows how to work with docker in general.
4.1. Docker Container Repository (in general)
A docker container repository is a storage location where docker images are stored, either locally on a system or remotely on a platform such as docker Hub, Google Container Registry (GCR), Amazon Elastic Container Registry (ECR), or a private docker registry. docker images contain all the necessary code, libraries, and dependencies required to run an application inside a container.
4.1.1. Key Aspects of a Docker Container Repository
Repository vs. Image:
A docker image is a snapshot of an application and its dependencies, essentially a template for creating containers.
A docker repository is a collection of related docker images, often versions of the same application. For example,
myapp:1.0,myapp:2.0, andmyapp:latestare different images in the same repository.
Local Repository (On your machine):
docker images are first built and stored locally on the user’s machine. This is often referred to as the local docker repository.
To see the images stored locally, you can run:
docker images
This command lists all the images in your local repository, showing the repository name, tags (versions), image ID, and size.
Remote Repository:
Remote repositories are hosted on platforms like docker Hub, AWS ECR, GCR, or any private docker registry.
These repositories store and distribute images so that users can
pushandpulldocker images as needed. When you rundocker pullto download an image ordocker pushto upload an image, you are interacting with a remote repository.
Repository Contents: A docker repository contains the following:
Images: Each repository contains one or more docker images. Each image can have multiple tags, which identify different versions or configurations of the same image. For example, a repository for
myappmay contain images with tags likelatest,v1.0,v2.0, etc.Image Layers: docker images are made up of layers, where each layer represents a change or update (such as installing a library or changing a file). Layers allow docker to optimize storage and download by only pulling layers that are not already available locally.
Metadata: Each image comes with metadata that includes details about its creation, such as the image size, the commands used to create it (e.g., from the Dockerfile), and environment variables that might be used when running containers from the image.
Private vs. Public Repositories:
Public repositories allow anyone to pull and use images. docker Hub is an example of a public registry where popular open-source images are available (e.g., Ubuntu, MySQL).
Private repositories restrict access, often used in enterprise environments to store proprietary or internal application images.
4.1.2. Basic Commands for Interacting with a Docker Repository
Listing Images in Local Repository:
docker images
This shows the images currently stored on your machine.
Pulling an Image from a Remote Repository:
docker pull <repository>:<tag>
Example:
docker pull ubuntu:latest
Pushing an Image to a Remote Repository:
Before pushing an image, you must first log in to the repository (if it’s private):
docker login
Then, you can push the image:
docker push <repository>:<tag>
Example:
docker push myrepo/myapp:1.0
4.1.3. Example of a Docker Repository and Its Contents
For example, in docker Hub, if you have a repository named myapp, it may contain the following images:
myapp:latest: The latest stable version of the app.myapp:v1.0: The first major release of the app.myapp:v2.0: The second major release of the app, perhaps with significant feature changes or improvements.
Each image will have its own layers and metadata, and you can pull specific versions by specifying the tag (:latest, :v1.0, etc.).
In summary, the docker container repository serves as a centralized store for docker images, enabling easy sharing, versioning, and distribution of containerized applications across environments.
4.2. Local RT-Linux Docker Container Repository
When using docker container in RT-Linux, docker images will be stored either locally in RAM or in a persistent repository.
The persistent repository will be stored onto a filesystem which is located in a raw file image
created by the qemu-img tool at the very first start of the RT-Linux guest.
It will only be created if the parameter rt_data_size_MB is set in the guest_config.sh or
usr_guest_config.sh guest configuration files.
The RT-Linux autostart script then calls the rtdata_init.sh script located in the guest folder.
This script will mount the filesystem image at /mnt/rtdata when RT-Linux boots.
After mounting the filesystem the /mnt/rtfiles/etc/rt-linux/files/docker-env/dockerenv_init.sh script
will be called which will mount the docker repository into /mnt/rtdata.
These mountpoints (which then will be located in the persistent filesystem /mnt/rtdata) are defined
in /hv/guests/etc/rt-linux/files/docker-env/dockerenv_dirs.sh.
After starting a RT-Linux guest with docker support, you can verify which filesystems are mounted at the persistent file image:
root@vmf64:~# mount | grep loop0
/dev/loop0 on /mnt/rtdata type ext4 (rw,relatime)
/dev/loop0 on /var/lib/docker type ext4 (rw,relatime)
/dev/loop0 on /var/opt/codesysvcontrol type ext4 (rw,relatime)
/dev/loop0 on /home/root type ext4 (rw,relatime)
/dev/loop0 on /root type ext4 (rw,relatime)
See chapter Example Real-time Linux guest with Docker how to select a RT-Linux image with docker support and how to work with it.
4.3. Docker Base Image
A docker base image is the foundational layer upon which all other layers in a docker container are built. It’s essentially the starting point for creating a docker image, and it doesn’t inherit from any other image.
A base image can either be:
A minimal operating system such as
Ubuntu,Alpine, orDebian, which provides a basic environment to run applications.An empty image (sometimes referred to as a scratch image), which allows you to build everything from scratch without any pre-existing layers.
4.3.1. Key Concepts of Docker Base Images
Predefined vs. Custom Base Images:
Predefined Base Images: These are popular base images created and maintained by communities or organizations. For example:
ubuntu: A full-fledged operating system image based on Ubuntu.alpine: A very small and lightweight Linux distribution.node,python: Images that not only include an operating system but also come pre-configured with specific programming languages or runtimes.
Custom Base Images: You can create a custom base image by starting from a minimal OS or from scratch, and then adding your specific dependencies or configuration.
How to Use a Base Image: When writing a
Dockerfileto build an image, you typically specify the base image using theFROMinstruction:# Example of using a base image (Ubuntu) FROM ubuntu:20.04 # Commands to install your application and dependencies RUN apt-get update && apt-get install -y nginx CMD ["nginx", "-g", "daemon off;"]
In this example,
ubuntu:20.04is the base image. All subsequent layers are built on top of this.Why Use a Base Image?:
Simplicity: A base image provides a ready-made environment, so you don’t have to start from scratch and set up the entire OS yourself.
Standardization: Base images offer a standardized foundation, ensuring that everyone using the image gets a consistent environment.
Efficiency: Many base images are lightweight, allowing for efficient use of resources and smaller image sizes. For example, the
Alpinebase image is just a few megabytes in size compared to other larger operating systems likeUbuntuorCentOS.
Popular docker Base Images:
Alpine: A tiny Linux distribution known for its very small size (~5 MB) and simplicity. It’s used for minimalist environments.
FROM alpine
Ubuntu: One of the most commonly used base images, providing a complete Linux OS.
FROM ubuntu:20.04
Debian: A stable and widely-used Linux distribution.
FROM debian:buster
Node.js, Python, Java: These images come pre-configured with popular programming languages or runtimes, allowing developers to build applications with the necessary software pre-installed.
FROM node:14
FROM python:3.8
Scratch Base Image:
scratchis a special base image in docker that represents an empty image. It is useful when you want to create extremely lightweight images that contain only the application itself with no operating system files.Commonly used when building Go, C, or C++ applications that don’t require an entire operating system for runtime.
FROM scratch
COPY my-binary /my-binary
CMD ["/my-binary"]
Creating Your Own Base Image:
If you have specific needs that are not met by an existing base image, you can create your own:
You can start from a minimal base image (like
alpine) and add custom tools and configurations.Once your custom base image is ready, you can push it to a docker registry and reuse it as a base for other Dockerfiles.
4.3.2. When to Choose Different Base Images
Small Application Footprint: If you need the smallest possible image, consider using
alpineor evenscratch.Specific Environment: If your application depends on a specific version of a language or OS, choose a base image that matches your requirements, like
node,python, orubuntu.Custom Needs: If none of the available base images fit your needs, you can create your own by starting from a minimal OS or using
scratch.
4.4. Set up Docker
4.4.1. Docker on Ubuntu
Create a script setupdocker.sh on Ubuntu to install the docker environment:
#!/bin/bash

# Exit on error
set -e

# 1. Update the package list
echo "Updating package list..."
sudo apt-get update

# 2. Install dependencies for APT to use HTTPS
echo "Installing necessary dependencies..."
sudo apt-get install -y ca-certificates curl gnupg lsb-release

# 3. Add docker’s official GPG key
echo "Adding docker's official GPG key..."
curl -fsSL https://download.docker.com/linux/ubuntu/gpg | sudo gpg --dearmor -o /usr/share/keyrings/docker-archive-keyring.gpg

# 4. Set up the stable docker repository for Ubuntu
echo "Setting up docker repository..."
echo "deb [arch=$(dpkg --print-architecture) signed-by=/usr/share/keyrings/docker-archive-keyring.gpg] https://download.docker.com/linux/ubuntu $(lsb_release -cs) stable" | sudo tee /etc/apt/sources.list.d/docker.list > /dev/null

# 5. Update the package list again
echo "Updating package list after adding docker repository..."
sudo apt-get update

# 6. Install docker Engine, CLI, and plugins
echo "Installing docker Engine and other components..."
sudo apt-get install -y docker-ce docker-ce-cli containerd.io docker-buildx-plugin docker-compose-plugin

# 7. Start and enable docker
echo "Starting and enabling docker service..."
sudo systemctl start docker
sudo systemctl enable docker

# 8. Verify docker installation
echo "Verifying docker installation..."
docker_version=$(sudo docker --version)
echo "docker has been installed: $docker_version"

# 9. Test docker installation
echo "Running docker hello-world test..."
sudo docker run hello-world

# Optional: Add the current user to the docker group
echo "Would you like to run docker without sudo? (y/n)"
read -r add_to_group

if [ "$add_to_group" = "y" ]; then
    sudo usermod -aG docker $USER
    echo "Added $USER to the docker group. Please log out and log back in or run 'newgrp docker' to apply changes."
else
    echo "You can still run docker with sudo."
fi

echo "docker installation is complete."
Run the script to install docker:
chmod +x ./setupdocker.sh
./setupdocker.sh
4.4.2. Docker on Debian
Create a script setupdocker.sh on Debian to install the docker environment:
#!/bin/bash

# Exit on error
set -e

# 1. Update the package list
echo "Updating package list..."
sudo apt-get update

# 2. Install dependencies for APT to use HTTPS
echo "Installing necessary dependencies..."
sudo apt-get install -y ca-certificates curl gnupg lsb-release

# 3. Add docker’s official GPG key
echo "Adding docker's official GPG key..."
curl -fsSL https://download.docker.com/linux/debian/gpg | sudo gpg --dearmor -o /usr/share/keyrings/docker-archive-keyring.gpg

# 4. Set up the stable docker repository for Debian
echo "Setting up docker repository..."
echo "deb [arch=$(dpkg --print-architecture) signed-by=/usr/share/keyrings/docker-archive-keyring.gpg] https://download.docker.com/linux/debian $(lsb_release -cs) stable" | sudo tee /etc/apt/sources.list.d/docker.list > /dev/null

# 5. Update the package list again
echo "Updating package list after adding docker repository..."
sudo apt-get update

# 6. Install docker Engine, CLI, and plugins
echo "Installing docker Engine and other components..."
sudo apt-get install -y docker-ce docker-ce-cli containerd.io docker-buildx-plugin docker-compose-plugin

# 7. Start and enable docker
echo "Starting and enabling docker service..."
sudo systemctl start docker
sudo systemctl enable docker

# 8. Verify docker installation
echo "Verifying docker installation..."
docker_version=$(sudo docker --version)
echo "docker has been installed: $docker_version"

# 9. Test docker installation
echo "Running docker hello-world test..."
sudo docker run hello-world

# Optional: Add the current user to the docker group
echo "Would you like to run docker without sudo? (y/n)"
read -r add_to_group

if [ "$add_to_group" = "y" ]; then
    sudo usermod -aG docker $USER
    echo "Added $USER to the docker group. Please log out and log back in or run 'newgrp docker' to apply changes."
else
    echo "You can still run docker with sudo."
fi

echo "docker installation is complete."
Run the script to install docker:
chmod +x ./setupdocker.sh
./setupdocker.sh
4.4.3. Windows 10 (WSL2)
Enable WSL2 and install Ubuntu. See Setting Up WSL2 and Ubuntu 24.04 on Windows 10
Install docker Desktop (https://www.docker.com/products/docker-desktop/) and enable WSL2 integration
Install docker support: Docker on Ubuntu
4.5. Example: Yocto RT-Linux docker base image
In this example a docker base image will be created based on the Yocto RT-Linux guest image.
4.5.1. Base image creation
See chapter Docker Base Image for background information about docker base images.
To create such base image, we need to extract the root filesystem from the Yocto RT-Linux image.
For this purpose you will have to create a RT-Linux guest with no docker support in a first step.
For example create a RT-Linux guest using the System Manager and select the Linux 5.15 x64 image.
After starting the guest, you need to log in and run the following command (the folders may be different on your RT-Linux image!):
tar -czf /mnt/rtfiles/files/rootfs.tar.gz /bin /conf /etc /init /lib64 /root /sbin /usr /boot /home /lib /linuxrc >/dev/null
The rootfs.tar.gz will be located on the Hypervisor host at /hv/guests/files.
Copy this image to your build machine, e.g. into ~/docker/baseimage and create a new file Dockerfile in this folder
with the following content:
FROM scratch
ADD rootfs.tar.gz /
CMD ["/bin/sh"]
Create the base image:
sudo docker build -t yocto-base-image ./
Test if the image exists and works:
sudo docker images
The newly created image should be listed.
sudo docker run -it yocto-base-image /bin/sh
You should see a shell prompt and will be able to type in typical shell commands.
To leave the container, type exit.
Finally, you may save the base image for later usage.
sudo docker save -o yocto-base-image.tar yocto-base-image
4.6. Example: docker container for the EC-Master demo
The Yocto RT-Linux base image from the foregoing example will be used as the base platform for the EtherCAT master stack demo application.
4.6.1. Create an EC-Master demo container
Create a new folder where to create this container, e.g. ~/docker/ecm.
Copy all binary files which are needed into this folder.
Finally, create a new docker configuration file ecm.cfg in this folder with the following content:
# Use your Yocto-based image as the base
FROM yocto-base-image:latest

# Create directories for applications and shared libraries
RUN mkdir -p /usr/local/bin /usr/local/lib

# Copy applications into the container
COPY EcMasterDemo /usr/local/bin/EcMasterDemo
COPY EcMasterDemoSyncSm /usr/local/bin/EcMasterDemoSyncSm

# Set execute permissions on the applications
RUN chmod +x /usr/local/bin/EcMasterDemo /usr/local/bin/EcMasterDemoSyncSm

# Copy shared libraries into the container
COPY libemllSockRaw.so /usr/local/lib/libemllSockRaw.so
COPY libemllIntelGbe.so /usr/local/lib/libemllIntelGbe.so
COPY libEcMaster.so /usr/local/lib/libEcMaster.so

# Initialize LD_LIBRARY_PATH
ENV LD_LIBRARY_PATH="/usr/local/lib:/lib:/lib64"

# Choose the application to run by default when the container starts
CMD ["/usr/local/bin/EcMasterDemo", "-sockraw", "eth0", "1"]
Create the container:
sudo docker build -t yocto-ecm-container -f ecm.cfg ./
Test if the image exists and works:
sudo docker images
Next, save the base image.
sudo docker save -o yocto-ecm-container.tar yocto-ecm-container
4.6.2. Run the EC-Master demo container
The yocto-ecm-container.tar file which you have created must be transferred now to the Hypervisor Host.
You may copy it at /hv/guests/files.
Create a RT-Linux guests with docker support and start this guest.
Load the container:
docker load </mnt/rtfiles/files/yocto-ecm-container.tar
Run the container:
docker run --privileged -it yocto-ecm-container
You should see the master demo application start running. You may have to adjust the commandline parameters in ecm.cfg according
to your needs.