2. RT-Linux Guest
2.1. Example Real-time Linux guest
Initially, the Hypervisor Host does not provide any example guest folders. To switch to an example guest, you must execute the corresponding initialization. For instructions on how to initialize the examples, refer to Hypervisor Manual (chapter Example guest folders).
Important
You need at least 256 Mbyte RAM for the shipped RT-Linux image.
After the example is initialized, the Real-time Linux guest can be found in /hv/guests/guestrtlinux
hv_open_example rt-linux
hv_sync_example rt-linux
cd /hv/guests/guestrtlinux
Real-time Linux guest specific files are stored in /hv/guests/guestrtlinux/files:
autostart.sh: RT-Linux autostart script, you may enhance this script to automatically run your RT-Linux application.timesync.sh: Time-synchronization script, this will assure the RT-Linux time and date is consistent with the Hypervisor Host.remote_cmd_exec.sh: Example script which is used to show how to run a RT-Linux application from within a Windows or Ubuntu guest.
2.1.1. File system access for RT-Linux guests
The Hypervisor Host file system is mounted into the /mnt/rtfiles folder of RT-Linux.
The Hypervisor Host folder /hv/guests acts as the root folder for all guests and is mounted into this folder.
2.2. Example Real-time Linux guest with Docker
To use Real-time Linux guest with Docker you must initialize the appropriate Real-time Linux guest first. Refer to Example Real-time Linux guest.
Open the System Manager in a browser and verify that System Manager is connected, synchronized and is in Config mode.
In the Navigator tab open the example Real-time Linux guest.
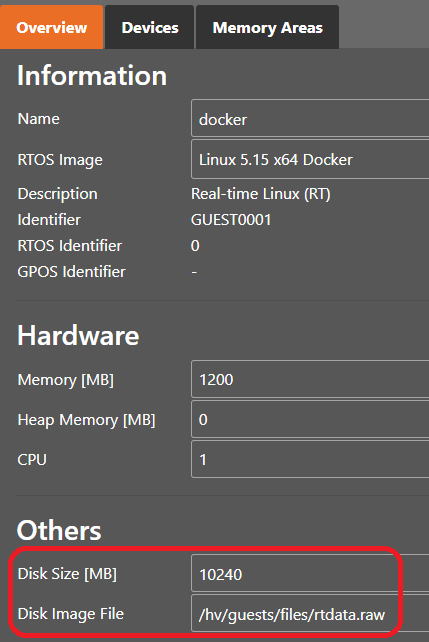
Change Hardware/Memory to at least 1200 Mb and change the RTOS Image to Linux 5.15 x64 Docker.
Important
You need at least 1200 Mbyte RAM for the shipped RT-Linux image.
Hint
The RT-Linux Docker repository can be created either in RAM or in a persistent filesystem.
If Docker is used in RAM, the repository must be set up fresh after each restart of RT-Linux.
To make the Docker repository persistent, it must be stored in a persistent filesystem container.
The desired size of the container can be determined using the System Manager or, alternatively, be set in usr_guest_config.sh using the rt_data_size_MB switch.
When RT-Linux starts, the filesystem is mounted at /mnt/rtdata, and the Docker repository is mounted into this filesystem.
The default location of the container file is below the guest folder, e.g. /hv/guests/guest0001/files/rtdataimage.raw.
Important
The data file will only be created when the RT-Linux guest is started and no existing data container file is found.
Once the container file is created, its size cannot be changed. The size should be large enough for your complete Docker environment.
If the default path and filename for the container file shall be changed, you need to assure that it must be located below the /hv/guest folder!
Configure the size of the data file. In this guide, we will create a data file with a size of 10GB (10240MB).
You can configure the data container path, filename and size using the System Manager:
Or, alternatively, using the usr_guest_config.sh file:
cd /hv/guests/guest0001
mousepad usr_guest_config.sh
Add or Adjust the following lines (in this case, the default path and filename will be used):
export rt_data_size_MB=10240
Turn the System Manager into Run mode, start the VMF and start the guest.
Connect to the guest using ssh or telnet.
Next, verify that Docker works by running docker info and you will see messages like:
root@vmf64:~# docker info
Client:
 Version:    24.0.6
 Context:    default
 Debug Mode: false
 ...
The following sections show how to work with Docker example images. For more details please refer to the official Docker documentation.
2.2.1. Get Docker images from the web
To start ready to use images from the Docker site you need one Ethernet adapter assigned to RT-Linux. This adapter needs to be configured for TCP/IP usage.
To pull (download) Docker image, you should start docker pull hello-world:
root@vmf64:~# docker pull hello-world
Using default tag: latest
latest: Pulling from library/hello-world
c1ec31eb5944: Pull complete
Digest: sha256:53641cd209a4fecfc68e21a99871ce8c6920b2e7502df0a20671c6fccc73a7c6
Status: Downloaded newer image for hello-world:latest
docker.io/library/hello-world:latest
Start the container via docker run hello-world. Then you will get messages like:
root@vmf64:~# docker run hello-world

Hello from Docker!
This message shows that your installation appears to be working correctly.

To generate this message, Docker took the following steps:
1. The Docker client contacted the Docker daemon.
2. The Docker daemon pulled the "hello-world" image from the Docker Hub.
    (amd64)
3. The Docker daemon created a new container from that image which runs the
    executable that produces the output you are currently reading.
4. The Docker daemon streamed that output to the Docker client, which sent it
    to your terminal.
To get a list of locally available images, use docker image ls
root@vmf64:~# docker image ls
REPOSITORY    TAG       IMAGE ID       CREATED         SIZE
hello-world   latest    d2c94e258dcb   11 months ago   13.3kB
2.2.2. Use local docker images
This chapter shows how to work with local Docker images on RT-Linux. As an example we will pull (download) the BusyBox image from a global repository (docker.io). Then we will save and restore the image locally.
In a first step, get the docker image from the web (e.g. on a separate Linux PC).
root@vmf64:~# docker pull busybox
Using default tag: latest
latest: Pulling from library/busybox
7b2699543f22: Pull complete
Digest: sha256:650fd573e056b679a5110a70aabeb01e26b76e545ec4b9c70a9523f2dfaf18c6
Status: Downloaded newer image for busybox:latest
docker.io/library/busybox:latest
Save the Docker image to the busybox.tar file:
root@vmf64:~# docker save busybox > busybox.tar
Next, copy the file busybox.tar to the guest shared folder, for example at /hv/guests/
After you have made the image available at the guest shared folder you can use the docker load command to load the saved image into the local repository:
root@vmf64:~# docker load < /mnt/rtfiles/busybox.tar
95c4a60383f7: Loading layer [==================================================>]  4.495MB/4.495MB
Loaded image: busybox:latest
Run the image:
root@vmf64:~# docker run -it busybox:latest
/ #
This will create and start a new container (docker run) in an interactive terminal (-it) by loading the image busybox:latest from the local repository.
The interactive terminal will give you access to the BusyBox console.
To exit the container use the exit command.
2.3. RT-Linux specific configuration parameters
Default settings are stored in the guest.config file in the guest folder. The user can override those setting in the usr.config file.
2.3.1. Network configuration
All network configuration parameters are stored in the guest.config file under the [Rtos\Vnet\0] key.
Entry Name |
Type |
Description |
|---|---|---|
MacAddress |
String |
Virtual Network Adapter MAC address. |
IpAddress |
String |
IP address for the RT-Linux virtual network adapter. |
PollingPeriodMs |
String |
The polling period can be adjusted using this parameter. A value of 0 enables the interrupt mode. |
PollingPeriodUs (optional) |
dword |
The period in usec activates high resolution polling mode. If absent or value of 0, uses PollingPeriodMs parameter. |
NoNAPI (optional) |
dword |
The value of 1 disables NAPI for Vnet driver. May provide better performance when used with CODESYS |
2.3.2. Autostart
Under the [Rtos\Autostart\1] key you can define optional autostart parameters.
Entry Name |
Type |
Description |
|---|---|---|
Executable |
String |
Name and path of the executable file |
Parameter |
String |
Parameters of the executable |
In guest.config a default autostart script is configured. This script (autostart.sh) is located in the sub-folder files of the guest folder.
You can redefine the name and location of the autostart script in usr.config as well as change the existing default settings in the shipped script.
The [Rtos\Linux] key contains Linux specific settings. The followings entries are optional and
provide the possibility to disable some RT-Linux components:
Entry Name |
Type |
Description |
|---|---|---|
novnet |
String |
If |
nossh |
String |
If |
notelnet |
String |
If |
nortosfs |
String |
If |
nortosservice |
String |
If |
2.3.3. Kernel command line
The [Rtos\Linux] key can specify the kernel command line:
Entry Name |
Type |
Description |
|---|---|---|
cmd_line |
String |
Command line string passed to the Kernel. Default value is nopti |
2.3.4. Time synchronization settings
The [Rtos\TimeSync] key contains time synchronization settings. RT-Linux has here some own specific
parameters. Please note, [Rtos\TimeSync] and [Host\TimeSync] can have other parameters as well,
valid for Linux and all other operating systems. Please refer to Hypervisor\doc\RtosVM-UserManual.pdf to get details.
Entry Name |
Type |
Description |
|---|---|---|
TimezoneLinux |
String |
Contains timezone for Linux, as in
TZ Linux environment variable, ex. Europe/Berlin. By default, Linux starts with UTC timezone. All existing time zones could be found in /usr/share/zoneinfo directory.if this parameter is set and TaskEnabled parameter is not 0, boot script creates a link to the specified time zone binary file from
/etc/localtime. |
TaskEnabled |
dword |
0 Task will not be started
1 Task will be started
2 Task will be started, init time and timezone once and then finish.
omitted = 0 = Task will not be started. It differs from omitted value from other OSes defined in
RtosVM User Manual |
2.4. Example Applications
2.4.1. General
To make your initial experiences in working with RT-Linux and Linux go smoothly, a number of example application programs have been provided with the product release. Some are intended as exercises to help familiarize you with various system features; others are useful tools. Much of the code can serve as model software that can save you time in developing your own applications.
The example applications are located at the product SDK. Please refer to RT-Linux Guest SDK to locate Linux or Windows SDK.
2.4.2. List of examples
These examples are based on the RTOS-Library. For more information about this library see the RTOS VM User Manual.
Windows |
RT-Linux |
Description |
|---|---|---|
CSharpDemo |
The C# demo shows you how to use RtosLib functions from a C# application. |
|
EventDemo |
EventDemo |
Use the Shared event demo to experiment with Shared Events between OS. |
FileDemo |
The File demo shows you how a Linux application can remotely access the RtFiles directory. |
|
InterlockDemo |
InterlockDemo |
The interlock demo shows you how to use the InterlockedCompareExchange function to synchronize shared memory access works between two OS. |
MsgQueueDemo |
MsgQueueDemo |
Use the Message queue demo to see how a simple communication channel can be established between two OS using a shared memory based message queue to transfer data. |
PipeDemo |
PipeDemo |
Use the Pipe demo to see how a simple communication channel can be established between two OS using a shared memory-based pipe to transfer data. |
ShmDemo |
ShmDemo |
Use the Shared memory demo to see how a simple communication channel can be established between two OS using Shared Memory to transfer data. |
SocketDemo |
SocketDemo |
Use the Socket demo to see how a simple communication channel can be established between two OS using shared memory-based socket to transfer data. |
TimerDemo |
Use the Timer demo to see how a periodic task with real time priority can be started. |
2.5. RT-Linux Guest SDK
The development of applications for RT-Linux Guest with the SDK can be done on Windows or Linux. This can involve using a Windows or Linux guest in the RTOSVisor or a separate PC with Windows or Linux.
- Linux development:
The SDK required for developing RT-Linux applications on Linux can be found on the Hypervisor Host in the file
/hv/guests/files/LinuxTools/rtlinux-sdk.tar. You can extract the SDK either directly within the Hypervisor Host or on a separate development PC running Linux. Currently the SDK includes three subdirectories:/incfor headers,/libfor libraries and/examplesfor sample applications. A Description for developing and debugging RT-Linux applications using Eclipse in Ubuntu is available in the Hypervisor Manual in section remote-debugging:Debugging RT-Linux Guest with Eclipse on Ubuntu. In addition, the source files to create the RT-Linux binaries are included (sources_*.xz).- Windows development:
The SDK required for developing RT-Linux applications on Windows is located in the file
Hypervisor\SDK\rtlinux-sdk.zip, which is part of the RTOSVisor installation package. Instructions for developing and debugging RT-Linux applications using Microsoft Visual Studio in Windows are available in the section remote-debugging:Debugging RT-Linux Guest with Visual Studio on Windows in the Hypervisor Manual manual. A short description how to build the provided examples is included in the fileexamples\linux\HowToBuildTheExamplesLinux.txtin the SDK.
2.6. Real-time application programming
RT-Linux guest is shipped with a pre-configured and validated hard real-time capable Linux image.
The basic technology behind it is the PREEMPT_RT patch for Linux.
Valuable information about how to create real-time capable Linux applications can be found at the Linux Foundation WIKI: https://wiki.linuxfoundation.org/realtime/documentation/howto/applications/start
2.7. RTOS Library
The RTOS library provides higher level communication services for synchronizing different operation systems or to exchange data between the operating systems. The RTOS library is based on VMF-functions which provide the basic communication functionality.
A description of the RTOS Library can be found in Chapter 10.1 of the Hypervisor\doc\RtosVM-UserManual.pdf, which is included in the RTOSVisor installation package.
2.8. TCP/IP configuration
If you want to use TCP/IP in the guest, the appropriate drivers have to be loaded and the ethernet adapter must be configured appropriately.
Please uncomment the respective settings provided in the shipped autostart script.
# load Ethernet drivers if required
modprobe igb
modprobe igc
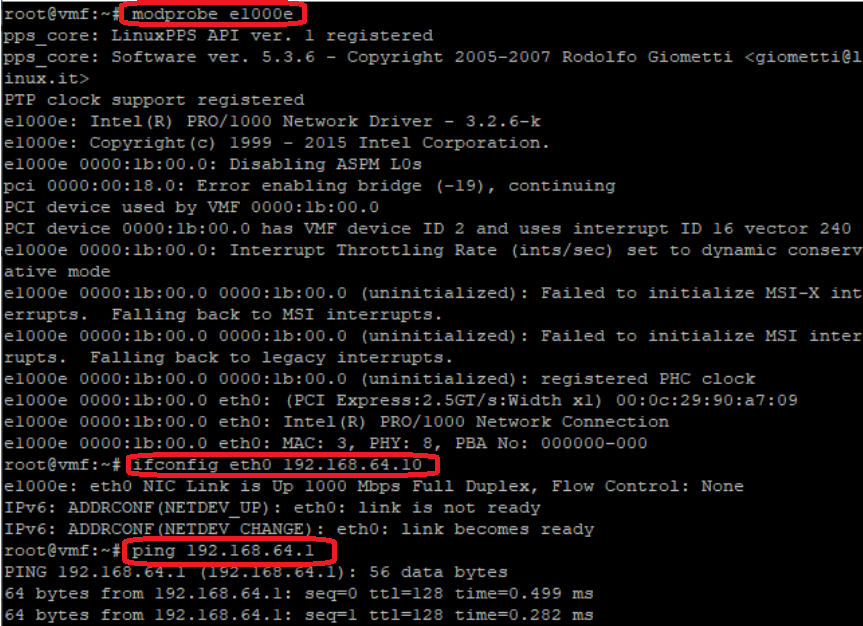
modprobe e1000e
modprobe r8169
ifconfig eth0 up
# set fixed IP address (note: the default kernel does not support DHCP)
ifconfig eth0 192.168.64.10
After restarting the guest, check if everything works: enter ifconfig and/or ping some device on the network.
Important
If you are using the acontis EtherCAT master stack, you do not need these drivers, the master stack is using its own high performance drivers. You should only load these drivers if you need to use TCP/IP in parallel to EtherCAT. In this case, please check the EC-Master documentation for details, how to unbind the driver from the Ethernet MAC that is used for EtherCAT.
2.9. Access Windows file system using Samba
It is possible to access the file system of a Windows PC using Samba. Here is a description of how to start samba automatically via a start-up shell-script.
Create a new Windows share in Windows or use existing one.
Modify the
usr.configfile by adding the following two lines. This will prevent the defaultautostart.shscript from being called. Alternatively, you can skip replacing the autostart script and add the call tocifs_mnt.shdirectly inautostart.sh.
[Rtos\Autostart\1]
"Executable"="/mnt/rtfiles/cifs_mnt.sh"
Create a new file named
cifs_mnt.shat/hv/guests/with the following content:
HOST_IP="192.168.157.1"
SHARE_NAME="SomeName"
USER="UserName"
PASSWORD="UserPassword"
mkdir -p /mnt/${SHARE_NAME}
mount -t cifs //${HOST_IP}/${SHARE_NAME} /mnt/${SHARE_NAME} -v -o
username=${USER},password=${PASSWORD},domain=${HOST_IP},vers=2.1
echo "cifs mounted"
Modify the
HOST_IP,SHARE_NAME,USERandPASSWORDparameters appropriate to your windows share from step 1.Take care that you create the
cifs_mnt.shfile with LF (Line Feed) line endings. Windows programs create CR/LF line ending, by default. Shell pre-processor cannot recognize this so you have to convert the line endings to only LF. Common Editors have functions to do that.Start RT-Linux and verify the mount results with the
mountcommand.
2.10. Remote Debugging
See the respective chapter in the Hypervisor Manual.
2.11. Synchronize Linux Time with Host
RT-Linux contains a special time synchronisation daemon, that works in background and synchronizes Linux time with host time. This daemon is disabled by default, but it starts automatically when the time synchronization feature is enabled in the configuration.
To enable this feature modify the following config section in /hv/config/hvbase.config:
[Host\TimeSync]
"TimeSyncMaster"="Host"
"TaskEnabled"=dword:1
And add or modify the following config section in /hv/guests/guestxxxx/usr.config
[Rtos\TimeSync]
"TimeSyncMaster"="Host"
"TaskEnabled"=dword:1
"TimezoneLinux"="Europe/Berlin"
Now start RT-Linux and check for a new log message showing that the timesync daemon has been started If you want to have different timezone in Linux and Host, you should set TZ variable in autostart script.
All existing time zones could be found in /etc/share/timezone directory.
Default RT-Linux image does not contain all available timezones due to size considerations. If need to use other timezones,
please change yocto/recipes-core/images/rtlinux-image-initramfs.bb file.
2.12. How to create your own RT-Linux Image (BSP)
2.13. RT-Linux GPL compliance
RT-Linux uses open-source packets with GPL licenses. RT-Linux is compliant to GPL V2, because the Linux kernel and the BusyBox (user interface shell including several commands) are based on GPL V2.
Compliance to the FLOSS (Free/Libre Open Source Software) licenses are achieved in RT-Linux by the following means:
The related source code is provided.
License text for the used software is provided.
Compilation scripts and modifications to the source code are provided.
RT-Linux source code and compilation scripts could be found inside RT-Linux Guest SDK.
All licenses texts are located at /hv/doc/licenses/rtlinux:
Important
Customer software which is added into the Linux kernel of RT-Linux also will have to be GPL compliant according to the above rules.
Customer software and applications running in user mode has not to be compliant to GPL and thus can stay closed source and can be provided under any kind of software license the customer chooses.