

2.4. Operating system configuration
The main task is to setup the operating system to support the appropriate network adapter for EtherCAT® usage and for some systems real-time configuration may be needed.
The operating system-specific settings and configurations are described in Platform and Operating Systems (OS).
2.4.1. Running EcSimulatorHilDemoGuiDotNet
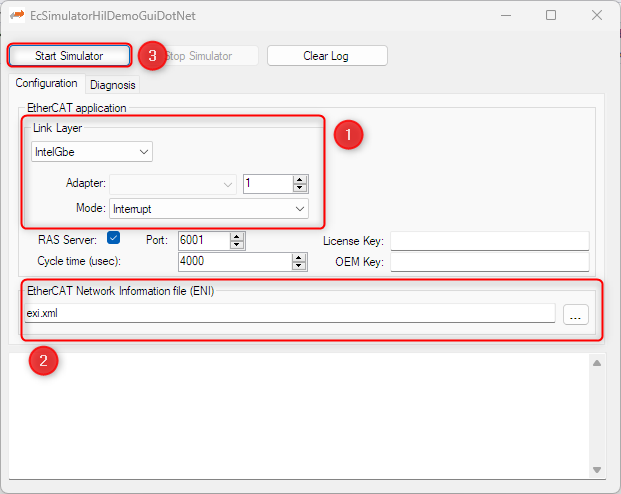
EC-Simulator HiL for Windows contains a .NET example application, the EcSimulatorHilDemoGuiDotNet.
Selecting the appropriate network adapter and providing an EtherCAT® Network Configuration file (ENI / EXI) is mandatory before clicking “Start” to run the EC-Simulator:
2.4.2. Running EcSimulatorHilDemo
The EcSimulatorHilDemo is an EC-Simulator example application that handles the following tasks:
Showing basic EtherCAT® communication
Stack initialization
Process Data operations (e.g., flashing INPUTs)
Periodic diagnosis task
Periodic Job Task
Logging to ecsimulator0.log, error0.log
The EcSimulatorHilDemo is available “out of the box” for different operating systems. The operating system must be prepared for running EtherCAT® applications.
See also
2.4.2.1. Setting up and running EcSimulatorHilDemo
2.4.2.1.1. Linux (EcSimulatorHilDemo)
Operating system configuration: See the section Operating system configuration for how to prepare the operating system.
Starting EcSimulatorHilDemo
$ cd /opt/EC-Simulator/Bin/Linux/x64
$ ./EcSimulatorHilDemo -intelgbe 2 1 -f exi.xml -perf -sp
2.4.2.1.2. Microsoft Windows (EcSimulatorHilDemo)
Windows configuration: See the section Operating system configuration for how to prepare the operating system.
Determine the network interface: Using the command line option the network interface card used by the example application can be determined. For example the option -ndis 192.168.157.2 0 will be using the network adapter card with the IP address 192.168.157.2 .
Simulating EtherCAT® modules: The simulator has to be connected with the target system using an Ethernet switch or a patch cable. Local IT infrastructure should not be mixed with EtherCAT® modules at the same switch as the MainDevice will send many broadcast packets! EtherCAT® requires a 100Mbit/s connection. Gigabit-Ethernet connections between simulator and MainDevice can be typically used, too.
Copy all of the example application files into one directory: The application EcSimulatorHilDemo.exe together with the stack DLLs and the EXI file have to be copied into one directory.
Run the example application: EcSimulatorHilDemo.exe has to be executed. The file name of the EXI file has to be given as a command line parameter as well as the appropriate Real-time Ethernet Driver parameters.
$ EcSimulatorHilDemo.exe -ndis 192.168.157.2 0 -f exi.xml -t 0 -v 3 -sp
2.4.2.2. Command line parameters
- EcSimulatorHilDemo <LinkLayer> [-f ENI-FileName] [-t cycle time] [-b time] [-a affinity] [-v level] [-perf [level]] [-log prefix [msg cnt]] [-lic key] [-oem key] [-fingerprint method] [-flash address] [-sp [port]] [-rec [prefix [frame cnt]]]
The parameters are as follows:
- -t <time>
Running duration [ms]. When the time expires the demo application exits completely.
- <time>:
Time [ms], 0 = forever (default = 120000)
- -b <cycle time>
Specifies the bus cycle time. Defaults to 1000 µs (1 ms).
- <cycle time>:
Bus cycle time in µsec
- -a <affinity>
The CPU affinity specifies which CPU the demo application ought to use.
- <affinity>:
0 = first CPU, 1 = second, …
- -v <level>
The verbosity level specifies how much console output messages will be generated by the demo application. A high verbosity level leads to more messages.
- <level>:
Verbosity level: 0=off (default), 1..n=more messages
- -perf [<level>]
Enable max. and average time measurement in µs for all EtherCAT® jobs (e.g. ProcessAllRxFrames).
- <level>:
Depending on level the performance histogram can be activated as well.
- -log <prefix> [<msg cnt>]
Use given file name prefix for log files.
- <prefix>:
- <msg cnt>:
Messages count for log buffer allocation
- -sp [<port>]
If platform has support for IP Sockets, this command-line option enables the Remote API Server to be started. The Remote API Server is going to listen on TCP Port 6000 (or port parameter if given) and is available for connecting Remote API Clients.
- <port>:
RAS server port
- -rec [<prefix> [<frame cnt>]]
Packet capture file recording
- <prefix>:
File name prefix
- <frame cnt>:
Frame count for log buffer allocation
2.4.2.2.1. Link Layer
Using one of the following demo application Link Layer options, the EC-Simulator will dynamically load the network driver for the specified network adapter card and use the appropriate network driver to access the Ethernet adapter for EtherCAT®.
ShowSyntaxLinkLayer() in Common/EcSelectLinkLayer.cpp is called automatically if the Demo application is started without parameters and lists the possibilities.
Note
Not all link layers are available on all operating systems or architectures. A detailed view in the form of a matrix can be found in the developer center.
- -alteratse <instance> <mode>
- <Instance>:
Device instance 1 = first, 2 = second, …
- <Mode>:
0 = Interrupt mode | 1 = Polling mode
- -bcmgenet <instance> <mode>
- Hardware: Broadcom BcmGenet
- <Instance>:
Device instance 1 = first, 2 = second, …
- <Mode>:
0 = Interrupt mode | 1 = Polling mode
- -bcmnetxtreme <instance> <mode>
- Hardware: Broadcom NetXtreme
- <Instance>:
Device instance 1 = first, 2 = second, …
- <Mode>:
0 = Interrupt mode | 1 = Polling mode
- -bpf <instance> <mode> <interface> [<prefix>]
- Hardware: Berkeley Packet Filter, Hardware independent
- <Instance>:
BPF instance (0=first), results to e.g. /dev/bpf0
- <Mode>:
0 = Interrupt mode | 1 = Polling mode
- <Interface>:
Name of Ethernet Interface, e.g. wm0
- Optional:
- <Prefix>:
Prefix of the BPF instance path, e.g. /alt
- -ccat <instance> <mode>
- Hardware: Beckhoff CCAT
- <Instance>:
Device instance 1 = first, 2 = second, …
- <Mode>:
0 = Interrupt mode | 1 = Polling mode
- -cpsw <instance> <mode> <portpriority> <masterflag> <refboard>
- Hardware: TI CPSW
- <Instance>:
Device instance 1 = first, 2 = second, …
- <Mode>:
0 = Interrupt mode, 1 = Polling mode
- <PortPriority>:
Low priority (0) or high priority (1)
- <MasterFlag>:
(m) Master (Initialize Switch), (s) Slave
- <RefBoard>:
bone | am3359-icev2 | am437x-idk | am572x-idk | 387X_evm | custom | osdriver
- If custom:
- <CpswType>:
am33XX | am437X | am57X | am387X
- <PhyAddress>:
0 … 31
- <PhyInterface>:
rmii | gmii | rgmii | osdriver
- <NotUseDmaBuffers>:
0 = FALSE | 1 = TRUE
- -dpdk <instance> <mode> <port>
- Hardware: Hardware independent, only available for Linux.
- <Instance>:
Device instance 1 = first, 2 = second, …
- <Mode>:
0 = Interrupt mode (not implemented), 1 = Polling mode
- <Port>:
DPDK port ID, e.g. 0
This option supports a large variety of NICs. Whether a NIC is supported depends on its network driver. For a list of supported network drivers see https://www.dpdk.org.
- -dpdkenetc4 <instance> <mode> <port>
- Hardware: NXP iMX95 ENETC4, only available for Linux.
- <Instance>:
Device instance 1 = first, 2 = second, …
- <Mode>:
0 = Interrupt mode (not implemented), 1 = Polling mode
- <Port>:
DPDK port ID, e.g. 0
- -dw3504 <instance> <mode> <refboard>
- Hardware: Synopsys DesignWare 3504-0 Universal 10/100/1000 Ethernet MAC (DW3504)
- <Instance>:
Device instance 1 = first, 2 = second, …
- <Mode>:
0 = Interrupt mode | 1 = Polling mode
- <RefBoard>:
Reference Board: intel_atom | lces1 | rd55up06 | r12ccpu | rzn1 | socrates | stm32mp157a-dk1 | custom
- If custom:
- <DW3504Type>:
intel_atom | cycloneV | lces1 | stm32mp157a-dk1
- <PhyInterface>:
fixed | mii | rmii | gmii | sgmii | rgmii | osdriver
- <PhyAddress>:
0 … 31 (don’t use if osdriver)
- -dwxgmac <instance> <mode> <RefBoard>
- Hardware: Synopsys DesignWare Cores XGMAC 10G/25G Ethernet MAC
- <instance>:
Device instance 1 = first, 2 = second, …
- <mode>:
0 = Interrupt mode | 1 = Polling mode
- <RefBoard>:
Reference Board: jetson-agx-orin | jetson-agx-thor | custom
- If custom:
- <Type>:
jetson-agx-orin | jetson-agx-thor
- <PhyInterface>:
fixed | osdriver | 10gbaser
- <PhyAddress>:
0 … 31, default 0 (don’t use if osdriver)
- -eg20t <instance> <mode>
- Hardware: Intel EG20T Gigabit Ethernet Controller
- <Instance>:
Device instance 1 = first, 2 = second, …
- <Mode>:
0 = Interrupt mode | 1 = Polling mode
- -emac <instance> <mode> <refboard>
- Hardware: Xilinx LogiCORE IP XPS EMAC
- <Instance>:
Device instance 1 = first, 2 = second, …
- <Mode>:
0 = Interrupt mode | 1 = Polling mode
- <RefBoard>:
MC2002E | custom
- If custom:
- <RegisterBase>:
Register base address as hex value
- <RegisterLength>:
Register length as hex value
- <NotUseDmaBuffers>:
0 = FALSE | 1 = TRUE
- -fslenetc <instance> <mode> <refboard>
- Hardware: NXP ENETC4 (NETC, i.MX95)
- <Instance>:
Device instance 1 = first, 2 = second, …
- <Mode>:
1 = Polling mode
- <RefBoard>:
verdin-imx95 | custom
- If custom:
- <Type>:
imx95
- <PhyInterface>:
fixed | osdriver
- <PhyAddress>:
0 … 31 (ignored if osdriver)
- -fsletsec <instance> <mode> <refboard>
- Hardware: Freescale TSEC / eTSEC V1 / eTSEC V2 (VeTSEC)
- <Instance>:
Device instance 1 = first, 2 = second, …
- <Mode>:
0 = Interrupt mode | 1 = Polling mode
- <RefBoard>:
p2020rdb | twrp1025 | istmpc8548 | xj_epu20c | twrls1021a | tqmls_ls102xa | custom
- If custom:
- <PhyAddress>:
0 … 31
- <RxIrq>:
Default depending on ETSEC type
- <NotUseDmaBuffers>:
0 = FALSE | 1 = TRUE
- -fslfec <instance> <mode> <refboard> [--nopinmuxing] [--nomacaddr]
- Hardware: Freescale FEC/ENET
- <Instance>:
Device instance 1 = first, 2 = second, …
- <Mode>:
0 = Interrupt mode | 1 = Polling mode
- <RefBoard>:
mars | sabrelite | sabresd | imx28evk | topaz | imxceetul2 | mimxrt1064-evk | imx93evk | custom
- If custom:
- <FecType>:
imx25 | imx28 | imx53 | imx6 | vf6 | imx7 | imx8 | imx8m | imxrt1064 | imx9
- <PhyInterface>:
fixed | mii | rmii | rmii50Mhz | gmii | sgmii | rgmii | osdriver
- <PhyAddress>:
0 … 31, default 0 (don’t use if osdriver)
- Optional:
- --nopinmuxing:
No pin muxing
- Optional:
- --nomacaddr:
Don’t read MAC address
- -gem <instance> <mode> <refboard> [--osdriver] [--clkdivtype_k26] [--nopinmuxing]
- Hardware: Cadence GEM/MACB
- <Instance>:
Device instance 1 = first, 2 = second, …
- <Mode>:
0 = Interrupt mode | 1 = Polling mode
- <RefBoard>:
zc702 | zedboard | microzed | zcu102 | zcu104 | KR260 | rpi5 | polarfire | custom
- If custom:
- <PhyAddress>:
0 … 31
- <PhyConnectionMode>:
MIO (0) or EMIO (1)
- <UseGmiiToRgmii>:
Use Xilinx GmiiToRgmii converter TRUE (1) or FALSE (0)
- <GmiiToRgmiiPort>:
GmiiToRgmii converter PHY address 0 … 31
- <GemType>:
zynq7000 | ultrascale | bcm2712 | polarfire
- Optional:
- --osdriver:
PhyInterface osdriver
- Optional:
- --clkdivtype_k26:
Clock divisor
- Optional:
- --nopinmuxing:
Don’t use pin muxing
- -intelgbe <instance> <mode> [--tts <sendoffset>|--tmr] [--nophyctrlonconnect]
- Hardware: Intel Pro/1000 network adapter card
- <Instance>:
Device instance 1 = first, 2 = second, …
- <Mode>:
0 = Interrupt mode | 1 = Polling mode
- Optional:
- --tts:
Enable Real-time Ethernet Driver Time Triggered Send (TTS)
- <SendOffset>:
TTS cyclic frame send offset from cycle start (usec)
- or:
- --tmr:
Enable Real-time Ethernet Driver Timer
- Optional:
- --nophyctrlonconnect:
Disable PHY control (e.g. PHY reset, PHY PM settings, Gbits Ctrl) on link connection detected
- -i8255x <instance> <mode>
- Hardware: Intel Pro/100 network adapter card
- <Instance>:
Device instance 1 = first, 2 = second, …
- <Mode>:
0 = Interrupt mode | 1 = Polling mode
- -icss <instance> <mode> <masterflag> <refboard> [--mii <phyaddress>|--osdriver] [--nophyreset] [--tts <sendoffset>]
- Hardware: Texas Instruments Board with PRUSS
- <Instance>:
ICSS Port (100 Mbit/s) 1 … 4
- <Mode>:
0 = Interrupt mode | 1 = Polling mode
- <MasterFlag>:
(m) Master (Initialize board, mdio, both phy) or (s) Slave
- <RefBoard>:
am572x-idk | am571x-idk | am3359-icev2 | am574x
- Optional:
- --mii:
PhyInterface mii
- <PhyAddress>:
0 … 31
- or:
- --osdriver:
PhyInterface osdriver
- Optional:
- --nophyreset:
No PHY Reset
- Optional:
- --tts:
Enables Real-time Ethernet Driver Time Triggered Send (TTS)
- <SendOffset>:
TTS cyclic frame send offset from cycle start [us]
- -icssg <instance> <mode> <masterflag> <refboard>
- Hardware: Texas Instruments AARCH64 Board with Gigabit PRUSS
- <Instance>:
ICSSG Port 1 … 6
- <Mode>:
0 = Interrupt mode | 1 = Polling mode
- <MasterFlag>:
(m) Master (Initialize board, mdio, both phy) or (s) Slave
- <RefBoard>:
am654x-idk
- -l9218i <instance> <mode>
- Hardware: SMSC LAN9218i/LAN9221
- <Instance>:
Device instance 1 = first, 2 = second, …
- <Mode>:
0 = Interrupt mode | 1 = Polling mode
- -lan743x <instance> <mode>
- Hardware: Microchip LAN743x
- <Instance>:
Device instance 1 = first, 2 = second, …
- <Mode>:
1 = Polling mode
- -ndis <ipaddress> <mode> [--name <adaptername>] [--disablepromiscuousmode] [--disableforcebroadcast]
- Hardware: Hardware independent, only available for Windows.
- <IpAddress>:
IP address of network adapter card, e.g. 192.168.157.2 or 0.0.0.0 if name given
- <Mode>:
0 = Interrupt mode | 1 = Polling mode
- Optional:
- --name:
Select network adapter by name
- <AdapterName>:
Service name from HKEY_LOCAL_MACHINE\SOFTWARE\Microsoft\Windows NT\CurrentVersion\NetworkCards
- Optional:
- --disablepromiscuousmode:
Disable promiscuous mode
- Optional:
- --disableforcebroadcast:
Disable force broadcast
- -multiplier <instance> <mode> [--type <type>] --port <port> --link <link parms>
- Hardware: Beckhoff CUxxxx Ethernet-Port-Multiplier
- <Instance>:
Device instance 1 = first, 2 = second, …
- <Mode>:
0 = Interrupt mode | 1 = Polling mode, for now only polling mode is supported
- --port:
Multiplier port in use
- <Port>:
0 = X1, 1 = X2, …
- --link:
Link parameters of network adapter connected to the uplink port
- <Link parms>:
e.g. -intelgbe …
- Optional:
- --type:
Multiplier type
- <Type>:
cu2508 = CU2508 Ethernet-Port-Multiplier | et2000 = ET2000 Multichannel Ethernet-Probe
- -remote <instance> <mode> <src ip> <src port> <dst ip> <dst port> [--mac <address>] [--rxbuffercnt <count>]
Hardware: Hardware independent. Tunnels EtherCAT frames through a TCP socket
- <Instance>:
Device instance 1 = first, 2 = second, …
- <Mode>:
1 = Polling mode
- <Src ip>:
Source adapter IP address (listen)
- <Src port>:
Source port number (listen)
- <Dst ip>:
Destination adapter IP address (connect)
- <Dst port>:
Destination port number (connect)
- Optional:
- --mac:
MAC Address
- <Address>:
formatted as xx:xx:xx:xx:xx:xx or xx-xx-xx-xx-xx-xx
- Optional:
- --rxbuffercnt:
Frame buffer count for interrupt service thread (IST)
- <Count>:
Buffer count
- -r6040 <instance> <mode>
- Hardware: RDC R6040
- <Instance>:
Device instance 1 = first, 2 = second, …
- <Mode>:
1 = Polling mode
- -rtl8139 <instance> <mode>
- Hardware: Realtek RTL8139
- <Instance>:
Device instance 1 = first, 2 = second, …
- <Mode>:
0 = Interrupt mode | 1 = Polling mode
- -rtl8169 <instance> <mode>
- Hardware: Realtek RTL8168 / RTL8169 / RTL8111
- <Instance>:
Device instance 1 = first, 2 = second, …
- <Mode>:
0 = Interrupt mode | 1 = Polling mode
- -sheth <instance> <mode> <refboard>
- Hardware: Renesas RZG1 or Armadillo-800 EVA or MYIR Remi Pi (Renesas RZ/G2L) or Renesas RX72N Envision Kit
- <Instance>:
Device instance 1 = first, 2 = second, …
- <Mode>:
1 = Polling mode
- <RefBoard>:
rzg1e | a800eva | rzg2l | rx72n
- -snarf <adaptername>
- Hardware: Hardware independent, only available for VxWorks
- <AdapterName>:
Adapter name, e.g. fei0
- -sockraw <device> [<mode>] [--nommaprx] [--promiscuousmode]
- Hardware: Hardware independent, only available for Linux.
- <Device>:
Network adapter, e.g. eth1
- Optional:
- <Mode>:
0 = Interrupt mode | 1 = Polling mode
- Optional:
- --nommaprx:
Disable PACKET_MMAP for receive
- Optional:
- --promiscuousmode:
Enable promiscuous mode
- -sockxdp <device> <mode> [--queue <id>] [--xdpmode <mode>]
- Hardware: Hardware independent, only available for Linux.
- <Device>:
Network adapter, e.g. eth1
- <Mode>:
0 = Interrupt mode | 1 = Polling mode
- Optional:
- --queue:
Set Queue Id
- <Id>:
Queue Id, e.g. 0, 1, … (Default 0)
- Optional:
- --xdpmode:
XDP Mode
- <Mode>:
SKB(1), DRV(2), HW(3) or DRV_ZEROCOPY(4). Default is SKB(1)
- -stm32eth <instance> <mode>
- Hardware: STM32H7 Ethernet
- <Instance>:
Device instance 1 = first, 2 = second, …
- <Mode>:
1 = Polling mode