2. Overview
2.1. Basic GUI elements
On the top left part of the System Manager, one can select the basic GUI elements:

Home: main user interface
Messages: show all messages
Settings: settings dialog
About: System Manager information
On the top right part of the System Manager, you can switch between Configuration mode and Run mode.

In the Configuration mode you will set up and configure general hypervisor settings and setup the guests.
In the Run mode you will be able to start and stop the guests.
2.2. Message Level
The System Manager provides messages for diagnosis purposes. The message level can be set in the Settings Dialog.

Caution
You need to select Save after changing the message level before you leave the dialog!
2.3. User Manuals
The user manuals are located on the the Hypervisor Host. They are accessible via the Help menu

2.4. Logfile Download
In case of issues with the hypervisor configuration, you may download the logfile which contains all the messages. Please select Download Log File in the Help menu.
2.5. Projects
Specific hypervisor configurations (guests, partitioning, memory areas, …) can be stored for later use.

These files (with extension hwc) are stored in /hv/sysmgr/WorkingDir.

2.6. Welcome Page
After selecting Project - New the Welcome page will be shown where you can select how to connect to the Hypervisor Host.

Three type of connection types to one or multiple Hypervisor Hosts as well as the last configuration session can be selected:
local connection to a single Hypervisor Host where the GUI backend (the Web Application) as well as the RTOSVisor backend are executed.
connection via TCP to one or multiple Hypervisor Hosts in the same network.
connection via a MQTT gateway to one or multiple Hypervisor Hosts in different networks. This method enables remote configuration and diagnosis over the Internet without the need for a VPN connection.
the last configuration session.

2.7. Local Connection
The most common connection to the Hypervisor Host is the local connection.
The System Manager GUI backend runs on the Hypervisor Host.
In a first step, you need to select Local Connection and the respective hypervisor type (RTOSVisor).
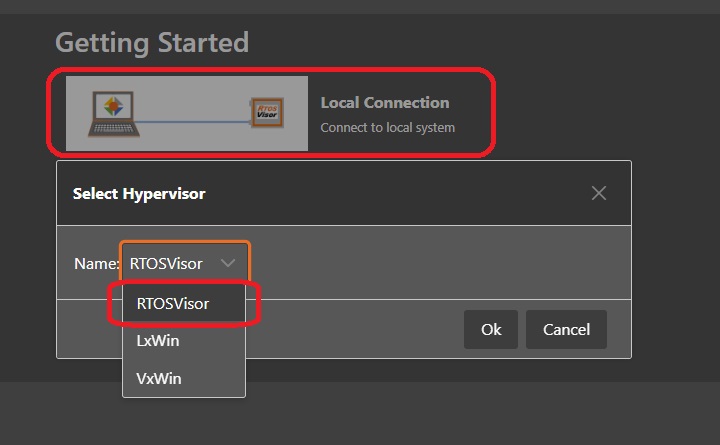
After acknowledging Connect to local system, the Hypervisor Host connection dialog will be shown.
You should provide an appropriate name for this Hypervisor Host and press the Select button.
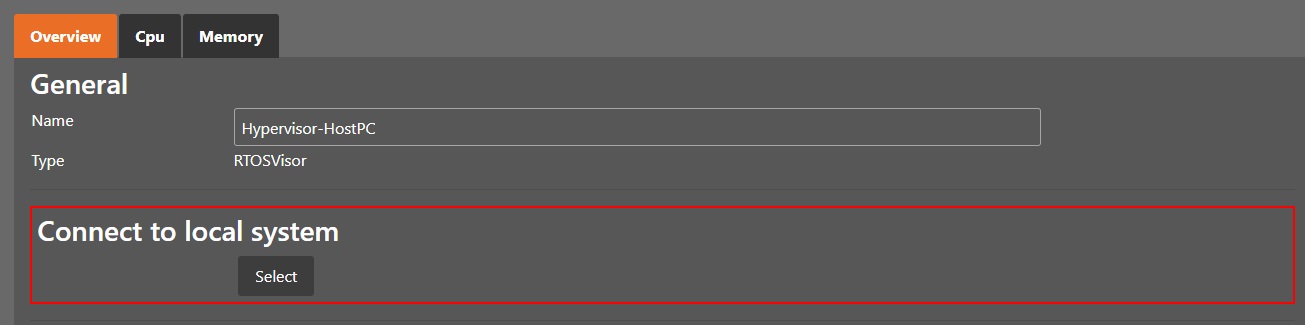
After you had selected the local connection type you will be able to configure one single Hypervisor Host.
2.8. TCP Connection
If you want to configure one or multiple systems remotely via TCP/IP, the hypervisor backend needs to enable its internal TCP Server. The GUI backend (Web Application) may run on the same computer as the browser is executed. Optionally, you can run the GUI backend also on a different computer. The graphics below assumes the GUI backend as well as the browser run on the same computer.

In a first step, you need to start the hypervisor backend with the TCP server enabled. In the following example, the TCP port is explicitely set to 6001.
cd /hv/sysmgr
sudo ./HvSystemManager /tcpserver=*:6001
If you simply use the option /tcpserver, the default port 6000 will be used.
Hint
By default, sysmgr is started at system boot. If you want to use only the TCP connection on this system, you can stop sysmgr using the command hv_sysmgr stop.
You can find a description about this in System Manager control.
Then you need to start the HvSystemManager web application (e.g. on the computer where the browser is running).
Windows (see Windows Installation)
Run the HvSystemManager.exe application without any parameter.
Linux (see Linux Installation)
Run the HvSystemManager application without any parameter.
Then start the browser and use the IP address of the web application to show the GUI (use the IP address of the computer where the web application runs and connect with port 5000).
If you run the browser and the web application on the same computer, just use the URL http:localhost:5000 in the browser.
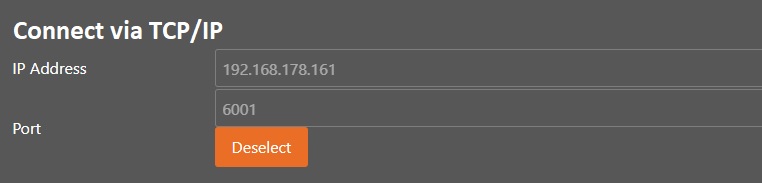
You need to select the TCP Connection option.
Set the appropriate IP address of the hypervisor computer as well as the port and press the Select button.
2.9. MQTT Gateway Connection
If you want to configure the system remotely using MQTT, the hypervisor backend needs to connect and register with a MQTT broker. The GUI backend (Web Application) may run on the same computer as the browser is executed. Optionally, you can run the GUI backend also on a different computer. The graphics below assumes the GUI backend as well as the browser run on the same computer.

In a first step, you need to connect the hypervisor backend with the MQTT broker (on the hypervisor machine).
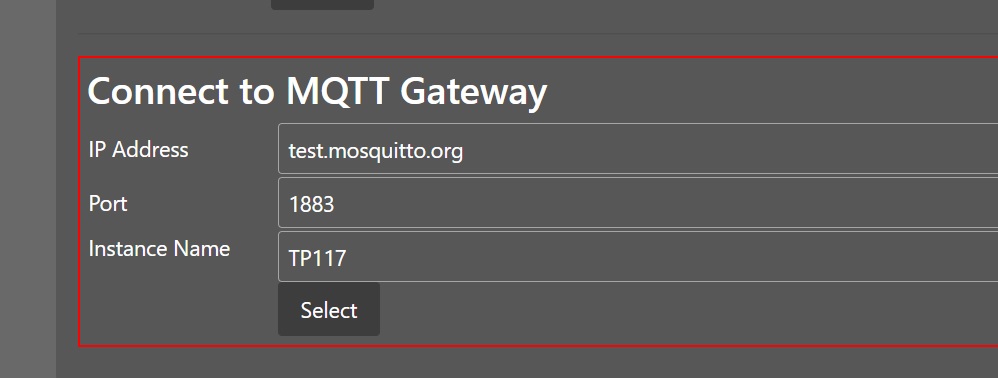
In the following example, a public test broker at test.mosquitto.org is used.
The hypervisor backend needs to be registered with a unique name, in our example it will be TP117.
The default TCP port of MQTT is 1883.
cd /hv/sysmgr
sudo ./HvSystemManager /mqttserver=TP117:test.mosquitto.org:1883
Then you need to start the HvSystemManager web application (e.g. on the computer where the browser is running).
Windows (see Windows Installation)
Run the HvSystemManager.exe application without any parameter.
Linux (see Linux Installation)
Run the HvSystemManager application without any parameter.
Then start the browser and use the IP address of the web application to show the GUI (use the IP address of the computer where the web application runs and connect with port 5000).
If you run the browser and the web application on the same computer, just use the URL http:localhost:5000 in the browser.
Finally you need to select the MQTT Gateway Configuration option.

Set the approprite broker and hypervisor name and press the Select button.
2.10. Last Session
The last configuration session will be loaded. This includes the respective connection (local, TCP or MQTT) and the related hypervisor configuration (guests, partitioning etc.).
The System Manager will store the last session in the same way as storing projects. The file last_session.hwc will contain the respective data.