4.13. Microsoft Windows CE
4.13.1. Identification of the Link Layer

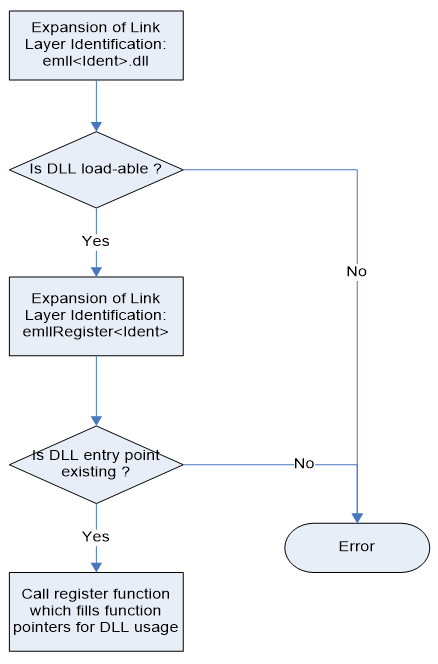
The Link Layer module DLL has to be locatable within the applications DLL search path (local or Windows directory). If it is not, an error is given.
4.13.2. KUKA CeWin
For KUKA CeWin (Windows CE runs in parallel with Windows on the same host) the network adapter card to be used has to be assigned to Windows CE. It is also possible in CeWin to load the NDISUIO filter driver dynamically.
An example how to include the EtherCAT Master using a Realtek RTL8139 Network Interface Card can be found in the directory /SDK/FILES/Ndisuio/CeWin (CeWin version 3.3.1):
Windows INF-File to assign the Realtek NIC to the RTOS (WindowsCE): RTOS_RTL8139.inf
WinCE image file for Windows CE 4.2 with RTL8139 support:
/3.3.1/WINCE420/RTL8139.zipWinCE image file for Windows CE 5.0 with RTL8139 support:
/3.3.1/WINCE500/RTL8139.zipWindows CE configuration for the Realtek-NIC: RTL8139.config
Dynamic start of the NDISUIO-filter driver AtNdisUio.dll via network share: AtNdisUio.config
Note
Due to a bug in Windows CE Version 5.0 a workaround is needed to load a DLL (e.g. the NDISUIO driver AtNdisUio.dll) from a network share. This can be done by including the following configuration file into cewin.config:
/SDK/FILES/Ndisuio/CeWin/CE5_DllLoadFix.config
To create a new Windows CE image which includes the NDISUIO based Link Layer the following files have to be included in the Windows CE OS-image:
/SDK/BIN/NDISUIO/x86/AtNdisUio.dll/SDK/BIN/NDISUIO/x86/EcMaster.dll/SDK/BIN/NDISUIO/x86/emllNdisUio.dll
This is done by use of the files:
[…]/SDK/FILES/EcMaster.bib
[…]/SDK/FILES/Ndisuio/AtNdisUio.bib
The registry entries which have to be added can be taken from:
[…]/SDK/FILES/Ndisuio/AtNdisUio.reg
The appropriate network adapter card (e.g. the Realtek 8139 adapter card) has to be taken from the Windows CE catalog to include it in the Windows CE image.
If using KUKA CeWin (Windows CE runs in parallel with Windows on the same host) the network adapter card has to be assigned to Windows CE. An example how to include the EtherCAT Master using the optimized Intel PRO/100 Network Interface Card can be found in the directory […]/SDK/FILES/I8255x/CeWin (version 3.3.1):
Windows INF-File to assign the PRO/100 NIC to the RTOS (WindowsCE): RTOS_I8255x.inf
Windows CE configuration for the PRO/100-NIC: I8255x.config
Note
- Due to a bug in Windows CE Version 5.0 a workaround is needed to load a DLL (e.g. for dynamically loading the EtherCAT stack EcMaster.dll) from a network share. This can be done by including the following configuration file into cewin.config:
[…]/SDK/FILES/Ndisuio/CeWin/CE5_DllLoadFix.config
The images shipped with CeWin can be used together with the Intel PRO/100 optimized Link Layer
For example to create a new Windows CE image which includes the optimized PRO/100 Link Layer the following files have to be included in the Windows CE OS-image:
[…]/BIN/WinCE500/I8255x/x86/EcMaster.dll
[…]/BIN/WinCE500/I8255x/CPU/emllI8255x.dll
This is done by use of the file:
[…]/SDK/FILES/EcMaster.bib
The registry entries which have to be added can be taken from:
[…]/SDK/FILES/I8255x/I8255x.reg
4.13.3. Windows CE 5.0
To be able to use the optimized Link Layers the following files have to be included to the Windows CE OS-image: Here the proceedings for Intel PRO/100
[…]/BIN/WinCE500/X86/EcMaster.dll
[…]/Bin/WinCE500/X86/emllI8255x.dll
This is done by use of the files:
[…]/SDK/FILES/EcMaster.bib
The registry entries which have to be added can be taken from:
[…]/SDK/FILES/I8255x/I8255x.reg
Same procedure and settings may be applied for the other optimized Link Layer; i.e. use I8254x instead of I8255x. Search locations for Optimized Link Layers can be adjusted using the PATH environment variable.
4.13.4. Windows CE 6.0
To be able to use the optimized Link Layers the following files have to be included to the Windows CE OS-image: Here the proceedings for Intel PRO/100
[…]/BIN/WinCE600/EcMaster.dll
[…]/BIN/WinCE600/emllI8255x.dll
[…]/SDK/FILES/I8255x/WinCE600/VirtualDrv.dll
This is done by use of the files:
[…]/SDK/FILES/EcMaster.bib
[…]/SDK/FILES/I8255x/WinCE600/VirtDrv600.bib (merge into platform.bib)
The registry entries which have to be added can be taken from:
[…]/SDK/FILES/I8255x/I8255x.reg
Same procedure and settings may be applied for the other optimized Link Layer; i.e. use I8254x instead of I8255x. Search locations for Optimized Link Layers can be adjusted using the PATH environment variable.
4.13.5. Windows CE 2013
To be able to use the optimized Link Layers the following files have to be included to the Windows CE OS-image: Here the proceedings for Intel PRO/100
[…]/BIN/ARM/WinCE800/EcMaster.dll
[…]/BIN/ARM/WinCE800/emllI8255x.dll
[…]/BIN/ARM/WinCE800/VirtualDrv.dll
This is done by use of the files:
[…]/SDK/FILES/EcMaster.bib
The registry entries which have to be added can be taken from:
[…]/SDK/FILES/I8255x/WinCE800/I8255x.reg
Same procedure and settings may be applied for the other optimized Link Layer; i.e. use I8254x instead of I8255x. Search locations for Optimized Link Layers can be adjusted using the PATH environment variable. For built-in chips like FslFec the VirtualDrv.reg is used. Then rebuild is necessary.
4.13.6. Setting up and running EcMasterDemo
- Windows CE configuration
See the section Operating system configuration for how to prepare the operating system
- Determine the network interface
Using the command line option the network interface card and Link Layer to be used in the example application can be determined. For example the option -i8255x 1 1 will dynamically load the optimized Intel Pro/100 Link Layer (the first PCI device instance) and operate in polling mode.
- Connection of the EtherCAT modules
The Evaluation board has to be connected with the target system using an Ethernet switch or a patch cable. Local IT infrastructure should not be mixed with EtherCAT modules at the same switch as the EC-Master will send many broadcast packets! EtherCAT requires a 100Mbit/s connection. If the network adapter card does not support this speed an Ethernet switch has to be used.
- Copy the corresponding LinkLayer module from Bin/WINCE<version>/<arch>:
emllI8254x.dll (Intel Pro/1000)
emllI8255x.dll (Intel Pro/100)
emllRTL8169.dll (Realtek RTL8169/8168/8111)
emllRTL8139.dll (Realtek RTL8139)
- Copy the EC-Master dynamic libraries to the Windows CE target system:
EcMaster.dll (Master core library)
AtemRasSrv.dll (Remote access service library if needed)
Copy one of the demo applications (EcMasterDemo, EcMasterDemoSyncSm, …) from the EC-Master package to the Windows CE target system.
- Run the example application
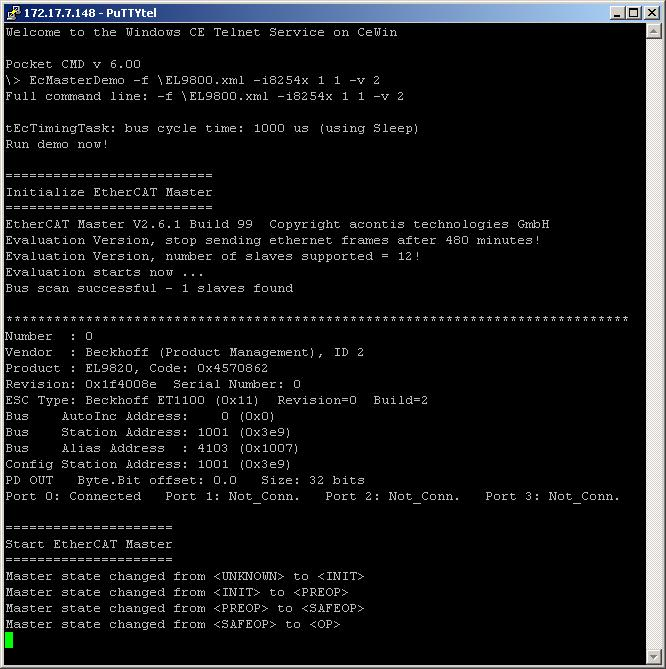
The file EcMasterDemo.exe has to be executed. The full path and file name of the configuration file has to be given as a command line parameter as well as the appropriate Link Layer. Example (starting the application on a network share via telnet):
EcMasterDemo "-f ENI.xml -rtl8169 1 1"
See also
4.13.7. OS Compiler settings
Besides the general settings from Compiling the EcMasterDemo the following settings are necessary to build the example application for Windows.
- Extra include paths
<InstallPath>/SDK/INC/WinCE
<InstallPath>/Examples/Common/WinCE
- Extra source paths
<InstallPath>/Examples/Common/WinCE
<InstallPath>/Sources/OsLayer/WinCE
- Extra library paths to the main EtherCAT components
<InstallPath>/SDK/LIB/WinCE
- Extra libraries (in this order)
coredll.lib corelibc.lib EcMaster.lib AtemRasSrv.lib
- Preprocessor definitions
CEWIN if running on acontis EC-WinCE.
Don’t “Treat wchar_t as Built-in Type”
- Entry Point:
mainWCRTStartup